Lighting is one of the most noticeable differences between different versions of Sonic Adventure. Let’s compare lighting systems in SA1 and SADX and see how they perform against each other. Thanks to reverse engineering we know quite a bit on how they work.
The Dreamcast version has a lighting system (referred to internally as “LANTERN”) that uses color palettes. The lighting information for each level is stored in a pair of files: the PL file (PL*.BIN) contains the palettes, and the SL file (SL*.bin) contains light direction and some miscellaneous information.
The LANTERN lighting system uses a formula to calculate a “brightness index” for each vertex in the scene, which is used to select colors in the palette. Several factors, such as the model’s normals and light direction (stored in the SL file) affect brightness index calculation. If we visualized brightness indices (from white being maximum brightness to black being completely unlit), it would look something like this:

Normally the skybox should be white because it’s fullbright (ignores lighting). It was edited out for clarity.
Let’s have a look at the palettes themselves. Here is a typical set of palettes found in the PL file for Twinkle Park Act 1:
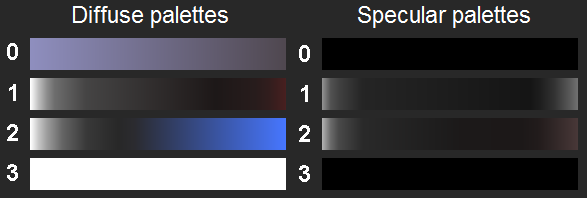
The left row of palettes is used for diffuse lighting. Diffuse palettes contain colors that the original (fullbright) texture gets multiplied by, like using Photoshop’s “Multiply” blending mode. Specular colors are added on top of the result of the multiplication, in a similar way Photoshop’s “Add” blending mode works. Because it’s additive, specular lighting creates highlights. The “gloss” on Sonic and other characters is an example of specular lighting.
Each palette consists of 256 colors. The color the texture gets multiplied by (or the color that gets added as a specular color) has the same index in the palette as the brightness index of the vertex. So the “brightest” vertex would get the first (0) color in the palettes, and the “darkest” vertex would get the last (255).
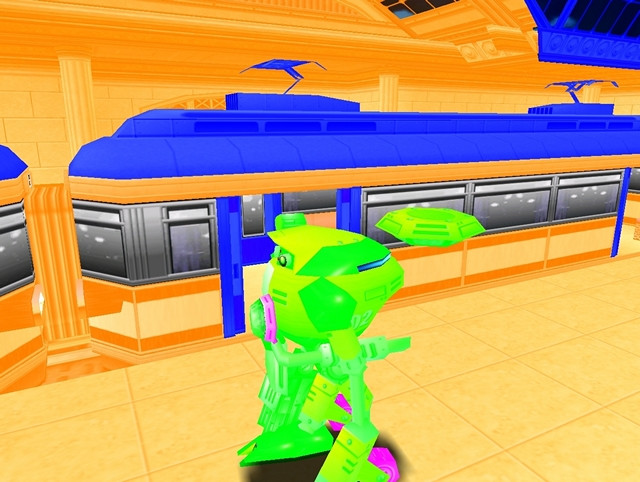
This system allows to use a wide range of colors to create vivid, original environments. But the system used in the Dreamcast version is even more versatile because it allows different kinds of models (level pieces, characters etc.) to use different palettes, and even within the same model different meshes can alternate between two specular palettes using material flags. For example, the screenshot below was taken from the Dreamcast version where all palettes were replaced with different solid colors. You can see the complexity of possible color combinations that comes from using many diffuse and specular palettes at the same time:
So, how does the game know which pair of palettes to apply to a given model? There are several main palette application rules, as well as some exceptions. To illustrate the full range, we need to look at another PL file. Here’s a palette list from Gamma’s Hot Shelter:
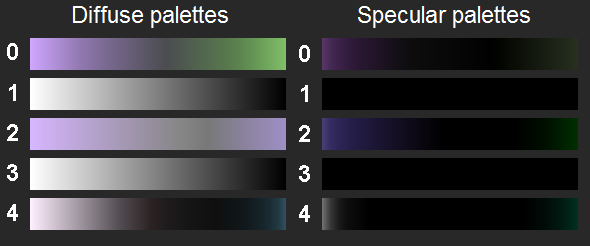
When each model is rendered in the game, there is usually a function call that sets a “light type” to be used by the model. A light type corresponds to a certain pair of palettes. For example, Diffuse 0 is applied to level pieces and objects. Specular 0 is applied to level pieces and objects when their meshes have the “ignore specular” material flag enabled. If it’s disabled, Specular 1 is used instead. The above rule also applies to all models that set the light type to 0.
Diffuse 1 and Diffuse 3 are never used in the Dreamcast version.
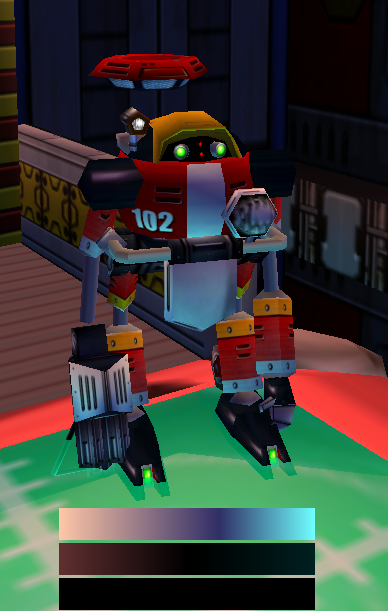
Diffuse 2 is the main diffuse palette used by playable characters and NPCs. In some rare cases it can be used by objects (such as floating meteors in Twinkle Park Act 1 or Chaos Emeralds in cutscenes) if they specifically set this light type. Specular 2 and 3 are used depending on whether the mesh has the “ignore specular” material flag. For example, Gamma’s model uses mostly Specular 3, although some of his body parts use Specular 2. Here’s an example of what usage of three different palettes can do (well, it’s actually two palettes since the third one is just black in this example, but still):
By the way, did you notice that Gamma’s eyes and head base are lit up in the Dreamcast version, but not in any of the ports? This is because the “ignore light” material flags were removed from Gamma’s model. For the same reason Big’s eyes no longer glow in the dark. This is a simple material flag change, which works the same way in both lighting systems.
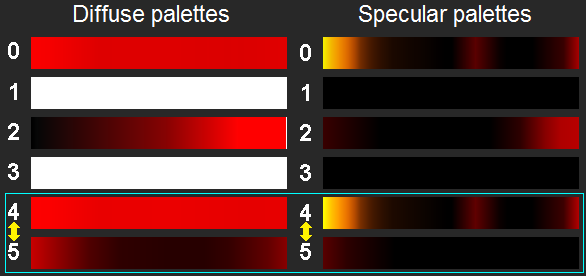
Diffuse 4 is a special palette. It is used by the fire effect in the Mystic Ruins Past, as well as some bosses. For example, the models for Chaos 2, Chaos 6 and Perfect Chaos all use Diffuse 4 and Specular 5. These palettes are used to accentuate the bosses and give them lighting that matches the environment. This is what Chaos 6 looks like with and without the diffuse palette:
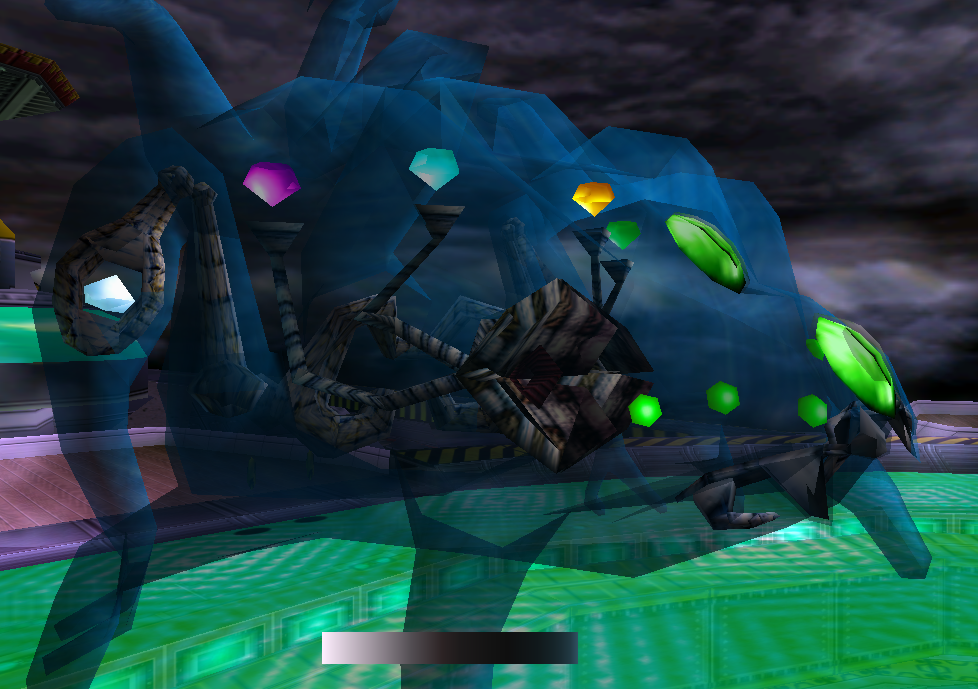
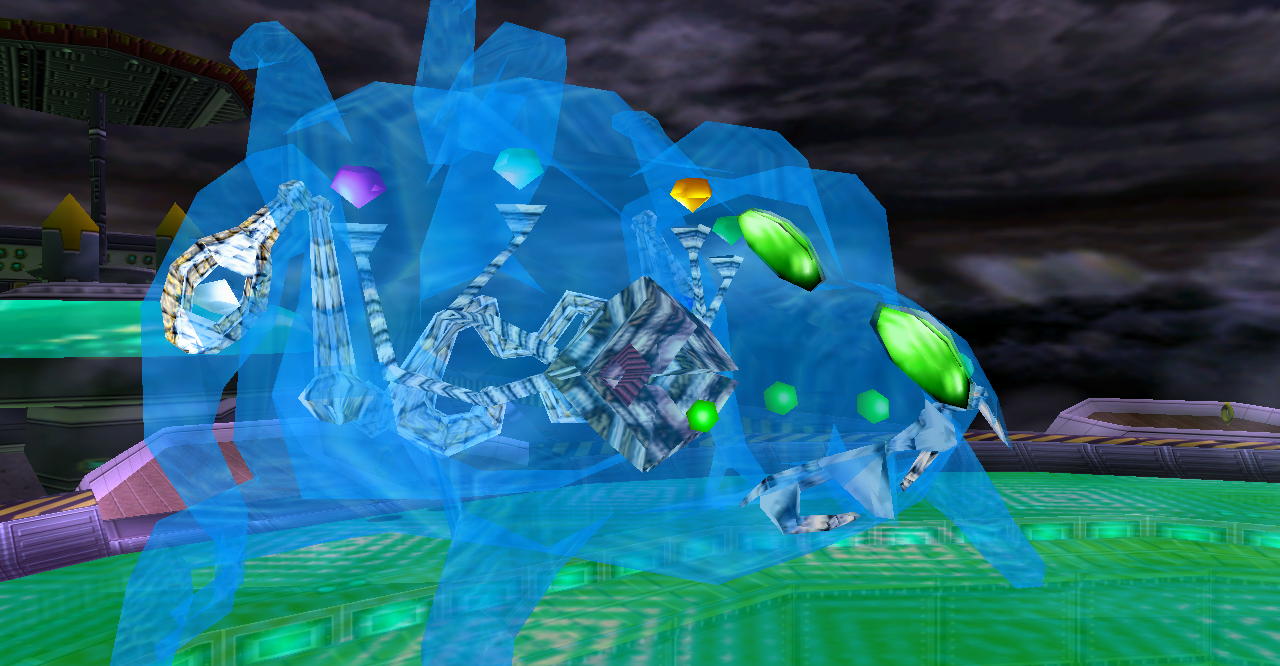
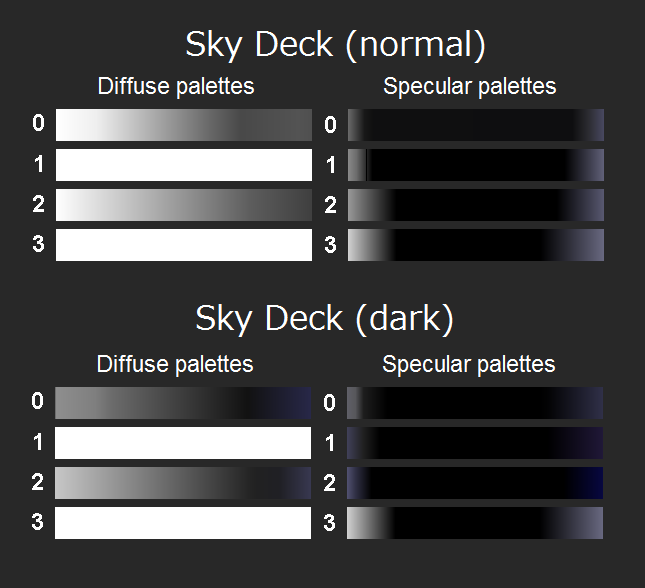
But that’s not all! In some cases the game switches between different PL/SL files in real time. For example, in Sky Deck Acts 1 and 2 the game toggles between two different sets of palettes when the Egg Carrier changes altitude. This affects not just the level, but also the characters:
In Mystic Ruins Past the game also alternates between palettes, but within the same file:
The level and objects that would normally use Diffuse and Specular 0 have a fade effect that blends between Diffuse/Specular 4 and 5, creating the effect demonstrated below. The effect is missing in the Gamecube version.
| Dreamcast | Gamecube |
|---|---|
Now that we’ve discussed the basic outline of the lighting system used in the Dreamcast version, let’s compare it with the Gamecube version. The palette lighting system was removed for stages but it’s still there for characters and objects. Thanks to the “SADX Preview” prototype that was leaked several years ago we can confirm that the palette lighting system was functional on the Gamecube sometime earlier even for stages, but it was removed from the final version. A more traditional lighting system was set up in its place. According to the data found in SADX Preview, which allows to toggle between lighting systems, the new lighting system uses the following parameters:
- Light number – apparently up to 4 lights can be active at the same time, but the game seldom uses more than 1 or 2
- Diffuse brightness – affects the overall brightness of the light
- Light color (diffuse)
- Ambient color – a separate color that is added on top of the diffuse color. Unlike specular, this isn’t a separate additive effect so it’s effectively the same as making the overall (diffuse) light color brighter
- Light direction
This system clearly doesn’t allow as much creative freedom as 256 individual colors for each brightness index in the Dreamcast version. There is also no support for specular lighting, which means the level pieces can no longer have specular highlights/gloss. However, even with such a system in place it would’ve been possible to create environments that looked somewhat decent. After all, not all levels in the Dreamcast version use crazy multi-color light transitions or a lot of specular highlights. You can find some areas that look okay-ish in SADX Mystic Ruins, Hot Shelter and Lost World. Emerald Coast and Windy Valley also look alright because the original palettes for them were simple white-to-black gradients, which the new system can imitate easily. Other stages, such as Ice Cap, Red Mountain or Final Egg, feature much less vibrant environments than the Dreamcast version.
The new lighting system is also broken in the PC version of the game. If you compare the screenshots from each version side by side (which you can do by going to individual level comparisons using the top menu), you can see how the PC version washes out the lighting even further and makes everything too bright. For example, in the Mystic Ruins it’s hard to tell what time of day it is without looking at the sky because the ground is lit up at all times. Station Square also looks almost the same during day and night. The original reason for this difference is that the PC version uses Direct3D 8 and its lights system, while the Gamecube version uses a different lighting formula that applies diffuse lighting last, making the result look more vibrant. In addition, the lighting data was altered for several stages in the PC version, which made the lights even brighter. This problem persists in all later ports of the game, including the nextgen console ports. As a result, the Gamecube version is the only port where the replacement lighting system works as intended.
The downgrade described above happened with level lighting, but character and object lighting is different. The Gamecube version in particular has a pretty versatile system for character lighting, which was also per-pixel unlike the Dreamcast version which uses per-vertex lighting. Looking at the Preview prototype can help us understand how it works.
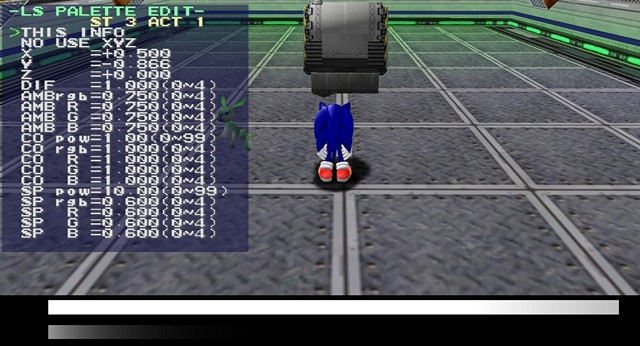
In the screenshot above you can see SADX Preview’s debug menu for character lighting. It visualizes character lighting using two gradients (diffuse and specular, just like palettes in the Dreamcast version) using a formula that takes in the following parameters:
- Color1 color and power – diffuse palette
- Color2 color and power – diffuse palette
- Ambient color – added on top of the diffuse palette (multiply)
- Specular1 color and power – specular palette
- Specular2 color and power – specular palette
- Light direction
(There’s also a “diffuse” parameter that doesn’t seem to do anything)
Using the above parameters it’s possible to create a lot of different palette combinations, and it would’ve been quite easy to imitate the color variety of the Dreamcast version using the same formula. The prototype even has a menu that is supposedly meant to load lighting information from a file. It could be that the developers were trying to load the Dreamcast’s PL files and recreate the gradients stored in them for use with the formula, or perhaps the menu comes from an older build, which was used to generate the PL files in the first place. We don’t know what exactly the menu was used for, but the PL and SL files from the Dreamcast version can still be found on the retail game’s disk, and they were even byteswapped for compatibility with the Gamecube’s Big Endian byte order. It’s possible to activate them in the Preview prototype, but they are not used in the final version.
Although the character lighting system described above is a lot more flexible than the level lighting system, for some reason its potential was largely unused. Only in a few stages do we see Sonic and other characters colored differently, and in the majority of areas the lighting on Sonic barely changes at all. Since we know the palette generation formula, it’s possible to convert SADX character lighting parameters into palettes that can be applied per-vertex with the Dreamcast version’s Lantern system. Here’s what those palettes look like in comparison with the Dreamcast version:
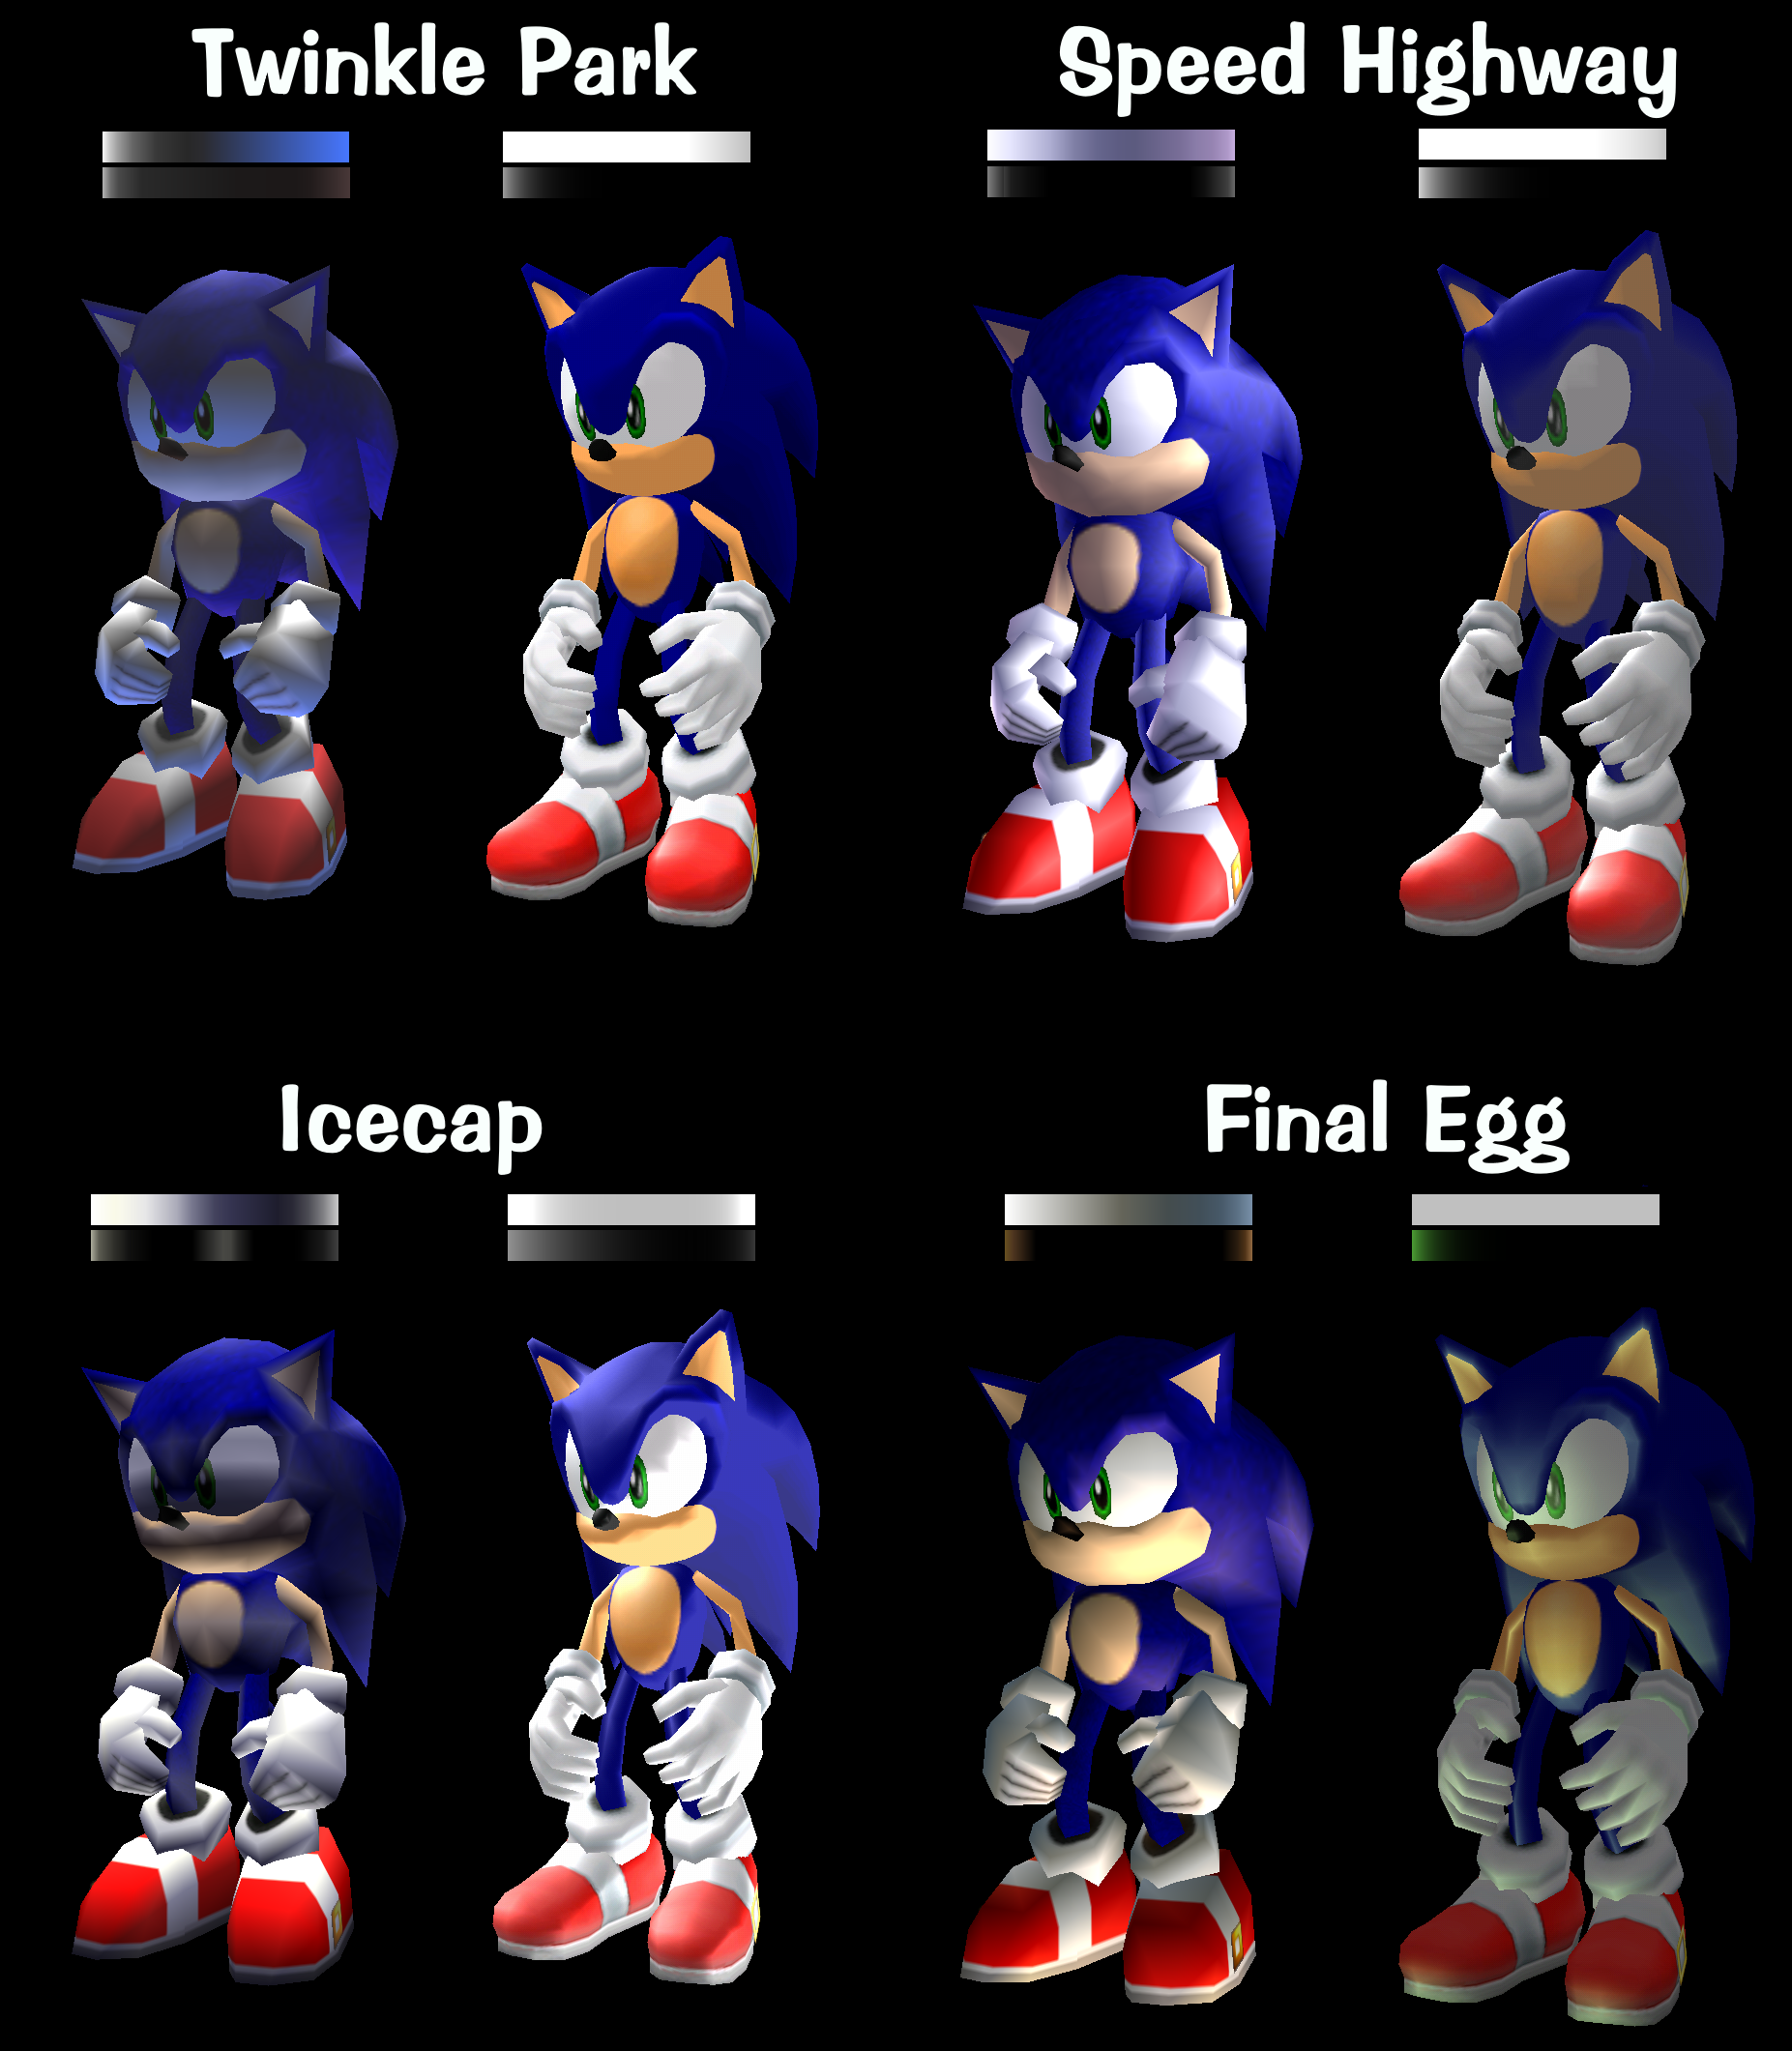
You can see how the Dreamcast version’s palettes have more gradations and color variety than the Gamecube version. Although there was no technical obstacle to making SADX character lighting more like the Dreamcast version, most levels in SADX use simple white-to-black gradients for character lighting, sometimes with minor specular tints, which would’ve been a good start, but only a handful of levels in SADX use specular colors different from white and grey.
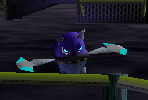
Another problem with the Gamecube version’s character/object lighting is that it often sets the specular values so high the models receive strong white gloss that can even obscure the details. For example, this is what happens to the Spinner enemies in Sky Deck:
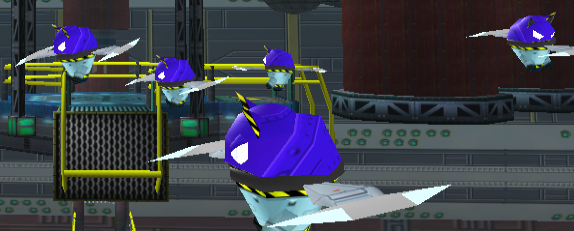
The white eyes are caused by an excessive amount of specular lighting. This is what these enemies look like in the Dreamcast version:
In addition to the above, the PC version has another problem with character lighting. It abandons palette altogether and uses some of the character lighting values to set up Direct3D lights. Half of character lighting values are never used in the PC version – only Ambient and Specular 1 colors are applied to the model, whereas Color 1, Color 2 and Specular 2 components of the palettes are ignored completely. On top of the PC version’s lighting being per-vertex, this makes it impossible to have any kind of complex coloring for character lighting in the PC version.
The PC version also has a problem with excessive specular. The game adds a directional specular light regardless of the model’s material flags. Although the amount of specular lighting can be controlled, in SADX it’s inflated to extremely high levels, especially in the PC version, which results in the infamous problem with the characters being “too shiny”. Interestingly the 2010 port (Dreamcast Collection/Steam) uses a shader for character lighting, and the lighting on characters and objects looks a lot closer to what it looked like on the Gamecube (although it still doesn’t use half of the values). This is one of the few advantages the Steam version has over the 2004 PC port, which is otherwise far superior, downgrades mentioned on this blog notwithstanding.
To compensate for the removal of palette lighting, the Gamecube version uses three approaches to stage lighting:
- The Stage Lights system that we’ve discussed above
- Semi-transparent models that are overlayed on top of other meshes to create an illusion of a shadow
- Fake lighting using baked-in vertex colors
Out of these three, only Stage Lights are “dynamic”, i.e. not attached to the level model. With the Dreamcast version, the same level could have completely different lighting with a simple swap of PL/SL files. The SADX counterpart of that is the Stage Lights system, which is used for such things as daytime changes in Adventure Fields. However, the other two types of lighting are baked into the level model itself and stay the same regardless of the time of day or light direction. The semi-transparent models (which look like this) are barely used in the game in stages other than Station Square and Emerald Coast, and there’s little to discuss about them – they’re just semi-transparent shapes overlayed on top of some level pieces. Vertex colors, however, are a bit more interesting.
Vertex colors are a relatively ancient technique used in games to enhance color variety without using a different texture. Vertex colors are color information stored for each vertex (point) in a model, which can be used for various things, such as transparency or ambient occlusion. Palette lighting in the original game is also created using vertex colors.
The main advantage of the Dreamcast version is the “dynamic” nature of vertex colors, which can change depending on light direction, the model’s material flags, camera position, the colors in the palette and the light type. In SADX this kind of lighting is faked because the vertex colors are static. Once a model has vertex colors baked in, they will never change no matter what happens to the environment. This may be sufficient for most Action Stages because they have a fixed time of day and light direction, but problems arise when vertex colors are used on objects or in areas where lighting changes significantly, for example in Sky Deck or in the Past cutscenes. With palette lighting it’s possible to switch to a separate palette to create a completely different look without reworking the level’s model. But SADX vertex colors always stay the same.
It could be argued that the SADX levels are inherently “better” because they have vertex colors baked in, while the SA1 levels don’t have built-in vertex colors. While the point about SA1 levels missing built-in vertex colors is correct, these levels are meant to use vertex colors generated by the Lantern lighting system. In SADX, however, static vertex colors were added to camouflage the removal of palette lighting. Moreover, it could be argued that the vertex colors in SADX levels are nowhere near as vibrant and diverse as the original game’s lighting – see each level’s page for a closer comparison.
An advantage to having the vertex colors baked in is the ability to customize lighting per vertex. From a technical standpoint this allows more control over lighting than the palette-based system, and SADX does have some cool additions the original game doesn’t have, such as the lights cast on the ground by lamp posts in Speed Highway, or shadows at the start of Lost World Act 2. However, these additions are scarce, and most of the time the original’s lighting looks vastly superior.
Realtime lighting effects aren’t possible with built-in vertex colors either. Note how the lighting changes on all level pieces on the Dreamcast, while the Gamecube version only changes the skybox:
| Dreamcast | Gamecube |
|---|---|
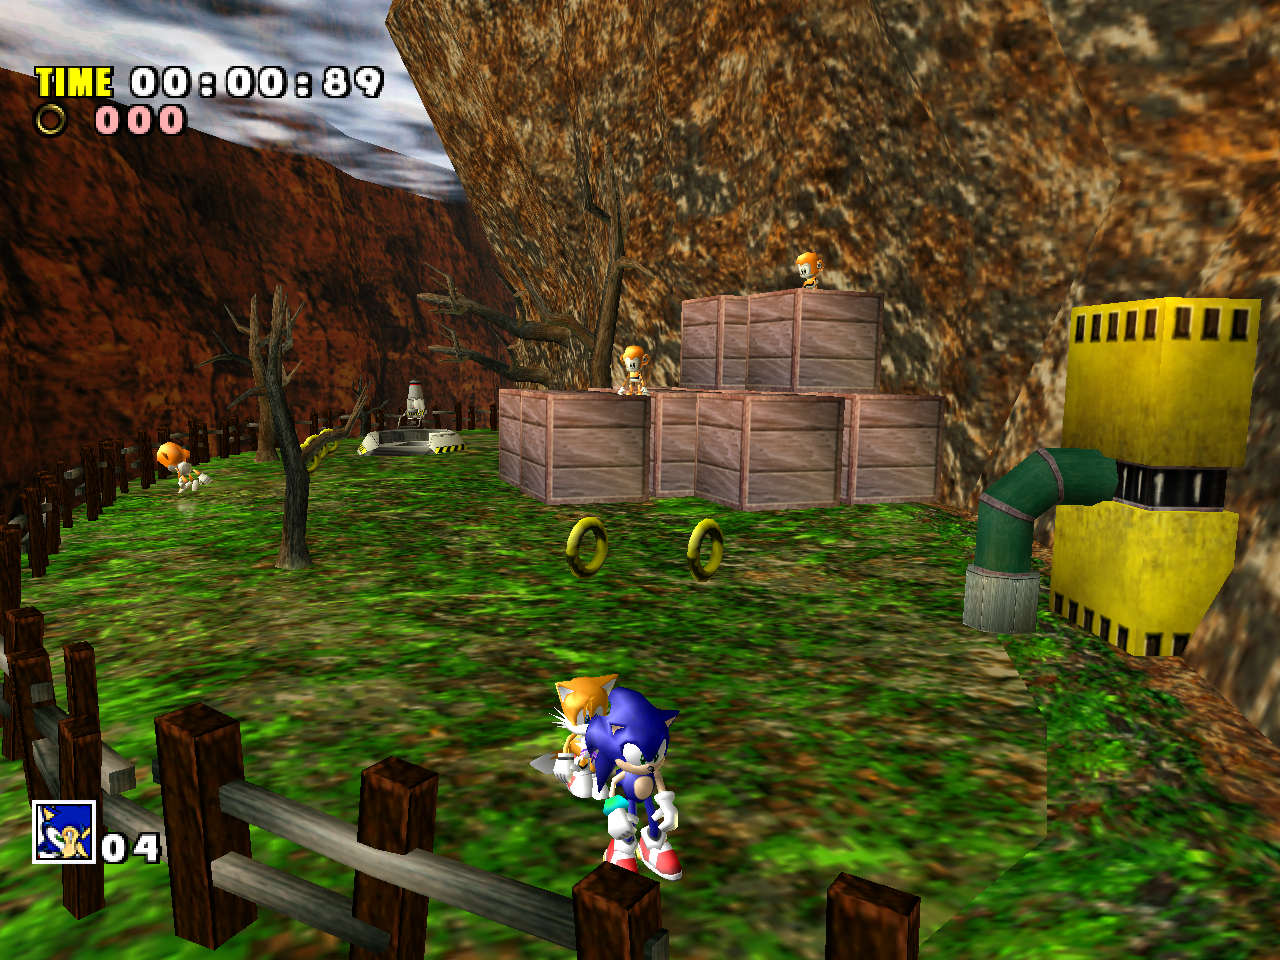
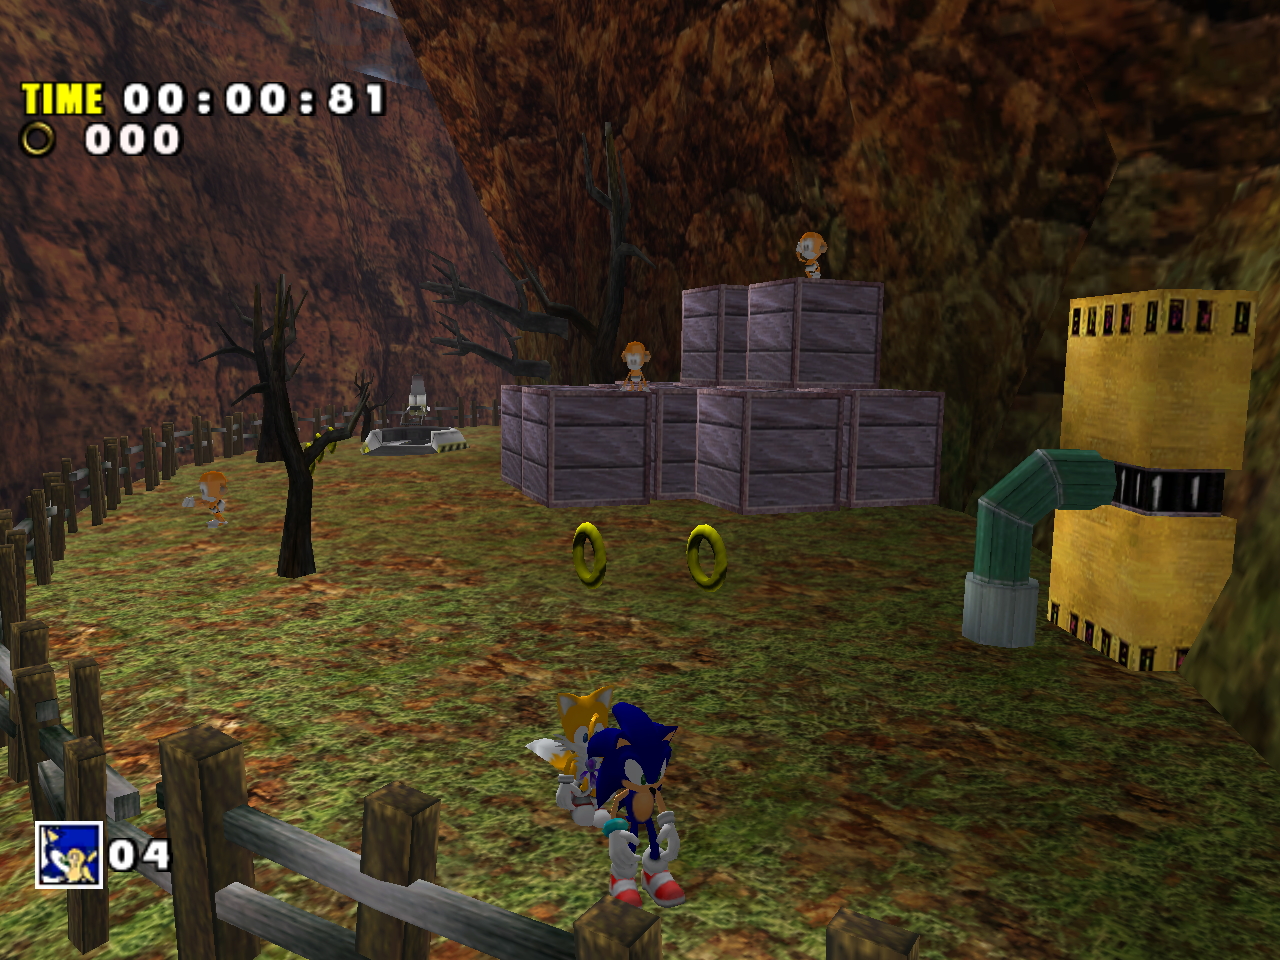
The problem with using vertex colors as a replacement for palette lighting causes many small details to disappear in SADX. For example, the lighting on such objects as rings, or boxes in Red Mountain, or enemies, makes it look like they are affected by the environment in the original game. If you saw a box in Red Mountain Act 1, it would have Act 1’s palette, but in Act 2 the same box would have Act 2’s palette, which gave it a red glow. Vertex colors stay the same regardless of which level it is. It would’ve been possible to palettize such objects using the character/object lighting system in SADX to give them more vibrant lighting, but other than excessive specular glow in some cases the SADX object/character lighting system doesn’t bring back the original game’s vibrancy. In the comparison below the boxes use the same model, but their lighting reacts to the environment much more prominently in the Dreamcast version due to the use of two palettes (diffuse + specular), while SADX relies almost exclusively on ambient lighting:
| Dreamcast | Gamecube |
|---|---|
 |  |
 |  |
On top of that, the PC version (and all later versions based on it) ignores built-in vertex colors for all objects that are not part of the level model. For example, let’s look at one of the pinball entrances in Casinopolis: it has green vertex colors in the Gamecube version, which are missing in the PC version.
| Gamecube | PC |
|---|---|
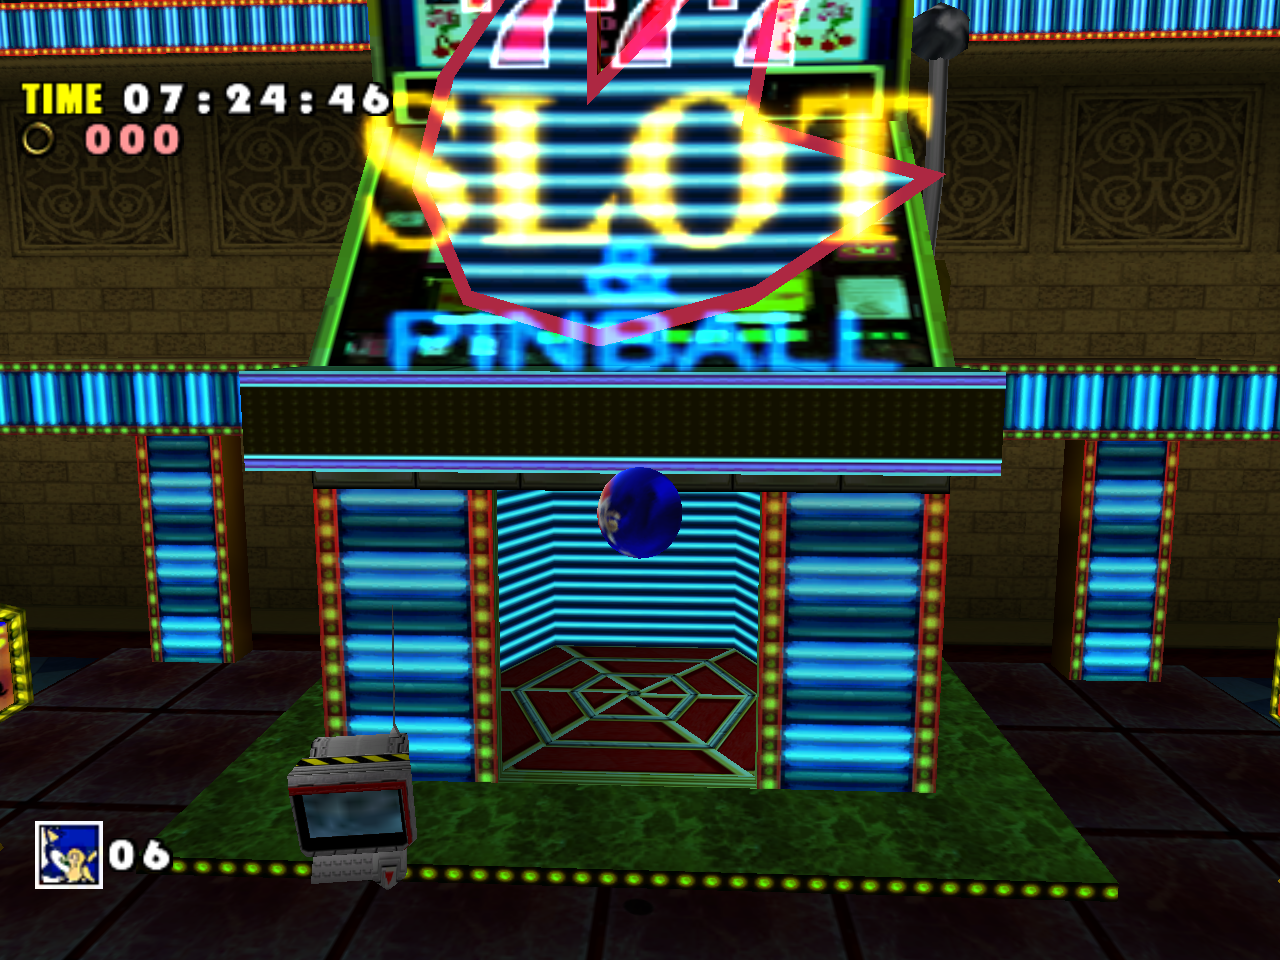 | 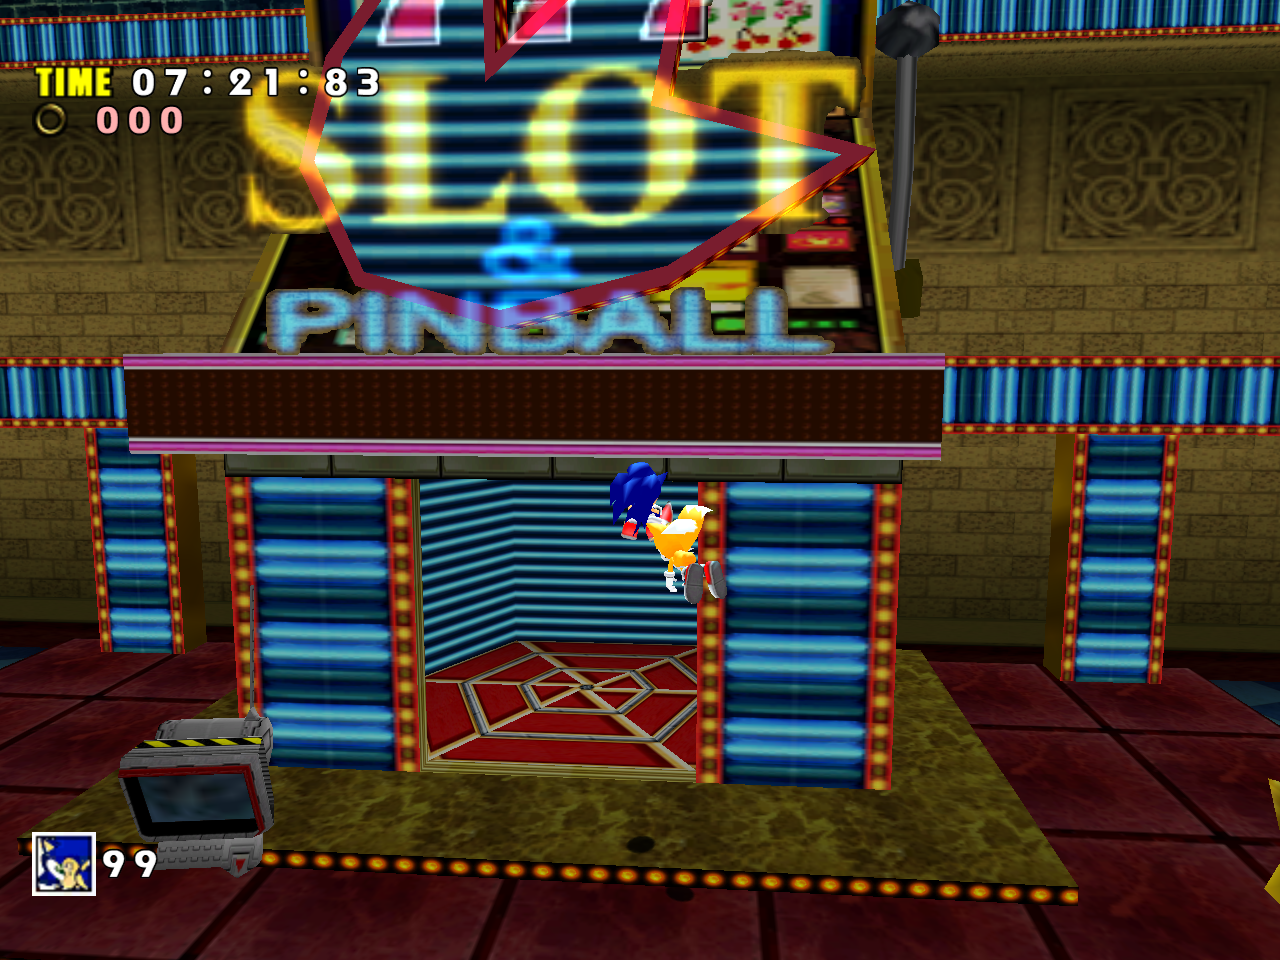 |
The model in the PC version still has vertex colors, but they aren’t applied because the functions that render object models in the PC version ignore vertex colors. This issue is persistent across all later ports as well, making the Gamecube version the only version that displays those colors properly.
In 2019 this issue was fixed in SADX Mod Loader. While the PC version’s lighting is still terrible, at least we have object vertex colors back now.
Like with texture quality, this creates a situation where the most accessible versions of the game have much worse lighting than the Gamecube version, which was arguably already inferior to the Dreamcast version. Thankfully the Dreamcast version’s lighting engine was almost completely recreated in the 2004 PC port by SonicFreak94. Visit the “Fixing the PC version of SADX” section for more information on how to install the mods and experience the original game’s lighting on PC!
You can compare the lighting in individual Action Stages and Adventure Fields by going to level comparison pages using the top menu.