All versions of SADX suffer from problems with rendering transparent models, which play a major role in visual downgrades. The original game took advantage of SEGA Dreamcast’s hardware features that were impossible to replicate on the Gamecube and other platforms. When the game was being ported to other platforms, the developers ran into numerous transparency-related problems with ingame assets. Some of such problems were fixed, but in the majority of cases the problematic assets were redesigned, and the new assets differ in quality or style from the original game. Let’s discuss the transparency issues in general, have a look at some specific problems and see how they could’ve been fixed.
In many ways, the Dreamcast was a console ahead of its time. One of the Dreamcast’s unique features was its PowerVR GPU. It was equipped with a hardware feature called order-independent transparency (OIT). No console before or after the Dreamcast ever had that feature built in on the hardware level, and it took many years until mainstream GPUs became capable of dealing with order-independent transparency.
Why is transparency so important? Traditionally, in 3D graphics rendering transparent objects is a pretty complex problem. To properly display transparent models together with non-transparent models, the polygons in a 3D scene have to be rendered in a specific order. Transparent polygons have to be rendered after opaque polygons in back to front (furthest to nearest) order to ensure the transparent blending operations are performed correctly. The framebuffer is like the “canvas” on which the polygons are “painted”. The order is important because once something’s been “painted” onto the framebuffer, you cannot simply put something behind a transparent object that’s already there.
In complex scenes with many transparent objects and moving camera this can become a problem because the engine needs to tell what is visible from the current camera angle, whether the visible polygons have transparency or not, and how close they are to the camera, all of which would influence their draw order. On top of that, the engine should make sure that transparent polygons are processed after the opaque polygons, not before. Even modern games struggle with transparent things sometimes.
With order-independent transparency the above issues are irrelevant. The polygons can be processed in any order, and transparent and non-transparent polygons are sorted automatically by the Dreamcast’s GPU. In the case of SA1, up to 32 layers can be sorted per pixel using 32×32 tiles, while other games, such as Omikron: The Nomad Soul, require 64 layers to look correct (according to MetalliC, the developer of Demul, the Dreamcast can sort up to 256 layers). This allowed the developers of Dreamcast games to create complex scenes involving transparent things without worrying about draw order. It was also unnecessary to have a strict model hierarchy of transparent and non-transparent polygons. Sonic Adventure is one of such games where the ingame assets are mixing transparent and opaque polygons without any consistency.
When the game was being ported to the Gamecube, the benefits of order-independent transparency were no longer there, and the developers ran into numerous problems involving transparent models. They tried to address them in two ways:
1. A draw queue system was set up to tell the game which models should be rendered in what order. While technically not bad for a game of that generation, the draw queue system doesn’t always work right in this game because of code bugs, and many assets were adjusted poorly for it. The most common issue with the draw queue system is transparent objects disappearing when you move the camera. This happens pretty often throughout the game, check out Twinkle Park or Hot Shelter for examples.
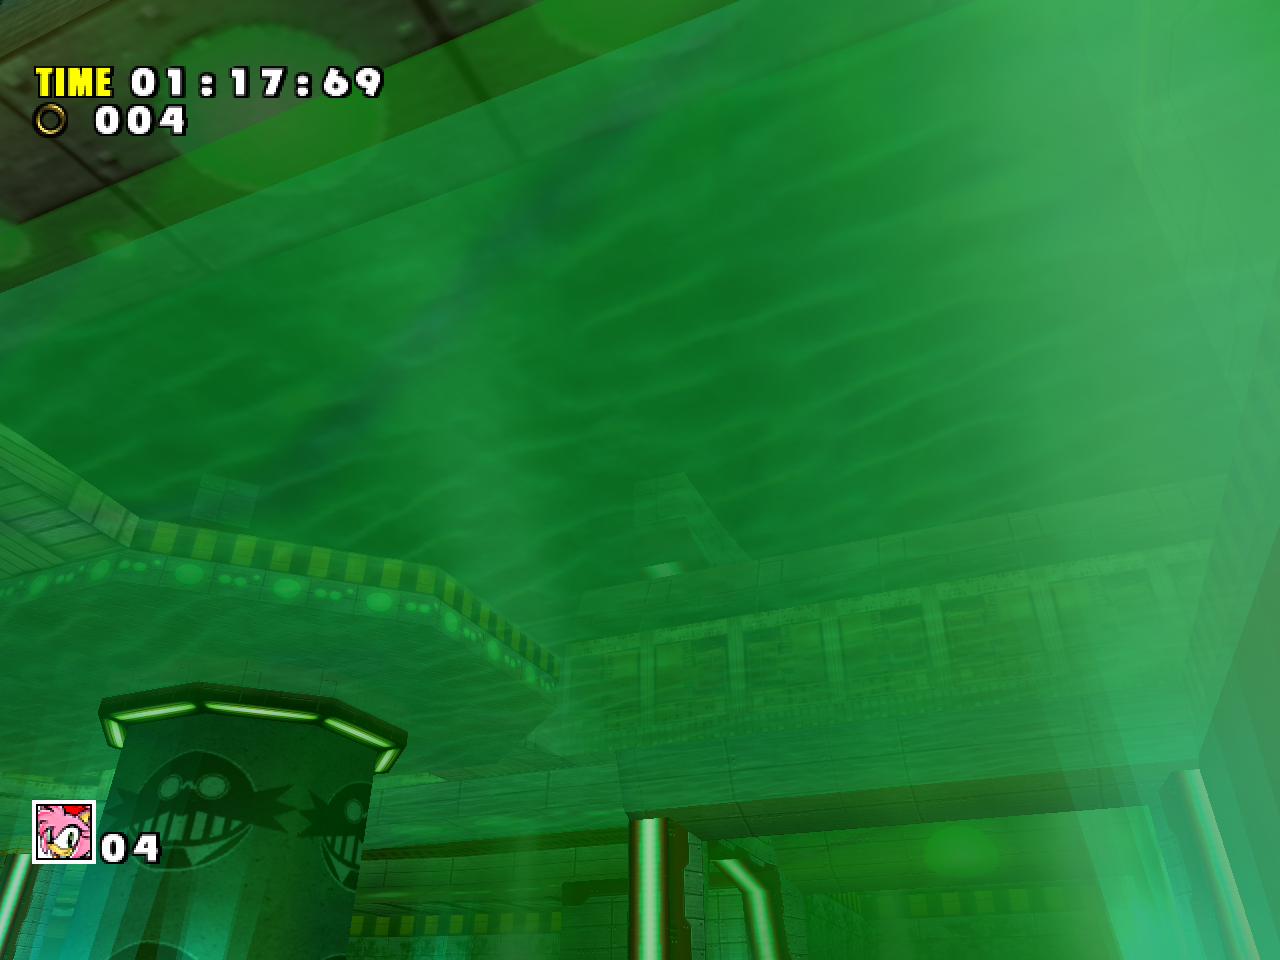
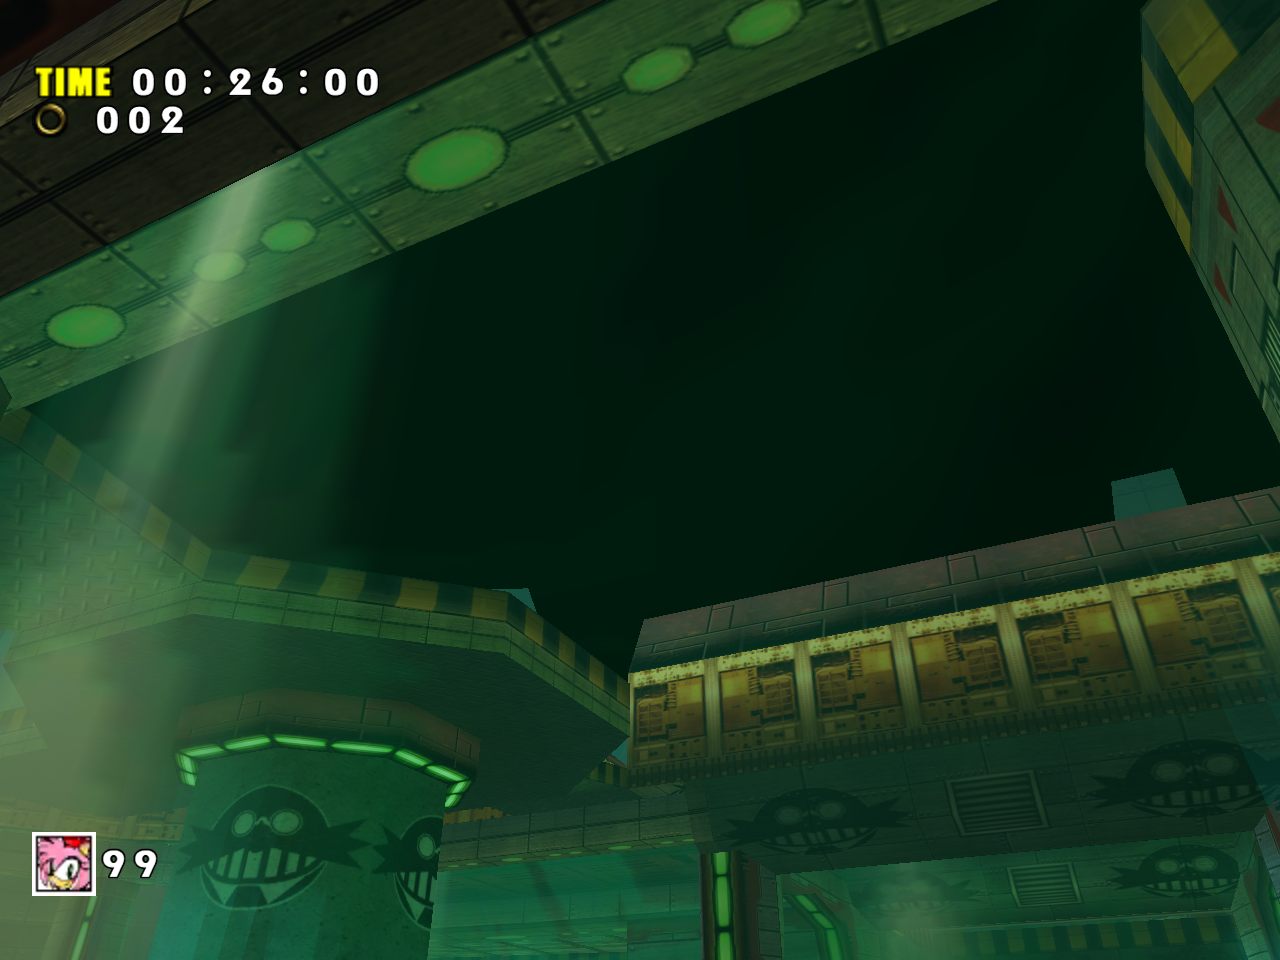
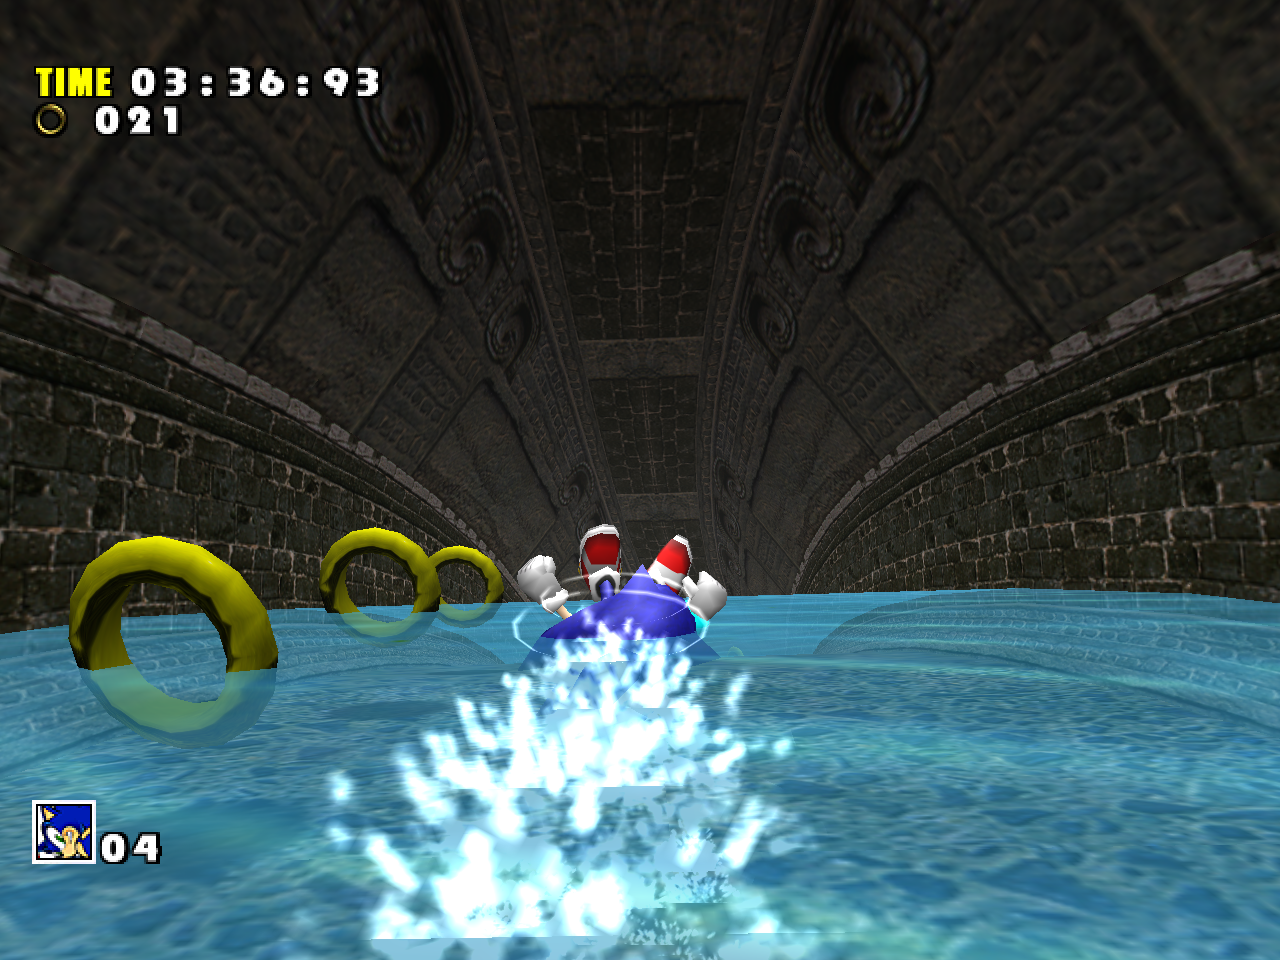
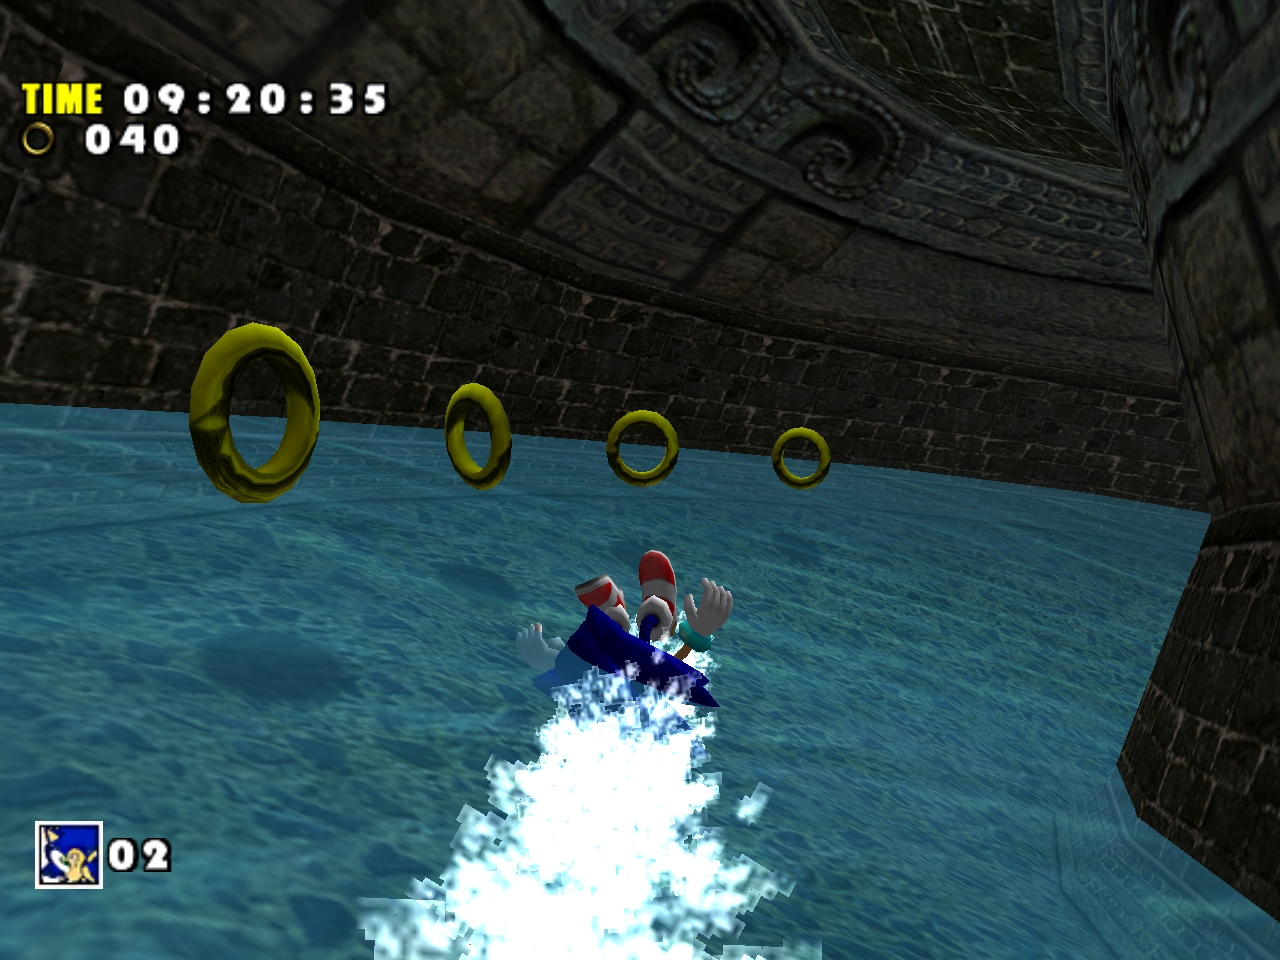
Sometimes the draw queue can’t handle transparent things because of engine limitations. For example, look at the aquariums in Hot Shelter Act 1:
Dreamcast
PC
The water behind the green glass is invisible in SADX, but it’s still there – here’s a part of it that manages to clip through the glass. This scene requires the water to be rendered first so that the green glass can be rendered on top of it. The reason it doesn’t render in SADX is that the water here is an interactive object (SET object), whereas the green glass is a level piece, and the game renders objects after level pieces unless a depth override is in place. This breaks the draw queue system and makes all transparent things behind the green glass disappear.
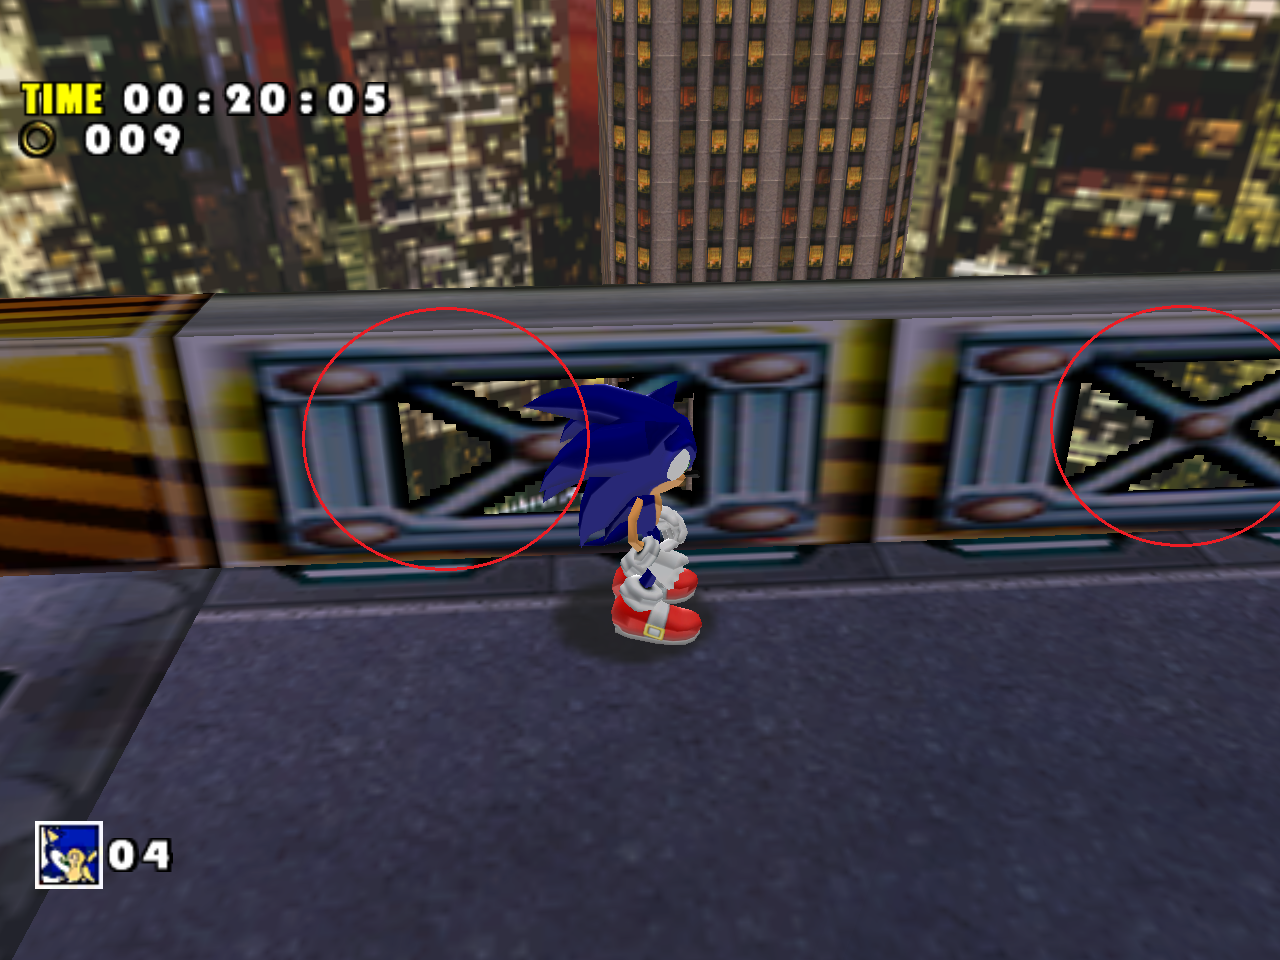
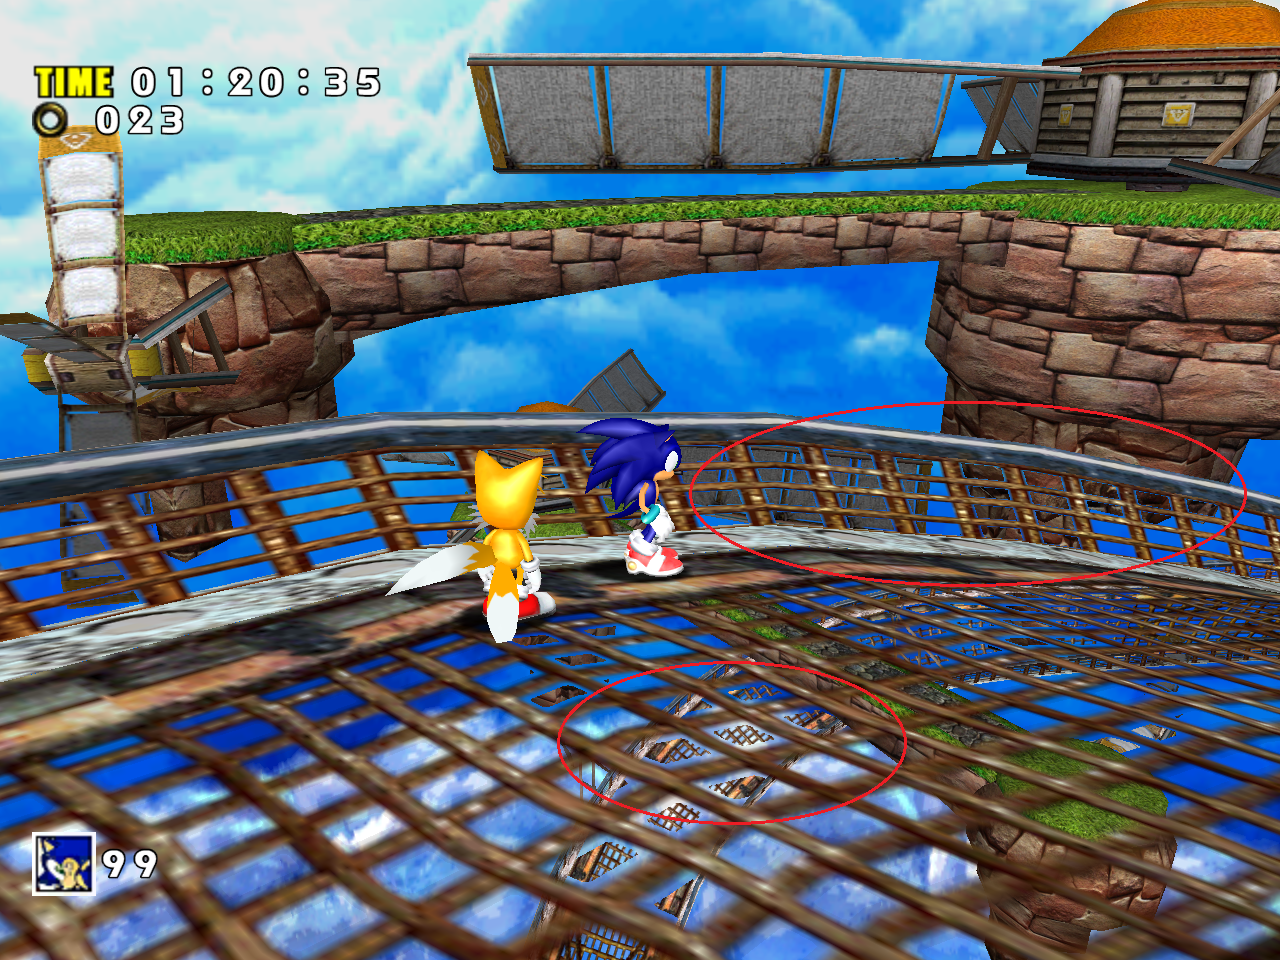
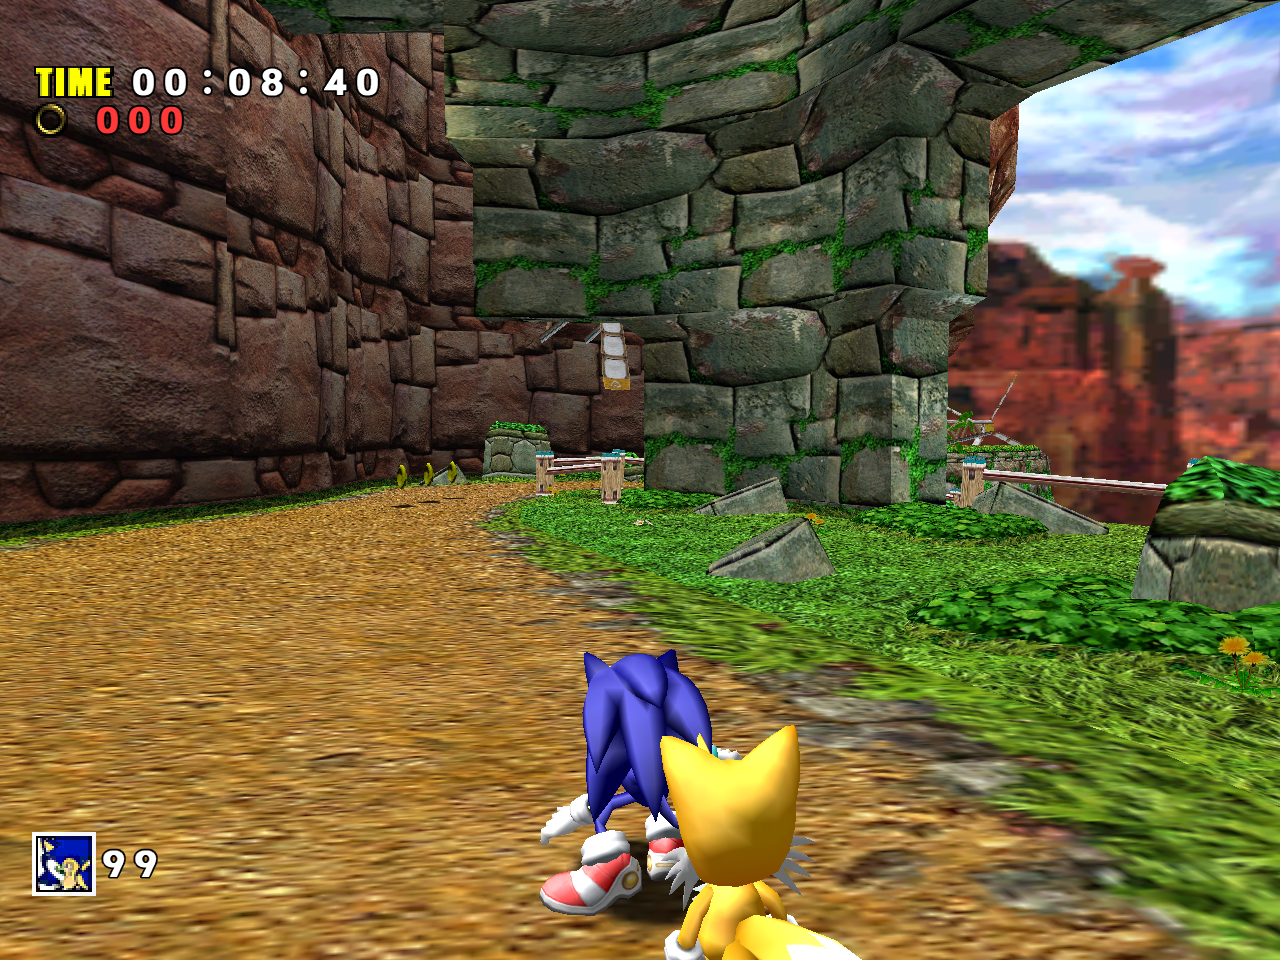
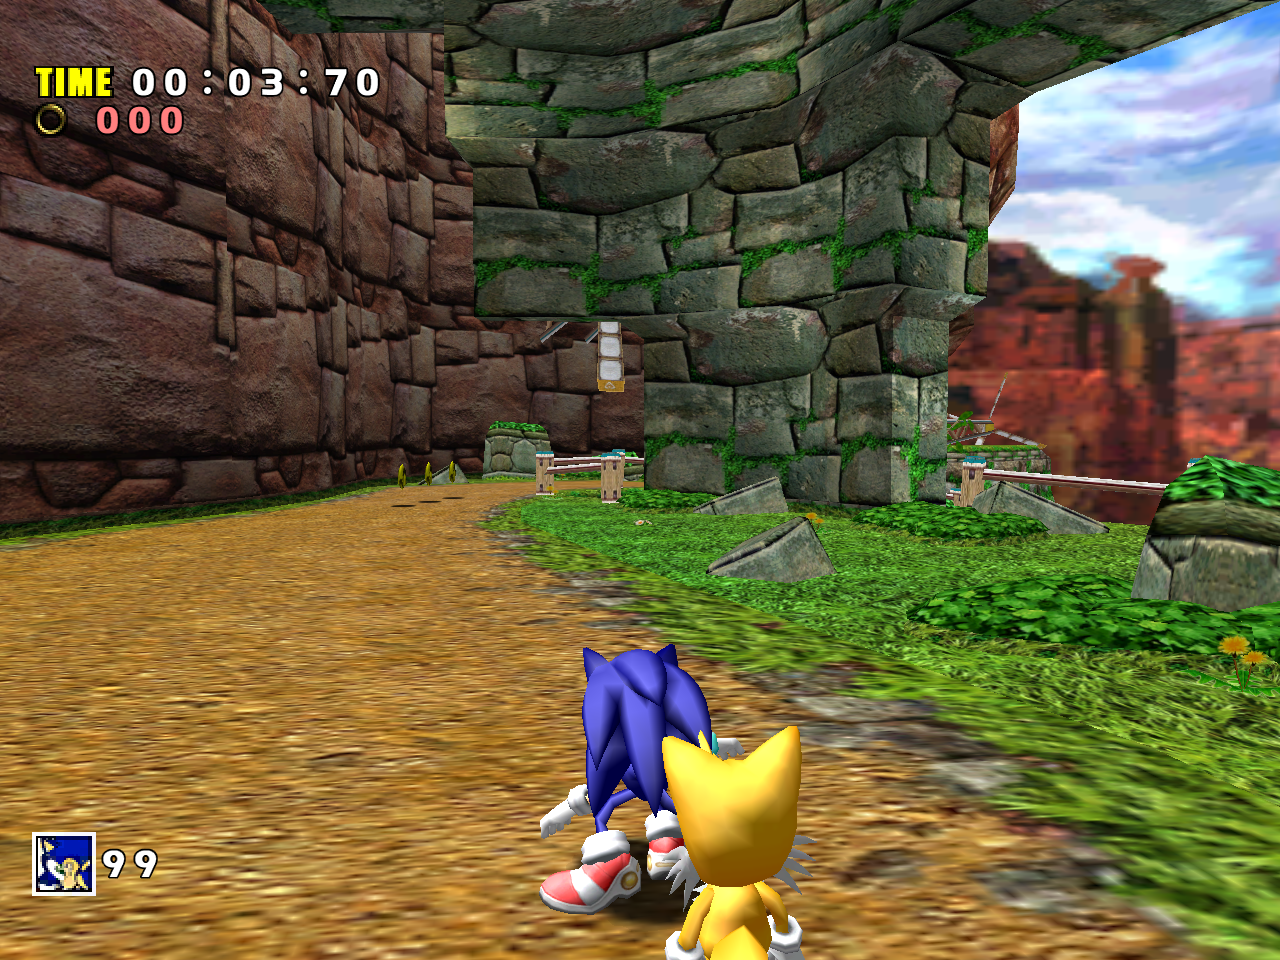
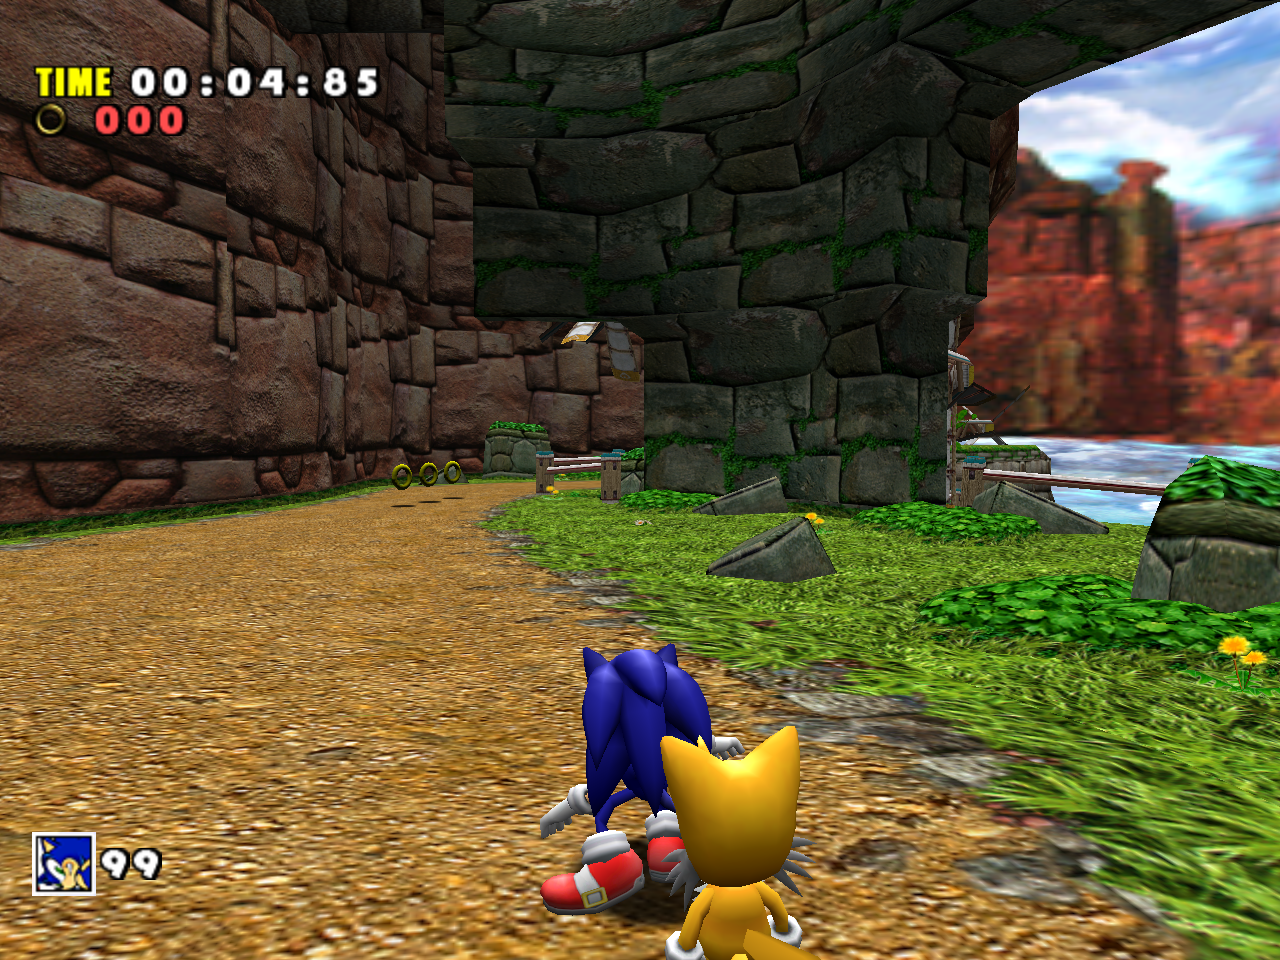
2. Alpha rejection was an additional measure to hide transparency problems or make them look less obvious. For textures with an alpha channel, the game only displays the pixels whose transparency (alpha) value is within a certain range. This allows some models with a grid-like transparent pattern, such as fences in Speed Highway or paths in Windy Valley, to look acceptable even though the game is still struggling with rendering them:
This doesn’t look too pretty, but at least it helps a bit. However, the problem with alpha rejection in SADX is that it also breaks a lot of unrelated special effects. In Perfect Chaos, alpha rejection causes effects such as waterfall splashes and mist to flicker or disappear – check out the Bosses section for a comparison. Also, all particle effects now have outlines that makes them look low-res. Water splashes, dust, fire, explosions – all of these look lower quality than they are because of this feature. Here’s an example from Lost World:
Dreamcast
Gamecube
Even with the above workarounds in place, the game still has many transparency issues. The design and aesthetic changes in SADX are sometimes seen as a legitimate attempt to improve the game. However, it is entirely plausible that the only reason these changes were actually made was because the port had problems displaying the original assets correctly. It makes sense because almost all levels that look different in SADX had transparency issues with their original Dreamcast designs when imported to the port as-is.
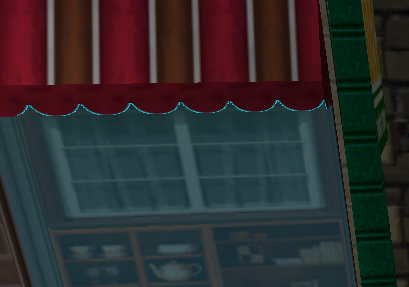
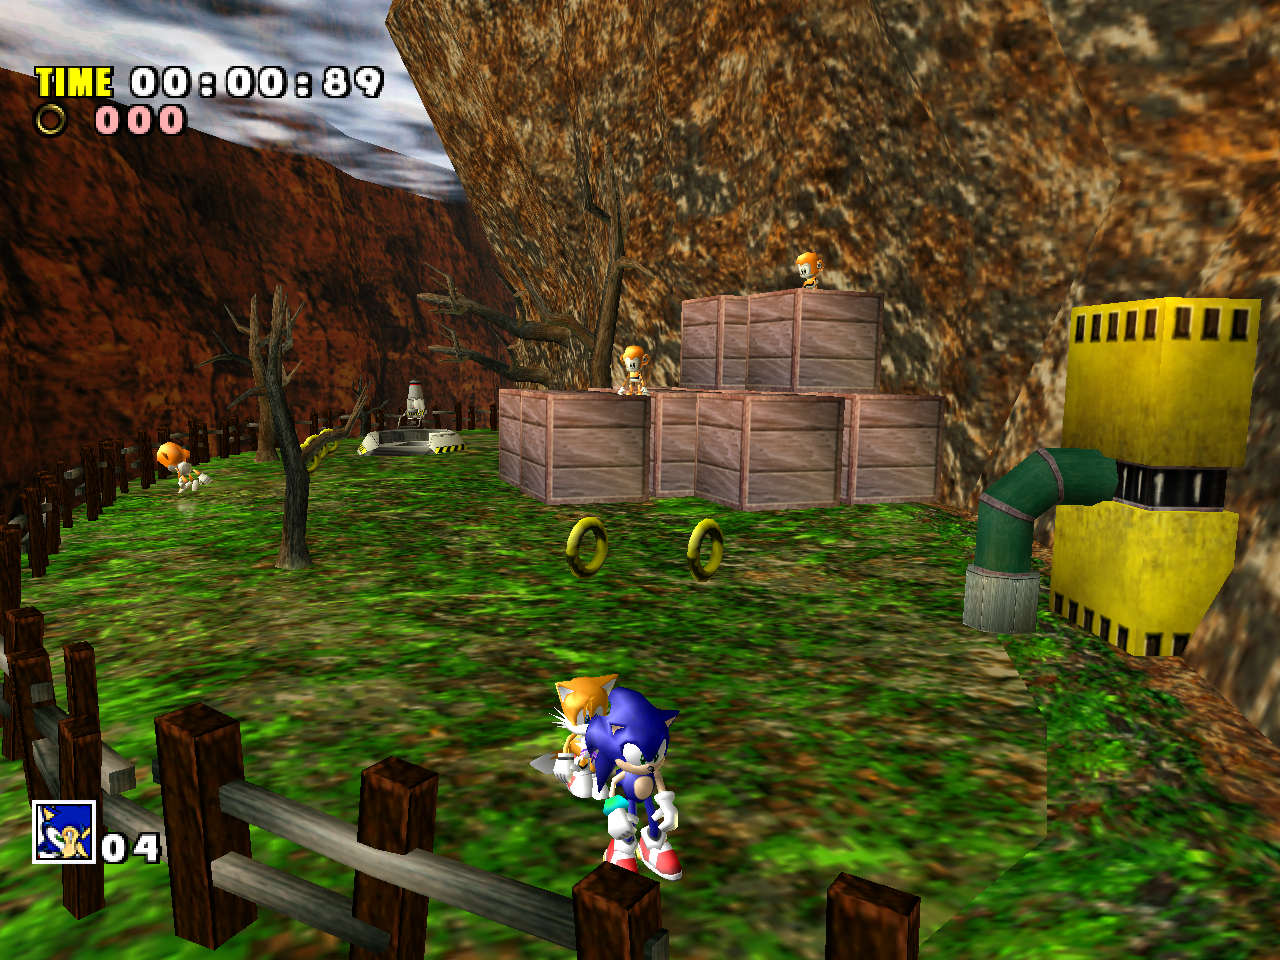
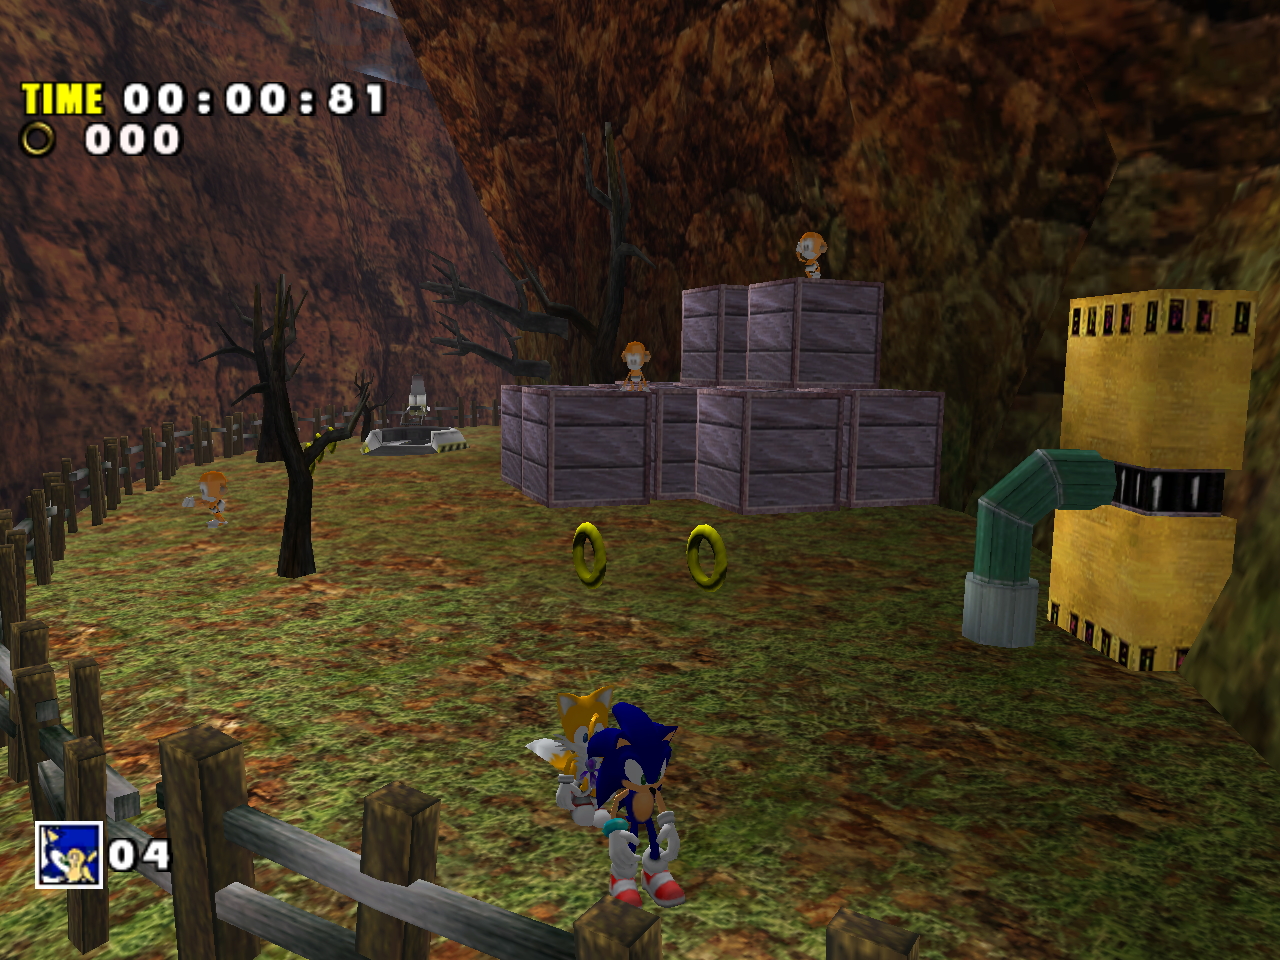
Here’s a typical SADX redesign. This roof had a triangle-shaped pattern in the Dreamcast version. In SADX the pattern was removed and the roof was made solid:
Dreamcast
PC
This was likely done because the triangle pattern is a square texture with an alpha channel, which had rendering problems in SADX. Here’s a screenshot from the “Preview” prototype where this area is still using Dreamcast graphics:
In fact, you can still see issues with textures like that in the final version at some camera angles if you try hard enough:
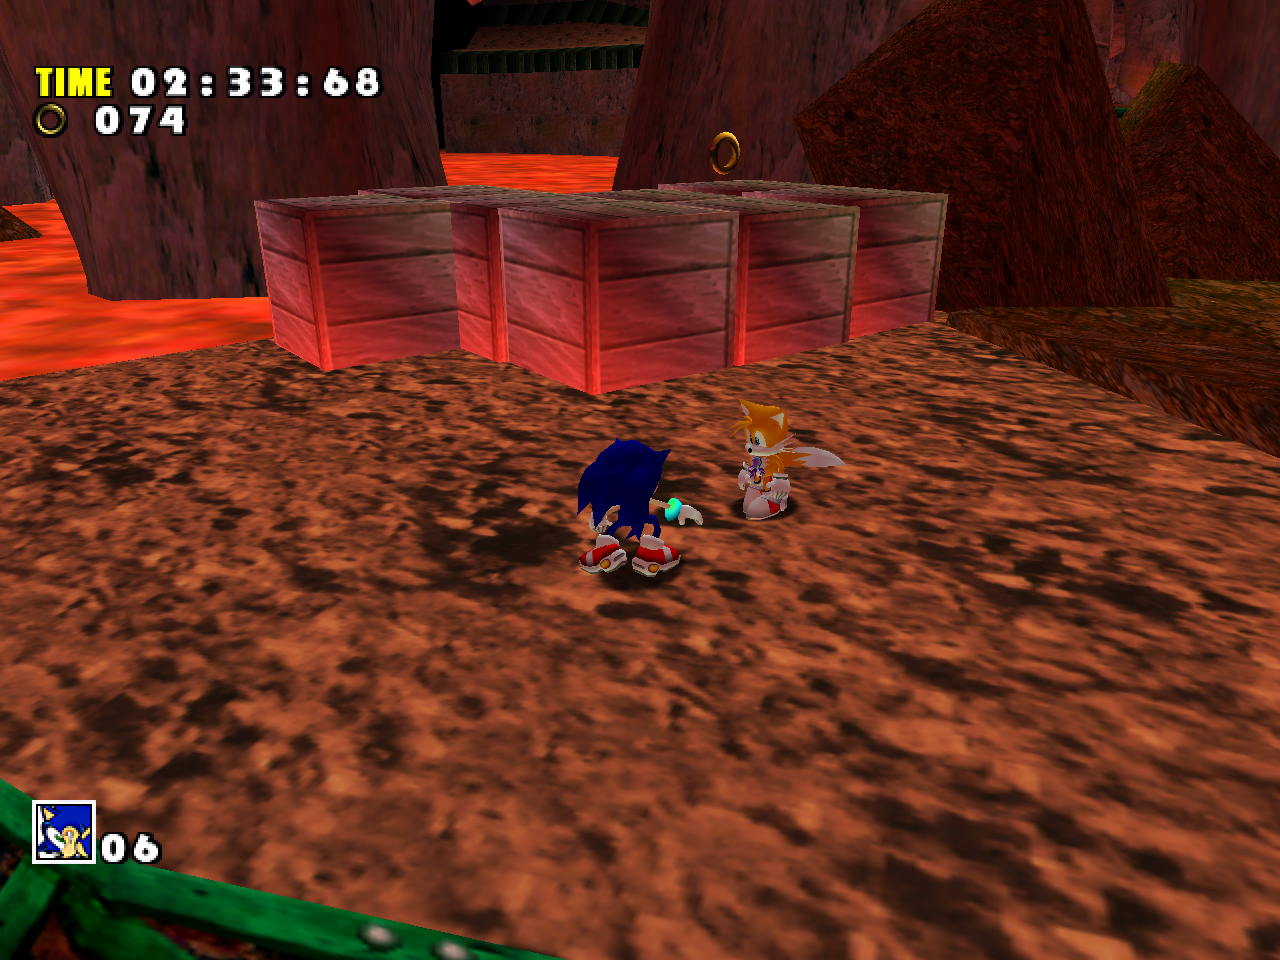
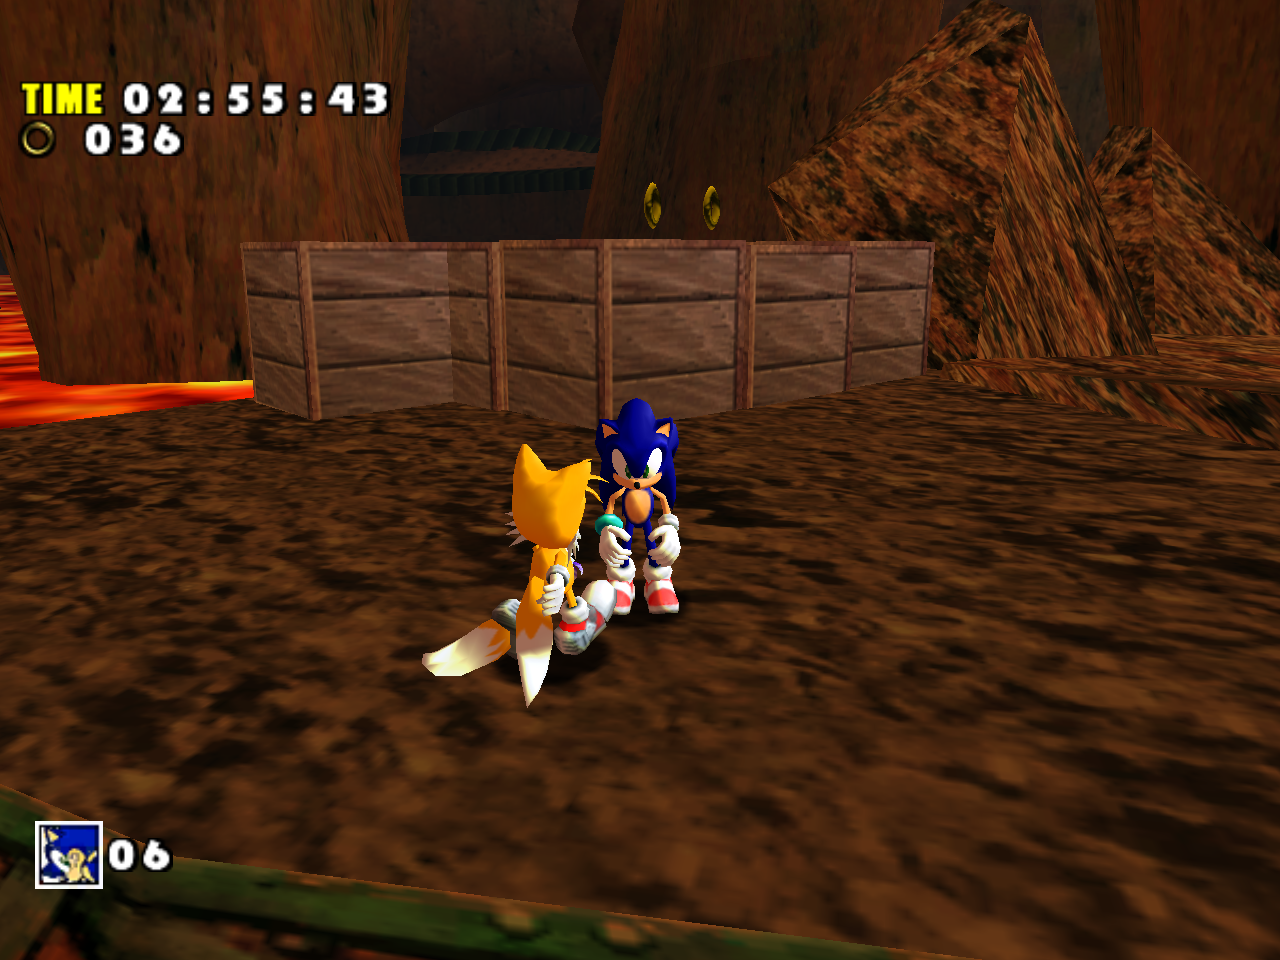
There appears to be a strong correlation between the areas that were redesigned and the areas that had rendering issues in the port with their original designs, which is possibly why the majority of those redesigns were done to hide transparency problems. As you can see, even the replacement assets don’t always work well. Even within the engine limitations, most transparency issues in SADX are fixable by rearranging the models involved, which is usually just moving around a couple of lines in code, or making minor edits to meshes to change the order they are listed in the model. Here’s how a typical transparency problem in SADX can be fixed within the limits of SADX engine:
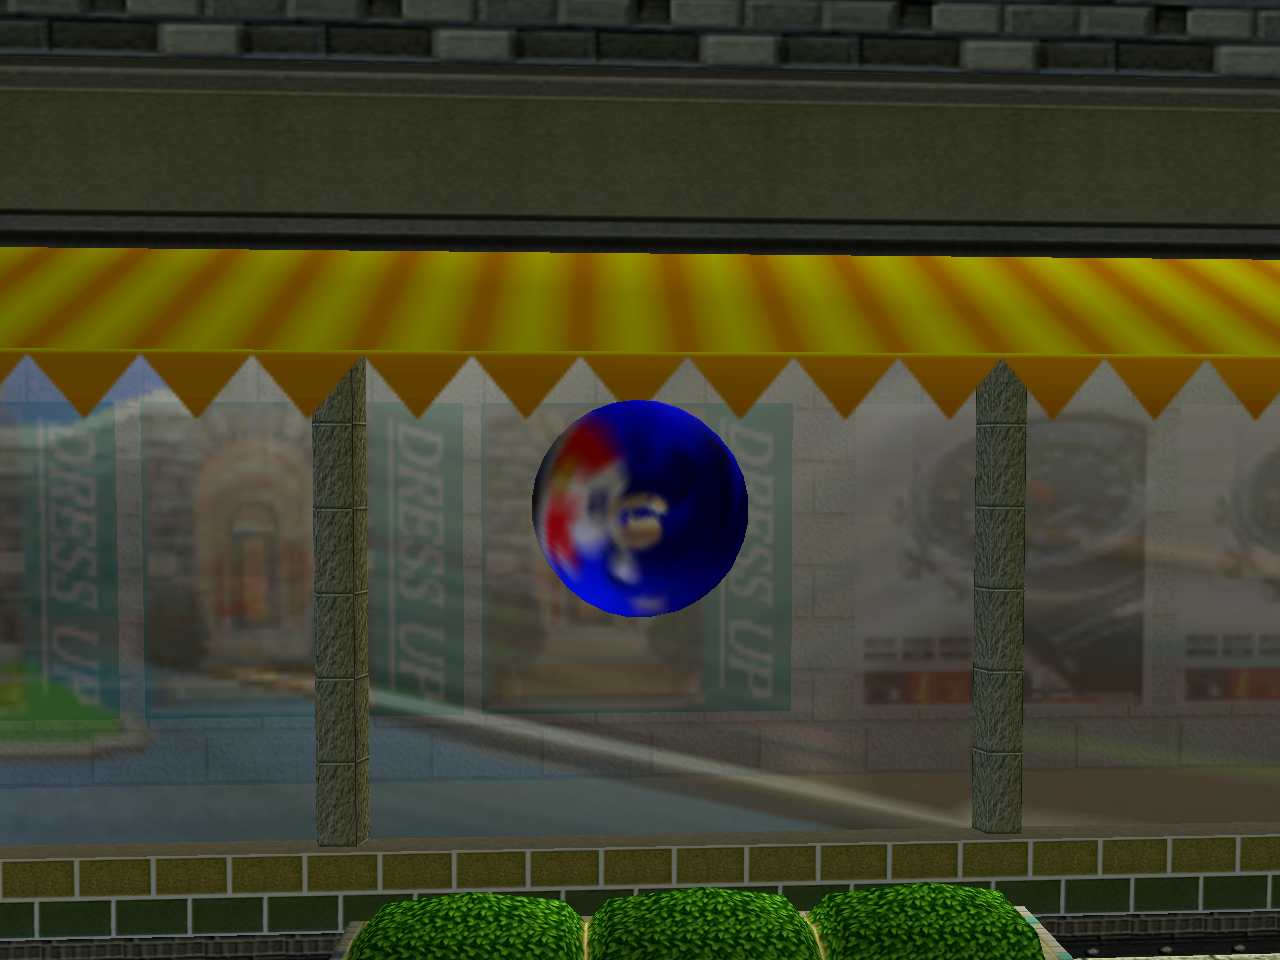
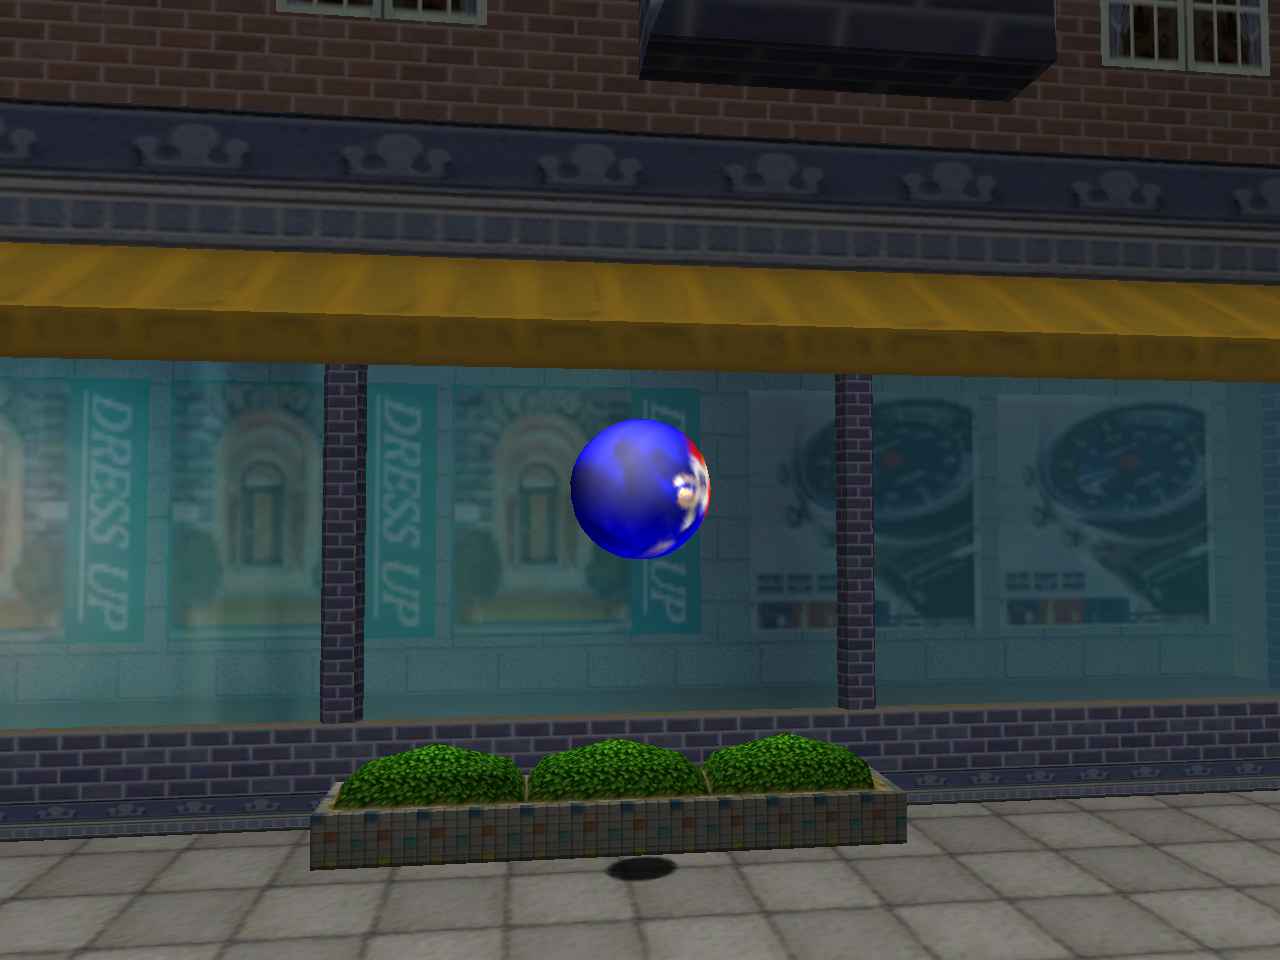
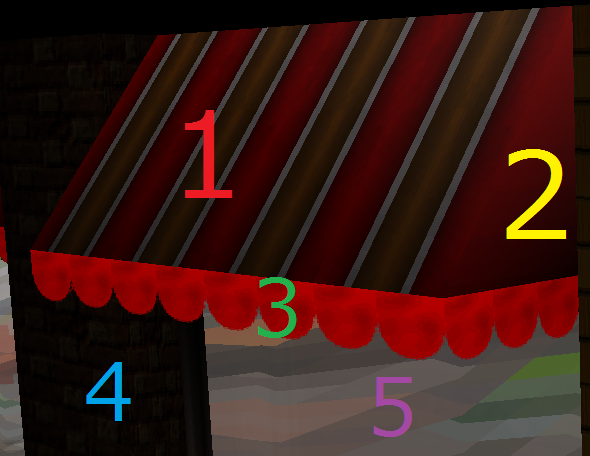
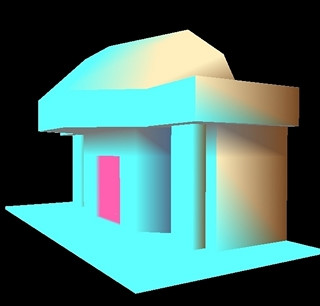
Here you can see a shop roof that has to be rendered together with its surroundings. Let’s describe all the meshes involved in this scene:
1 – roof top (opaque)
2 – roof side (opaque)
3 – roof top decoration (transparent)
4 – wall
5 – window reflection (transparent)
To render this properly, we have to arrange these meshes in the correct order, which would be 4, 1, 2, 5, 3. We render the non-transparent pieces first, starting with the wall, and then we render the transparent parts, finishing with the one that should be layered on top of the previous one. In order to render these assets like that, we have to make sure the level pieces are arranged in this particular order. However, in Dreamcast models the order could be anything, which is why there are issues when the original level is imported as-is. There are cases when this gets complicated, but for the most part rearranging the models is quite easy. However, instead of rearranging the problematic models, the developers decided to redesign those areas with new textures and models. The redesigned assets sometimes fail at conveying the atmosphere of the original game. Quite often they lack the variety or special effects of the original, or have lower quality textures. There are also cases where models that have transparency issues weren’t redesigned. Almost every level in SADX has problems related to transparency. You can read more on level-specific problems by using the top menu.
The Dreamcast Conversion mod resolves a large number of transparency issues with Dreamcast assets by sorting the models manually. In some cases it also hooks the game’s queued model system to set an arbitrary depth value to make models render in a specific order (many of these hacks are done the same way it’s done in the base port). Although not everything is fixable this way, the mod demonstrates that making a faithful conversion of SA1 assets is technically possible in the PC port without major compromises to aesthetics or visual quality.
As unfortunate as it is, sound and music quality has suffered almost as badly as textures and lighting in SADX. Let’s have examine some of the sound problems plaguing the ports.
This page is going to focus mainly on the PC version and later ports. This is because the Gamecube version’s sound format hasn’t been fully reverse engineered yet to allow direct sound quality comparions (although we can make some rough estimations). However, issues related to sound bugs and missing sounds mentioned here also affect the Gamecube version.
There are several types of sound issues in SADX, and they are specific to different ports. Here’s a list of issues and the ports affected by them:
The music no longer loops – 2004 PC port
Lower quality voice clips – 2004 PC port (all clips), Steam and nextgen console ports (only some clips)
Lag/stutter caused by the voice file format/implementation – 2004 PC port
Lower quality sound effects – 2004 PC port, Steam and nextgen console ports
Missing processing effects on some sounds – all ports
Sounds being cut off, looping incorrectly or playing too early/too late – all ports
Some sounds are missing – all ports
Wrong soundbanks are loaded, causing wrong sounds to play – all ports
Sound volume problems: some or all sounds are too quiet (PC 2004 port) or too loud (Steam/nextgen console ports)
Sound playback problems (sounds/voice clips playing in lower quality than the actual sound/voice files) – Steam and nextgen console ports
Let’s talk about the music first. The Gamecube, Steam and nextgen console ports use ADX music files that are the same as in the Dreamcast version. On the Dreamcast, some music tracks were downsampled in the versions of SA1 that contained both English and Japanese audio clips – this downsampling was undone for the GameCube version, so unless you own the Japanese version of SA1, the Gamecube version has the best quality music.
For the 2004 PC port, ADX music files were converted into the Windows Media Audio format. The main problem with the WMA format is lack of looping, which means the music in the PC port fades out and restarts at some point, while in other versions of the game it loops seamlessly.
Character voice clips were also converted into WMA for the 2004 PC port. This would’ve been fine because the voice clips don’t need loop points, but the conversion reduced the quality of the resulting voice clips. Here’s a voice clip from both versions with audible quality difference despite the WMA one using higher sampling rate and stereo sound:
Dreamcast
PC 2004
A well-known problem with the 2004 PC port is the stutter that happens during the kart race when you hit the jump panels and Sonic says “woohoo!”. When this happens, the game pauses for a brief moment. This has something to do with the voice clips being in the WMA format because it doesn’t happen in the ports that use ADX audio. Thanks to the Mod Loader you can fix the problem in the 2004 PC port by installing a mod that replaces all WMA voice clips with ADX voice clips.
Although the Steam and nextgen console ports go back to ADX voice clips, which are the same as on the Dreamcast/Gamecube for the most part, there are several voice clips that were edited. Those edited clips are lower quality than the original voice clips. There are only 9 English voice clips and 11 Japanese voice clips that are different from the Dreamcast version. Most of those edited voice clips have to do with the options menu, where the “Options” part was cut out for some reason. You can hear that the edited voice clip sounds a bit muffled:
Dreamcast
Steam
Now let’s talk about reduced sound quality. The easiest way to illustrate the reduction of sound quality is to compare some of the common sound effects across different versions. Here’s the jump sound:
Dreamcast
PC 2004
And here’s the ring loss sound:
Dreamcast
PC 2004
Steam
Apart from format differences such as sampling rate, there are also volume differences, missing processing effects and broken loops in many sounds. The biggest problem with sounds in the 2004 PC port is that they are too quiet. In the Dreamcast version, almost every Action Stage and Adventure Field has some kind of a background noise that is loud enough to be audible without washing out the music. Those sounds are still present in SADX, but they are so quiet it may seem they are missing. One example of such noises is the machinery humming in Final Egg Act 1, which you are supposed to hear right from the start, but it’s barely audible in SADX. The sea in Station Square hotel is also barely audible in SADX. Another example is the ticking sound of the clock in Speed Highway Act 3, which is there but due to a combination of low volume and SADX’s positional audio glitch it’s rarely heard ingame.
Some sounds are supposed to play multiple times but in SADX they play only once. For example, if you watch the cutscene before the Chaos 0 fight, you can hear the sound of bullets falling on the ground after the police shoot Chaos. In the Dreamcast version, that sound played multiple times in a row, which corresponded to multiple bullets hitting the ground, but in SADX it sounds like a single bullet. A similar problem happens with Zero’s chest thumping sound, which is barely audible in SADX because it plays only once.
The above problem is ironically the result of a bug fix. The original Dreamcast game has a number of sound bugs related to sounds not stopping when needed, which chokes the game’s sound queue and makes it stop all other sounds. For example, at the start of Emerald Coast if you walk slowly in a certain spot in the area where dolphins jump out of the water, you can get the water splash sound to repeat endlessly until you move, which will force the game to cancel all other sounds, including background noises. Another known instance of this bug is Knuckles’ Maximum Heat Attack charge sound, which kills all other sounds permanently when you charge it. To work around this issue, SADX made it impossible for most sounds to play more than once by default. Unless a sound is played with a specific flag that allows it to repeat, the game will check if the same sound is already playing, and not play it again if it’s already in the sound queue. While this fixes the above issues, it introduces other issues where you actually are supposed to hear the same sound playing multiple times.
On top of that, there are several bugs in the ports that cause sounds to play too early or too late, or not play at all. The game’s sound timers don’t always account for 60 FPS, which causes some sounds to get cut off or loop incorrectly. A good example of that is the looping background engine noise of the Egg Hornet, which plays fine at 30 FPS, but cuts off at 60 FPS (interestingly enough the Dreamcast version plays it fine even if it’s hacked to render at 60 FPS).
As for the sounds that play too early, most of the cutscenes involving the Tornado crashing or landing have timing problems. For example, in the cutscene where the Tornado 2 lands on the Egg Carrier, the metal screeching sound plays before the Tornado actually touches the Egg Carrier, which doesn’t happen in the Dreamcast version. The Dreamcast version also has a few sound problems like that (for example, the sound of the Tornado crashing in Tails’ opening cutscene plays too early and gets cut off), but SADX has many more.
The ports have code bugs in the positional audio system that cause some sounds to never play ingame. In addition, some sounds were removed or disabled on purpose. It’s difficult to talk about all of them in detail, but here’s a list of SADX sound bugs that weren’t there in the Dreamcast version. This isn’t a complete list, some of these were reported on Sonic Retro forums:
The spindash sound gets cut off if you have the Light Speed Dash upgrade, while in the Dreamcast version it fades out gradually. This also affects many other sounds, which fade out in the Dreamcast version but get cut off abruptly in all other versions. Technically this isn’t a bug. The Dreamcast version’s sound system used sequenced sounds, and the fadeout was a side effect of it. Although the Gamecube version also uses a sequenced format, the fadeout side effect was disabled. The later ports dropped the sequenced format altogether so the sounds simply cut off.
In the cutscene where Knuckles attacks Sonic, Sonic says “Whoah!” before jumping backwards. It isn’t heard in SADX because Sonic’s soundbank is no longer loaded by that cutscene. At the same time this “fixes” the opposite problem in a similar cutscene in Tails’ story, where Tails says “Whoah!” in Sonic’s voice in the Dreamcast version.
A thud noise is missing when Sonic (or Tails) and Knuckles run into each other and drop the Chaos emeralds before Chaos 4 emerges.
The water splashes made by Chaos 4 are muffled by another sound that was mistakenly encoded as stereo, which interferes with the positional audio system and becomes too loud.
A skid noise when Beta backs up just before his first boss battle is missing.
A foreboding noise when ZERO’s shadow casts over Amy in the cutscene after Twinkle Park is missing.
The cutscenes in Amy and Gamma’s story where Gamma lets Amy escape load the wrong soundbank, which causes the cutscenes to play random unrelated sounds.
Bush rustling in the Angel Island hub no longer loops, although the sound is still there.
The rings that NiGHTS takes you through in Casinopolis’ NiGHTS pinball game no longer make a sound as you travel through them.
The bombs dropped by the airplanes in Ice Cap Act 3 no longer make a whistling sound as they fall down, and their explosions are silent.
In the original game the ring sound alternated between the left and the right channel panning every time you collected a ring, like in classic 2D games. While the effect is technically still there in SADX, its strength was reduced to the point of being almost inaudible.
In Sky Deck Act 2, Eggman’s announcements when the ship changes altitude (“Descending into the clouds. Slow the ship down!” or “Go up! Full speed ahead!”) are no longer heard because they were removed from the Sky Deck soundbank. The game still plays them if the sounds are put back into the soundbank.
The ambient machinery noise at the Mystic Ruins Final Egg base is missing. The noise sound was replaced by a single beep, and the function to play the noise was disabled in code, probably because the developers realized that the replacement was annoying. It’s unclear why the original sound was replaced.
Hot Shelter loads the wrong enemy soundbank, which makes enemies like the Egg Keepers play the sound of the ocean. This also affects the original game to a certain extent, but in the Dreamcast version those enemies are silent instead.
The Chao soundbanks were replaced in SADX because the Chao system itself was changed to be more like SA2B (see the Chao Gardens page). It’s hard to compare sounds directly because the soundbanks are different between SA1 and SADX. Nevertheless, there are some identical sounds that we can compare. Which one do you think sounds better?
Dreamcast
PC 2004
Although the game still has the code to play certain Chao sounds and jingles, SADX no longer plays them because the SA2B Chao soundbanks don’t have these sounds. An example of such missing jingles is the brief score you hear at the start of Chao Race.
Finally, let’s discuss the ADX playback issue in the Steam and Dreamcast Collection ports. Sound quality in the 2010 ports is undeniably the worst among all versions of the game. Unlike SADX Gamecube and PC 2004, these ports have the opposite problem with sound volume. The background noises drown out almost everything but the music (example: try playing Casino Act 1, where even the music is barely audible because of the gushing water noise).
While volume issues can be rectified somewhat by lowering the game’s overall sound effect volume in the launcher (in the Steam version that is), these sound effects are still lower quality than in the original PC port. The 2004 PC port uses WAV sound effects stored in DAT soundbanks, while the 2010 version uses the same soundbank format but with the sounds converted to ADX. Since ADX is a lossy format, the conversion resulted in quality loss.
There’s also something wrong with the way the newer port play these sounds, which could possibly be related to a decoding error. Here’s a sound from the E_0001 soundbank that plays when Chaos 0 is defeated. This is how it sounds if the ADX file is decoded with an old tool called adx2wav. It sounds like that ingame too:
And this is how it sounds when decoded with vgmstream:
The same sound from the 2004 port for comparison:
Apart from the playback issue, the quality of sound effects in the Steam version slightly worse than in the 2004 PC port, and many sound issues from the 2004 port remain unresolved.
The Gamecube version has an important advantage related to 3D sound effects. The original Dreamcast game uses QSound, a binaural sound effect that creates the impression of 3D sound with stereo headphones. The Gamecube version uses Dolby Pro Logic II for a 5.1 surround sound effect, and there are more 3D sounds than in the Dreamcast version, although not all of them play correctly. The 2004 PC version uses DirectSound3D for hardware accelerated 3D sound, but it doesn’t work too well from Windows Vista onwards. The Steam version appears to have broken 3D sound altogether.
For the modded PC version, the majority of these issues have been fixed. The Mod Loader implements support for ADX files using the BASS audio library, so you can install the ADX Audio mod for best quality music and voices. In 2022, the use of BASS was extended to sound effects, which enabled full positional audio support. For the Sound Overhaul mod, all sounds in the Dreamcast version (except Chao voices) were recorded in a format supported by the 2004 PC port with proper looping where necessary. The mod also adds processing and fadeout effects to several sounds, and restores most missing sounds. To learn more about mods for the PC version, visit the “Fixing the PC version of SADX” section on this blog.
Lighting is one of the most noticeable differences between different versions of Sonic Adventure. Let’s compare lighting systems in SA1 and SADX and see how they perform against each other. Thanks to reverse engineering we know quite a bit on how they work.
The Dreamcast version has a lighting system (referred to internally as “LANTERN”) that uses color palettes. The lighting information for each level is stored in a pair of files: the PL file (PL*.BIN) contains the palettes, and the SL file (SL*.bin) contains light direction and some miscellaneous information.
The LANTERN lighting system uses a formula to calculate a “brightness index” for each vertex in the scene, which is used to select colors in the palette. Several factors, such as the model’s normals and light direction (stored in the SL file) affect brightness index calculation. If we visualized brightness indices (from white being maximum brightness to black being completely unlit), it would look something like this:
Normally the skybox should be white because it’s fullbright (ignores lighting). It was edited out for clarity.
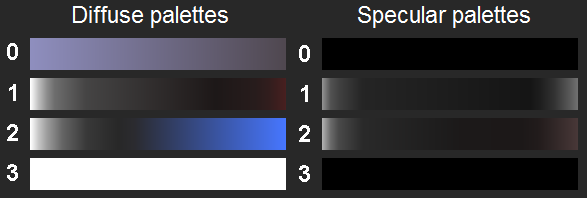
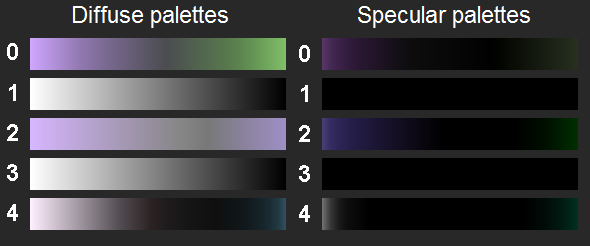
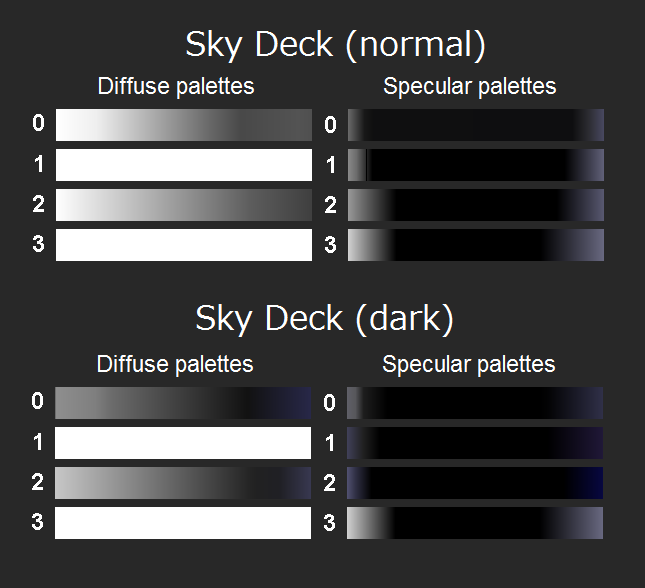
Let’s have a look at the palettes themselves. Here is a typical set of palettes found in the PL file for Twinkle Park Act 1:
The left row of palettes is used for diffuse lighting. Diffuse palettes contain colors that the original (fullbright) texture gets multiplied by, like using Photoshop’s “Multiply” blending mode. Specular colors are added on top of the result of the multiplication, in a similar way Photoshop’s “Add” blending mode works. Because it’s additive, specular lighting creates highlights. The “gloss” on Sonic and other characters is an example of specular lighting.
Each palette consists of 256 colors. The color the texture gets multiplied by (or the color that gets added as a specular color) has the same index in the palette as the brightness index of the vertex. So the “brightest” vertex would get the first (0) color in the palettes, and the “darkest” vertex would get the last (255).
This system allows to use a wide range of colors to create vivid, original environments. But the system used in the Dreamcast version is even more versatile because it allows different kinds of models (level pieces, characters etc.) to use different palettes, and even within the same model different meshes can alternate between two specular palettes using material flags. For example, the screenshot below was taken from the Dreamcast version where all palettes were replaced with different solid colors. You can see the complexity of possible color combinations that comes from using many diffuse and specular palettes at the same time:
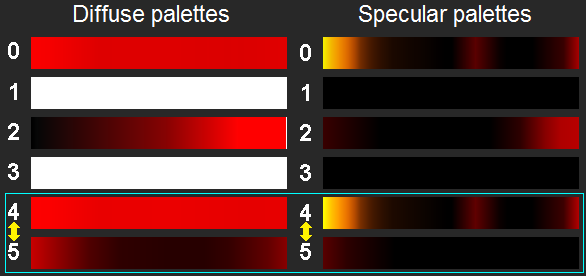
So, how does the game know which pair of palettes to apply to a given model? There are several main palette application rules, as well as some exceptions. To illustrate the full range, we need to look at another PL file. Here’s a palette list from Gamma’s Hot Shelter:
When each model is rendered in the game, there is usually a function call that sets a “light type” to be used by the model. A light type corresponds to a certain pair of palettes. For example, Diffuse 0 is applied to level pieces and objects. Specular 0 is applied to level pieces and objects when their meshes have the “ignore specular” material flag enabled. If it’s disabled, Specular 1 is used instead. The above rule also applies to all models that set the light type to 0.
Diffuse 1 and Diffuse 3 are never used in the Dreamcast version.
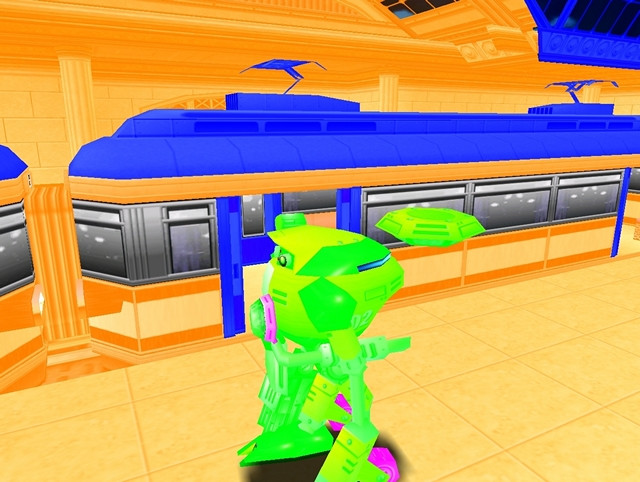
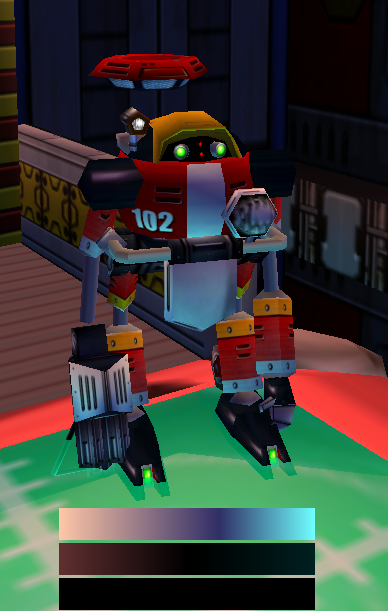
Diffuse 2 is the main diffuse palette used by playable characters and NPCs. In some rare cases it can be used by objects (such as floating meteors in Twinkle Park Act 1 or Chaos Emeralds in cutscenes) if they specifically set this light type. Specular 2 and 3 are used depending on whether the mesh has the “ignore specular” material flag. For example, Gamma’s model uses mostly Specular 3, although some of his body parts use Specular 2. Here’s an example of what usage of three different palettes can do (well, it’s actually two palettes since the third one is just black in this example, but still):
By the way, did you notice that Gamma’s eyes and head base are lit up in the Dreamcast version, but not in any of the ports? This is because the “ignore light” material flags were removed from Gamma’s model. For the same reason Big’s eyes no longer glow in the dark. This is a simple material flag change, which works the same way in both lighting systems.
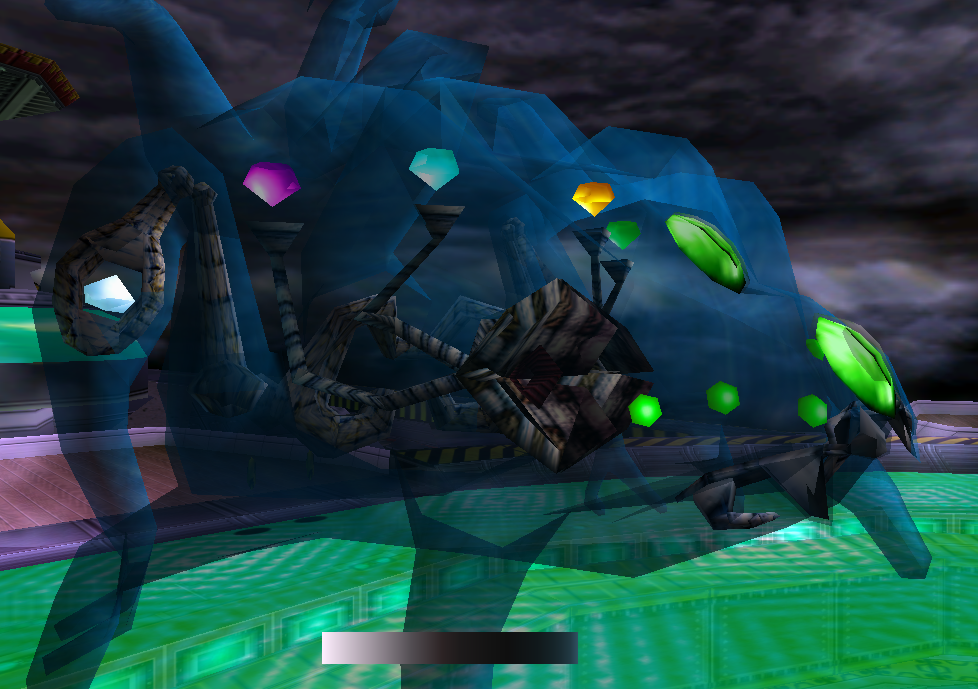
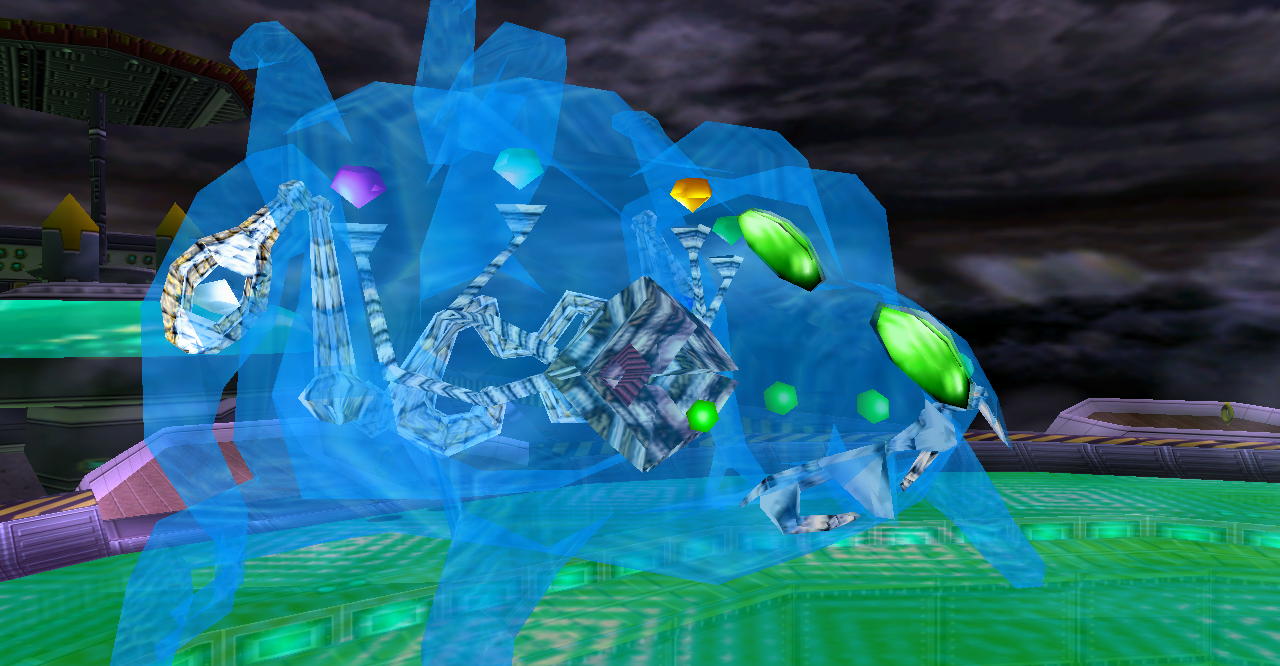
Diffuse 4 is a special palette. It is used by the fire effect in the Mystic Ruins Past, as well as some bosses. For example, the models for Chaos 2, Chaos 6 and Perfect Chaos all use Diffuse 4 and Specular 5. These palettes are used to accentuate the bosses and give them lighting that matches the environment. This is what Chaos 6 looks like with and without the diffuse palette:
Diffuse palette
No palette
But that’s not all! In some cases the game switches between different PL/SL files in real time. For example, in Sky Deck Acts 1 and 2 the game toggles between two different sets of palettes when the Egg Carrier changes altitude. This affects not just the level, but also the characters:
In Mystic Ruins Past the game also alternates between palettes, but within the same file:
The level and objects that would normally use Diffuse and Specular 0 have a fade effect that blends between Diffuse/Specular 4 and 5, creating the effect demonstrated below. The effect is missing in the Gamecube version.
Dreamcast
Gamecube
Now that we’ve discussed the basic outline of the lighting system used in the Dreamcast version, let’s compare it with the Gamecube version. The palette lighting system was removed for stages but it’s still there for characters and objects. Thanks to the “SADX Preview” prototype that was leaked several years ago we can confirm that the palette lighting system was functional on the Gamecube sometime earlier even for stages, but it was removed from the final version. A more traditional lighting system was set up in its place. According to the data found in SADX Preview, which allows to toggle between lighting systems, the new lighting system uses the following parameters:
Light number – apparently up to 4 lights can be active at the same time, but the game seldom uses more than 1 or 2
Diffuse brightness – affects the overall brightness of the light
Light color (diffuse)
Ambient color – a separate color that is added on top of the diffuse color. Unlike specular, this isn’t a separate additive effect so it’s effectively the same as making the overall (diffuse) light color brighter
Light direction
This system clearly doesn’t allow as much creative freedom as 256 individual colors for each brightness index in the Dreamcast version. There is also no support for specular lighting, which means the level pieces can no longer have specular highlights/gloss. However, even with such a system in place it would’ve been possible to create environments that looked somewhat decent. After all, not all levels in the Dreamcast version use crazy multi-color light transitions or a lot of specular highlights. You can find some areas that look okay-ish in SADX Mystic Ruins, Hot Shelter and Lost World. Emerald Coast and Windy Valley also look alright because the original palettes for them were simple white-to-black gradients, which the new system can imitate easily. Other stages, such as Ice Cap, Red Mountain or Final Egg, feature much less vibrant environments than the Dreamcast version.
The new lighting system is also broken in the PC version of the game. If you compare the screenshots from each version side by side (which you can do by going to individual level comparisons using the top menu), you can see how the PC version washes out the lighting even further and makes everything too bright. For example, in the Mystic Ruins it’s hard to tell what time of day it is without looking at the sky because the ground is lit up at all times. Station Square also looks almost the same during day and night. The original reason for this difference is that the PC version uses Direct3D 8 and its lights system, while the Gamecube version uses a different lighting formula that applies diffuse lighting last, making the result look more vibrant. In addition, the lighting data was altered for several stages in the PC version, which made the lights even brighter. This problem persists in all later ports of the game, including the nextgen console ports. As a result, the Gamecube version is the only port where the replacement lighting system works as intended.
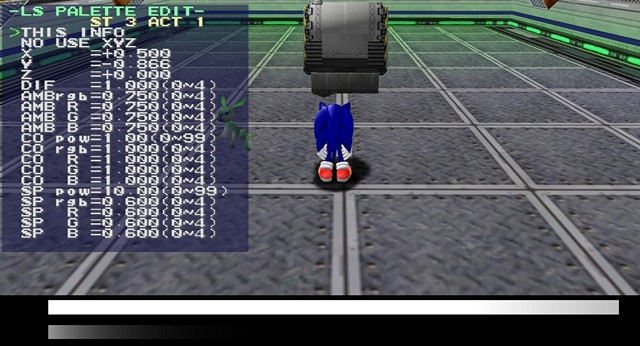
The downgrade described above happened with level lighting, but character and object lighting is different. The Gamecube version in particular has a pretty versatile system for character lighting, which was also per-pixel unlike the Dreamcast version which uses per-vertex lighting. Looking at the Preview prototype can help us understand how it works.
In the screenshot above you can see SADX Preview’s debug menu for character lighting. It visualizes character lighting using two gradients (diffuse and specular, just like palettes in the Dreamcast version) using a formula that takes in the following parameters:
Color1 color and power – diffuse palette
Color2 color and power – diffuse palette
Ambient color – added on top of the diffuse palette (multiply)
Specular1 color and power – specular palette
Specular2 color and power – specular palette
Light direction
(There’s also a “diffuse” parameter that doesn’t seem to do anything)
Using the above parameters it’s possible to create a lot of different palette combinations, and it would’ve been quite easy to imitate the color variety of the Dreamcast version using the same formula. The prototype even has a menu that is supposedly meant to load lighting information from a file. It could be that the developers were trying to load the Dreamcast’s PL files and recreate the gradients stored in them for use with the formula, or perhaps the menu comes from an older build, which was used to generate the PL files in the first place. We don’t know what exactly the menu was used for, but the PL and SL files from the Dreamcast version can still be found on the retail game’s disk, and they were even byteswapped for compatibility with the Gamecube’s Big Endian byte order. It’s possible to activate them in the Preview prototype, but they are not used in the final version.
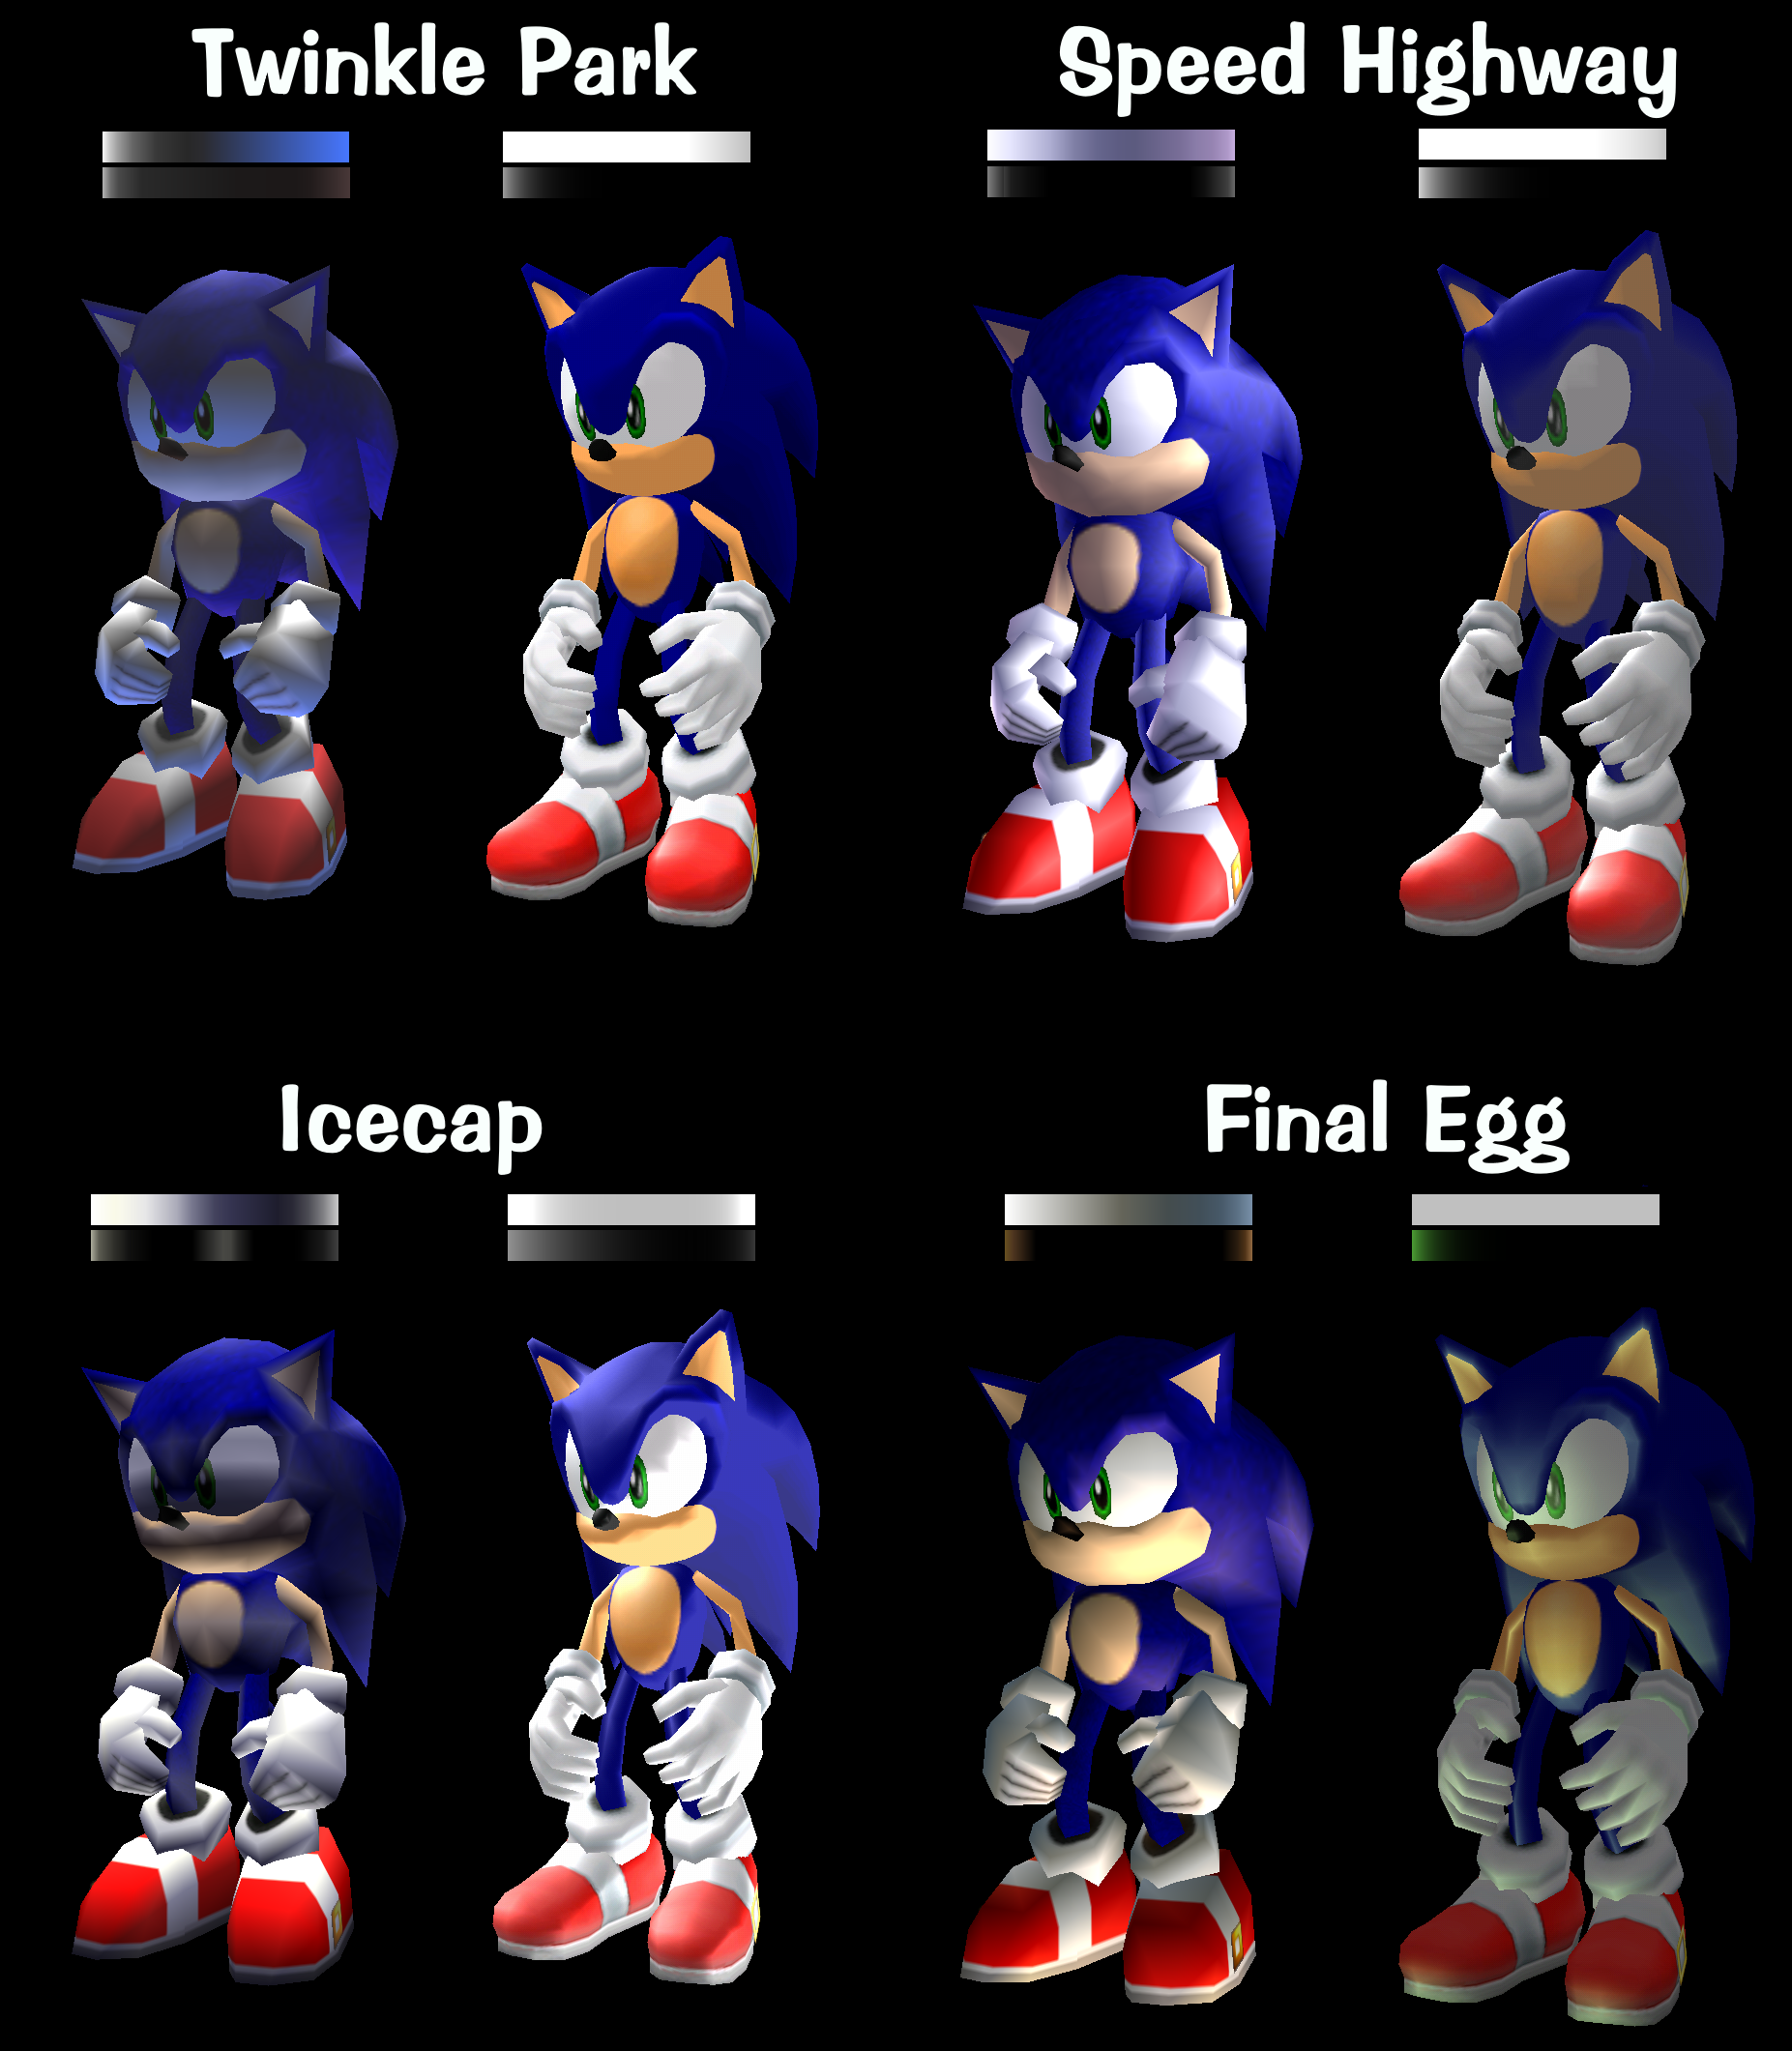
Although the character lighting system described above is a lot more flexible than the level lighting system, for some reason its potential was largely unused. Only in a few stages do we see Sonic and other characters colored differently, and in the majority of areas the lighting on Sonic barely changes at all. Since we know the palette generation formula, it’s possible to convert SADX character lighting parameters into palettes that can be applied per-vertex with the Dreamcast version’s Lantern system. Here’s what those palettes look like in comparison with the Dreamcast version:
You can see how the Dreamcast version’s palettes have more gradations and color variety than the Gamecube version. Although there was no technical obstacle to making SADX character lighting more like the Dreamcast version, most levels in SADX use simple white-to-black gradients for character lighting, sometimes with minor specular tints, which would’ve been a good start, but only a handful of levels in SADX use specular colors different from white and grey.
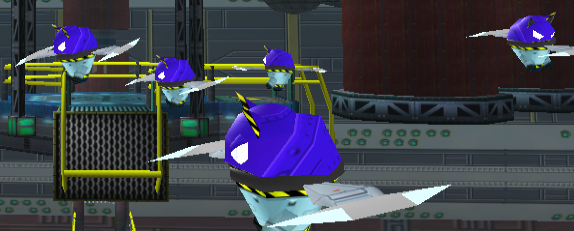
Another problem with the Gamecube version’s character/object lighting is that it often sets the specular values so high the models receive strong white gloss that can even obscure the details. For example, this is what happens to the Spinner enemies in Sky Deck:
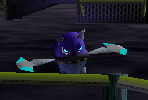
The white eyes are caused by an excessive amount of specular lighting. This is what these enemies look like in the Dreamcast version:
In addition to the above, the PC version has another problem with character lighting. It abandons palette altogether and uses some of the character lighting values to set up Direct3D lights. Half of character lighting values are never used in the PC version – only Ambient and Specular 1 colors are applied to the model, whereas Color 1, Color 2 and Specular 2 components of the palettes are ignored completely. On top of the PC version’s lighting being per-vertex, this makes it impossible to have any kind of complex coloring for character lighting in the PC version.
The PC version also has a problem with excessive specular. The game adds a directional specular light regardless of the model’s material flags. Although the amount of specular lighting can be controlled, in SADX it’s inflated to extremely high levels, especially in the PC version, which results in the infamous problem with the characters being “too shiny”. Interestingly the 2010 port (Dreamcast Collection/Steam) uses a shader for character lighting, and the lighting on characters and objects looks a lot closer to what it looked like on the Gamecube (although it still doesn’t use half of the values). This is one of the few advantages the Steam version has over the 2004 PC port, which is otherwise far superior, downgrades mentioned on this blog notwithstanding.
To compensate for the removal of palette lighting, the Gamecube version uses three approaches to stage lighting:
The Stage Lights system that we’ve discussed above
Semi-transparent models that are overlayed on top of other meshes to create an illusion of a shadow
Fake lighting using baked-in vertex colors
Out of these three, only Stage Lights are “dynamic”, i.e. not attached to the level model. With the Dreamcast version, the same level could have completely different lighting with a simple swap of PL/SL files. The SADX counterpart of that is the Stage Lights system, which is used for such things as daytime changes in Adventure Fields. However, the other two types of lighting are baked into the level model itself and stay the same regardless of the time of day or light direction. The semi-transparent models (which look like this) are barely used in the game in stages other than Station Square and Emerald Coast, and there’s little to discuss about them – they’re just semi-transparent shapes overlayed on top of some level pieces. Vertex colors, however, are a bit more interesting.
Vertex colors are a relatively ancient technique used in games to enhance color variety without using a different texture. Vertex colors are color information stored for each vertex (point) in a model, which can be used for various things, such as transparency or ambient occlusion. Palette lighting in the original game is also created using vertex colors.
The main advantage of the Dreamcast version is the “dynamic” nature of vertex colors, which can change depending on light direction, the model’s material flags, camera position, the colors in the palette and the light type. In SADX this kind of lighting is faked because the vertex colors are static. Once a model has vertex colors baked in, they will never change no matter what happens to the environment. This may be sufficient for most Action Stages because they have a fixed time of day and light direction, but problems arise when vertex colors are used on objects or in areas where lighting changes significantly, for example in Sky Deck or in the Past cutscenes. With palette lighting it’s possible to switch to a separate palette to create a completely different look without reworking the level’s model. But SADX vertex colors always stay the same.
It could be argued that the SADX levels are inherently “better” because they have vertex colors baked in, while the SA1 levels don’t have built-in vertex colors. While the point about SA1 levels missing built-in vertex colors is correct, these levels are meant to use vertex colors generated by the Lantern lighting system. In SADX, however, static vertex colors were added to camouflage the removal of palette lighting. Moreover, it could be argued that the vertex colors in SADX levels are nowhere near as vibrant and diverse as the original game’s lighting – see each level’s page for a closer comparison.
An advantage to having the vertex colors baked in is the ability to customize lighting per vertex. From a technical standpoint this allows more control over lighting than the palette-based system, and SADX does have some cool additions the original game doesn’t have, such as the lights cast on the ground by lamp posts in Speed Highway, or shadows at the start of Lost World Act 2. However, these additions are scarce, and most of the time the original’s lighting looks vastly superior.
Realtime lighting effects aren’t possible with built-in vertex colors either. Note how the lighting changes on all level pieces on the Dreamcast, while the Gamecube version only changes the skybox:
Dreamcast
Gamecube
The problem with using vertex colors as a replacement for palette lighting causes many small details to disappear in SADX. For example, the lighting on such objects as rings, or boxes in Red Mountain, or enemies, makes it look like they are affected by the environment in the original game. If you saw a box in Red Mountain Act 1, it would have Act 1’s palette, but in Act 2 the same box would have Act 2’s palette, which gave it a red glow. Vertex colors stay the same regardless of which level it is. It would’ve been possible to palettize such objects using the character/object lighting system in SADX to give them more vibrant lighting, but other than excessive specular glow in some cases the SADX object/character lighting system doesn’t bring back the original game’s vibrancy. In the comparison below the boxes use the same model, but their lighting reacts to the environment much more prominently in the Dreamcast version due to the use of two palettes (diffuse + specular), while SADX relies almost exclusively on ambient lighting:
Dreamcast
Gamecube
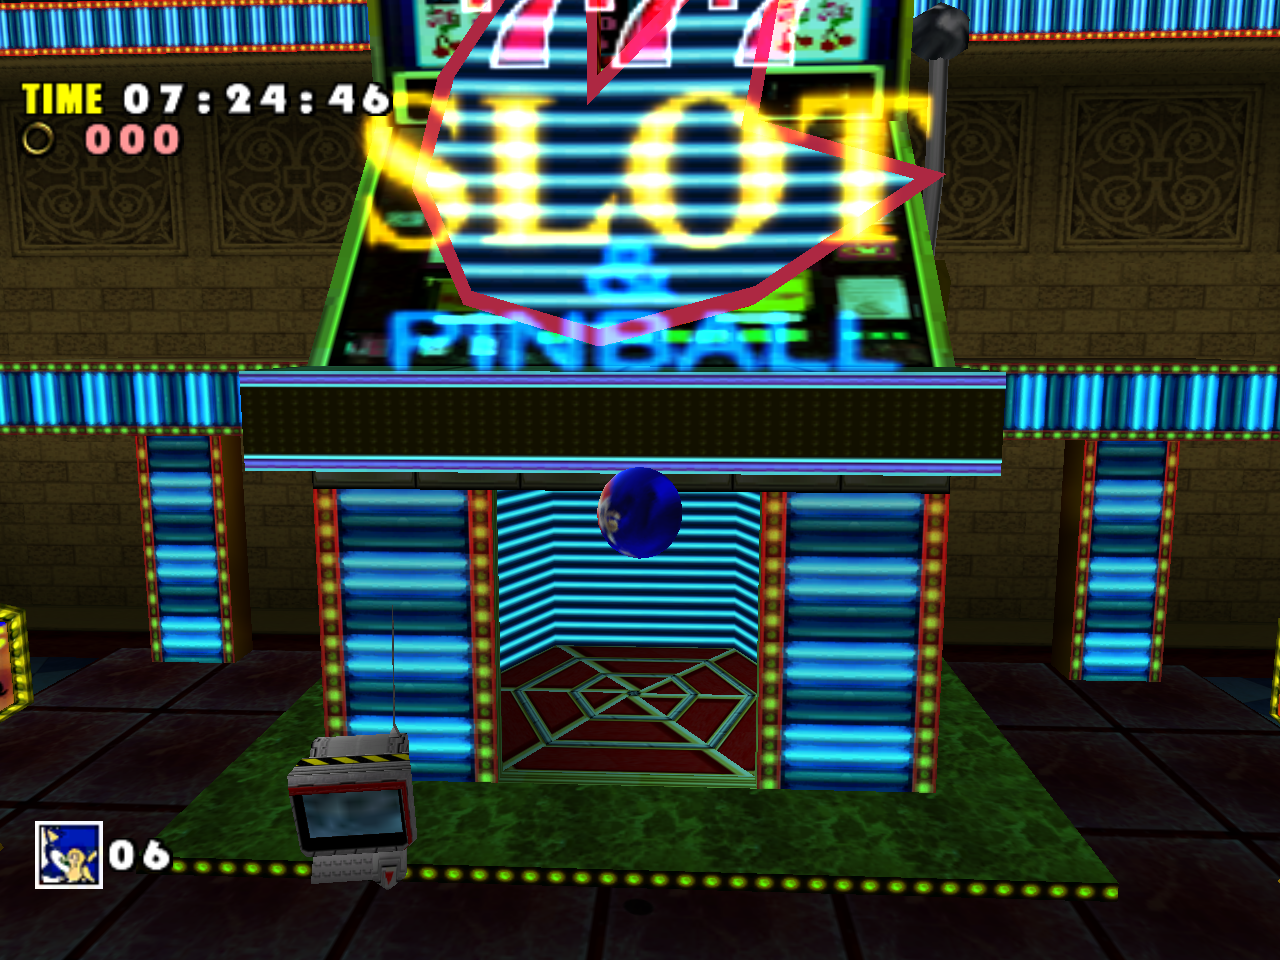
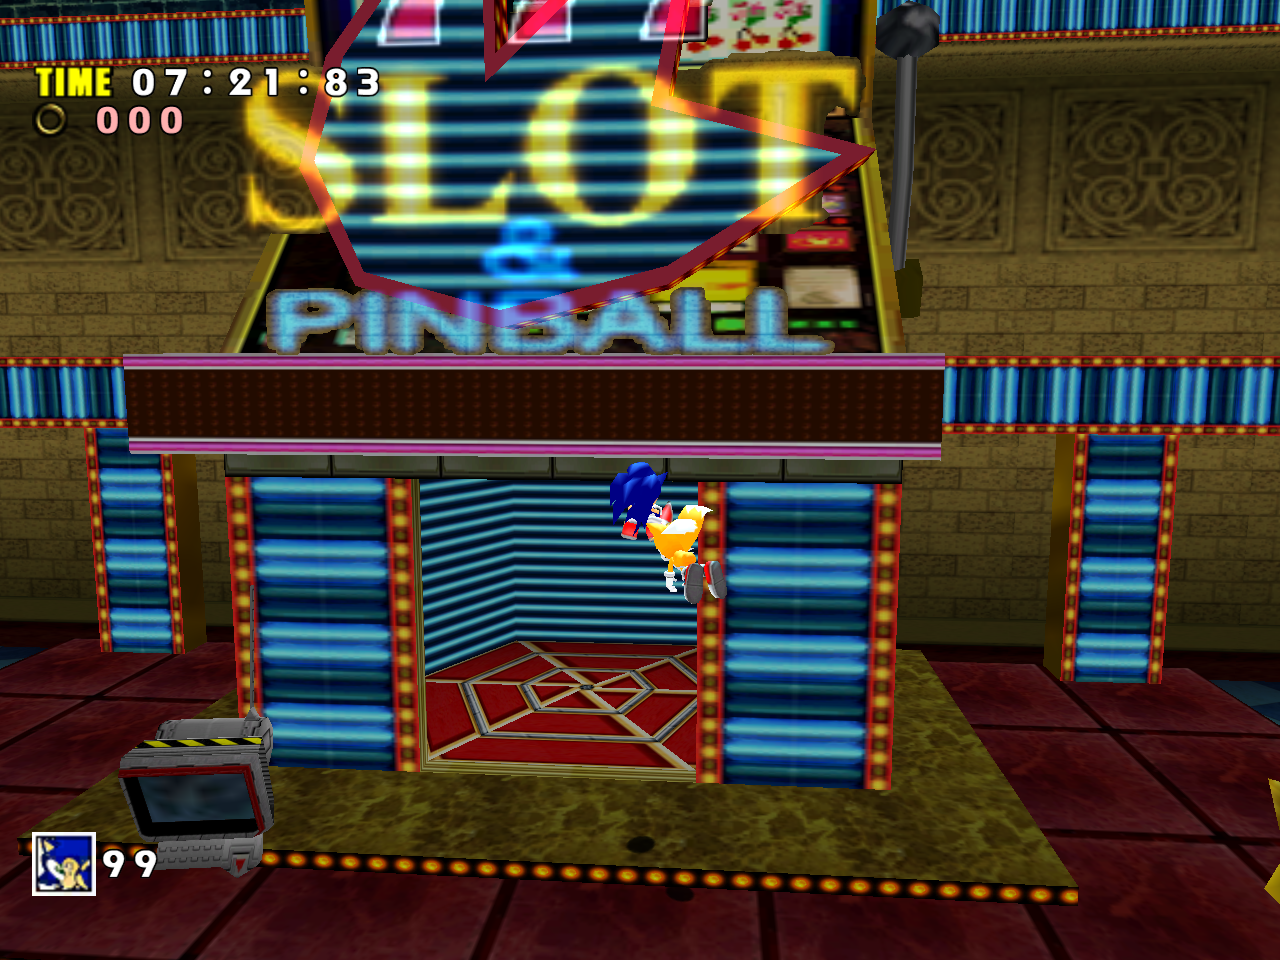
On top of that, the PC version (and all later versions based on it) ignores built-in vertex colors for all objects that are not part of the level model. For example, let’s look at one of the pinball entrances in Casinopolis: it has green vertex colors in the Gamecube version, which are missing in the PC version.
Gamecube
PC
The model in the PC version still has vertex colors, but they aren’t applied because the functions that render object models in the PC version ignore vertex colors. This issue is persistent across all later ports as well, making the Gamecube version the only version that displays those colors properly.
In 2019 this issue was fixed in SADX Mod Loader. While the PC version’s lighting is still terrible, at least we have object vertex colors back now.
Like with texture quality, this creates a situation where the most accessible versions of the game have much worse lighting than the Gamecube version, which was arguably already inferior to the Dreamcast version. Thankfully the Dreamcast version’s lighting engine was almost completely recreated in the 2004 PC port by SonicFreak94. Visit the “Fixing the PC version of SADX” section for more information on how to install the mods and experience the original game’s lighting on PC!
You can compare the lighting in individual Action Stages and Adventure Fields by going to level comparison pages using the top menu.
When Sonic Adventure was redesigned with the “DX” branding, some of its Action Stages and Adventure Fields received new textures. In some cases those textures are higher resolution than the Dreamcast version, in other cases they aren’t. Some offer more variety than the original game, most of them don’t. In some cases the textures are completely new, in other cases the new textures are recycled or slightly edited Dreamcast textures, sometimes in lower resolution (Final Egg) or with reduced color saturation (Ice Cap). You can read more about textures used in a particular level on each level’s page. This page is about texture quality in general. It examines the problems with texture quality in SADX Gamecube and PC and explains the possible reason why the quality reduction happened.
Textures that were reused from the original Dreamcast game (which make up the majority of textures in SADX) were recompressed each time the game was ported to a platform that used a different texture format. The Dreamcast’s native PVR format is rather limited and allows only a couple of texture formats. The Gamecube’s GVR format is more flexible than PVR, and allows several more texture formats, however its pixel formats are different and in a way more limited than PVR. Both formats are lossy (unlike BMP or PNG for example), which means some source information will be lost when a texture is saved in a format like that. The Dreamcast version has pretty sharp textures for an old and limited format like PVR. Normally there would be no issue with converting a PVR texture into some other format, but in SADX there is visible quality loss. Let’s see why.
Here are the most common PVR texture formats used in the Dreamcast version:
RGB565 – an opaque texture where each pixel uses 5 bits for red and blue and 6 bits for green.
ARGB1555 – a transparent texture where each pixel uses 1 bit (on/off) for transparency and 5 bits for red, green and blue channels.
ARGB4444 – a transparent texture that uses 4 bits for red, green, blue and transparency.
VQ and SmallVQ are compressed formats that rely on making a palette of most used colors in the texture and approximating other colors using the palette
The GVR format used in the Gamecube version has different formats. Here are the ones used in the Gamecube version of SADX:
RGB5A3 – can be either an opaque texture (RGB555) or transparent texture (ARGB3444). These are rough equivalents of RGB565 and ARGB4444, but they are lower quality than PVR because they’re missing 1 bit in Green (for RGB555) and 1 bit in Alpha (for ARGB3444). Although there is an RGB565 format for GVR, most textures use RGB5A3 or DXT1 described below.
DXT1 – a variation of the S3TC texture compression algorithm. It is lossy and can perform better or worse than VQ depending on the texture.
When the Dreamcast textures were converted to GVR, the original format was often neglected, and the destination format didn’t accommodate for all the color information that was present in the original texture (for example, instead of 6 bits for green, only 5 were used because an RGB565 texture was converted to RGB5A3/RGB555). Many textures went through DXT1 compression. As a result, some information was lost when the textures were converted, and most textures in the Gamecube version are lower quality. The recompression happened again in the PC version, which switched the textures back to PVRs. Although a few textures were reused from the Dreamcast version (such as those related to menus), many of the already lossy Gamecube textures were converted to PVR, which reduced their quality even further. There is some evidence that texture conversion was done in bulk. On the retail Gamecube disk of Sonic Adventure 2: Battle there is a leftover script that was used to convert the Dreamcast PVM texture archives into Gamecube GVM archives. It’s highly probable that something similar was used for SADX.
It must also be said that there are at least several textures in the Gamecube version of SADX that are higher quality than their Dreamcast counterparts. These textures are sometimes found in levels that were redesigned in SADX. At the moment only six textures in the entire game have been confirmed to have better compression in the Gamecube version. One texture is found in the Mystic Ruins main area (see below), the rest are in the first segment of Final Egg.
(Thanks BlueSpikeball for finding these textures in the Gamecube version!)
Other than these few, the Gamecube version’s texture quality suffers quite significantly. The PC version’s textures are even worse. Depending on the source texture the difference may be barely noticeable, but in many cases it looks like a bad JPEG recompression. It’s especially noticeable with low-resolution textures and gradients. Here are some examples:
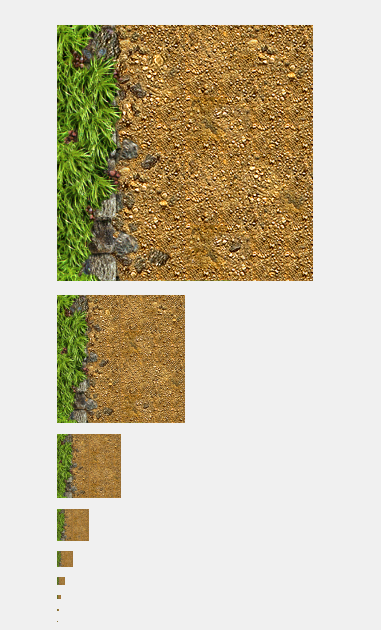
Apart from lower texture quality, the PC version suffers from lack of mipmaps. Mipmaps are smaller copies of a texture used to display it from a distance. Here is a typical texture with mipmaps from the Dreamcast version:
Mipmaps are beneficial because they give the textures a smoother look. The 2004 PC version doesn’t have mipmaps, which makes the game look significantly worse because the distant textures are reduced to pixelated garbage. It’s especially noticeable in motion with a lot of flickering. Thankfully the Mod Loader has a built-in feature that generates mipmaps for all textures, and before the Mod Loader there were texture edits for the PC version that added mipmaps. These fixes are essential if you’re playing the 2004 PC version with original textures.
The Steam/nextgen console ports don’t have built-in mipmaps either, instead they generate mipmaps on the fly like the Mod Loader. The textures themselves are the same between these ports and the 2004 PC port. While those ports don’t have the flickering caused by lack of mipmaps, all other points regarding texture quality mentioned in this post apply to the Steam/nextgen console versions as well.
Here are some comparisons with mipmaps on/off in the 2004 PC version:
No mipmaps
Mipmaps
No mipmaps + Anisotropic 16x
Mipmaps + Anisotropic 16x
Although anisotropic filtering improves the look of distant textures, it can’t completely remove distant flickering that you often see in motion. The only real solution for that is to use mipmapped textures. But even when not in motion, the mipmapped textures look a little smoother. For comparison, here is what the “maxed out” texture quality looks like.
Anisotropic filtering 16x, Dreamcast textures (SADX Mod Loader + DC Conversion)
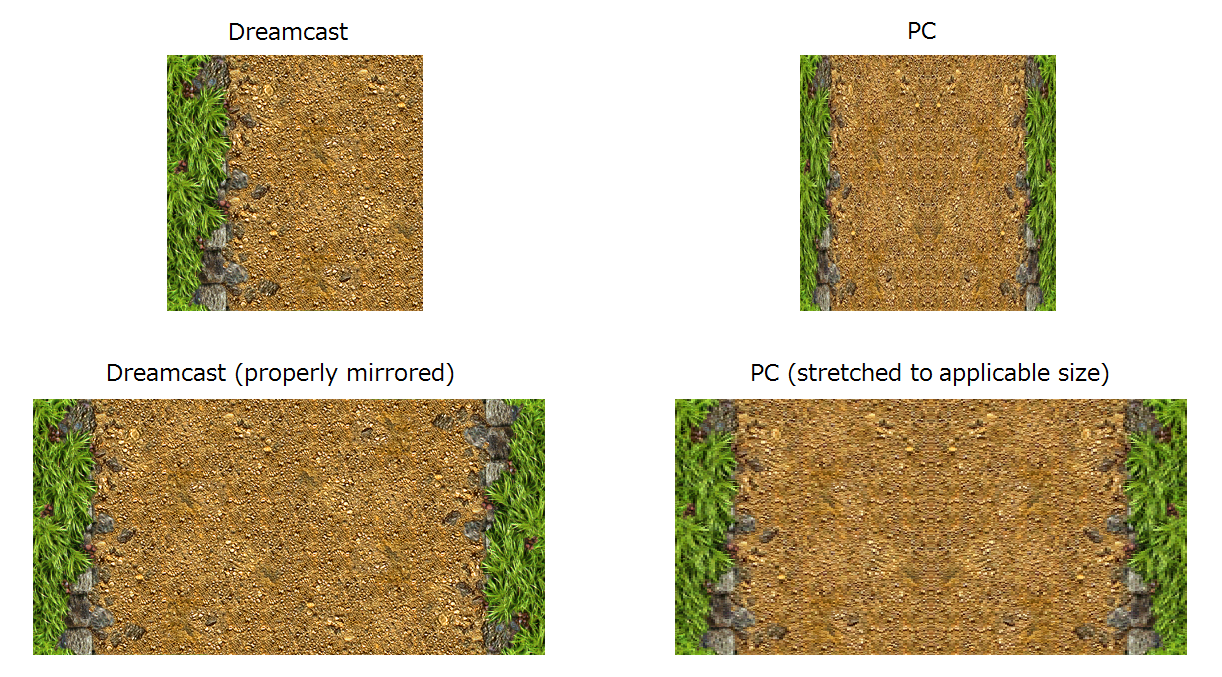
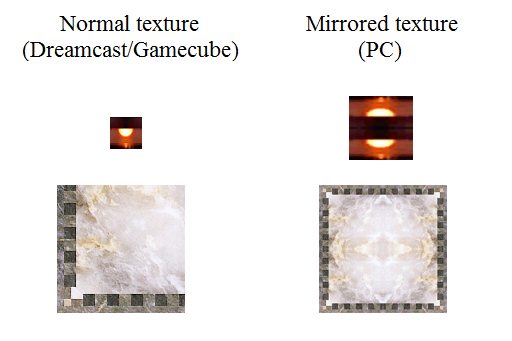
Another issue with the PC/Steam/nextgen console ports is texture mirroring. Although the game engine supports mirroring natively, for some reason the developers decided to mirror some of the textures manually and adjust UVs on some models to accommodate the change. This wouldn’t have caused problems on its own, but the mirrored texture is often squeezed into the same resolution as the original unmirrored texture, which means the resolution of the final texture that is applied to the model is reduced. In addition, the mirroring in the PC version is usually done by flipping the texture horizontally or vertically, while it would’ve looked a lot better if the texture was rotated. Here’s an example illustrating both problems:
Here’s another example of mirrored textures from Twinkle Park. Although the light texture’s horizontal resolution was increased (or the texture was just stretched), the trap door texture is quarter the size (half the resolution) of the original Dreamcast texture:
In addition, the developers adjusted UVs on some models to use a mirrored texture, but didn’t mirror the texture, and vice versa. There are several noticeable problems with texture mirroring in different levels in the PC version. You can read more on that in posts dedicated to each level. Twinkle Park and Lost World are good examples.
It may be hard to discuss artistic changes in SADX because everyone’s aesthetic preferences are different. Someone may prefer the more “realistic” look of the new textures introduced in SADX. Those who prefer the original Dreamcast look may think those new textures look lifeless and boring (in some cases they are literally the same textures but desaturated), but to each their own. However, when it comes to textures that weren’t redesigned, the Dreamcast version has the highest quality textures, and each subsequent port has more and more problems coming from recompression.
This is an unfortunate situation because the Dreamcast version is now the least accessible release, while the PC and nextgen console ports, which are the most accessible ways to play the game right now, have got the worst quality textures out of all versions of the game. Combined with broken lighting and a plethora of other problems in the ports, people who play them first without knowing what the Dreamcast version was like may get a wrong impression of the game. This could be part of the reason Sonic Adventure is no longer remembered as fondly as it used to be. The Steam and nextgen console ports in particular have done a lot of damage to the reputation of the Dreamcast classic.
Thanks to the efforts of the SADX modding community, the textures in the 2004 PC version are no longer an issue. The developers of SADX Mod Loader have added a texture pack feature, which allows to load custom textures in lossless formats like PNG for any part of the game. The Dreamcast Conversion mod restores original PVR textures for the whole game, and the HD GUI mod adds custom high resolution textures for HUD, menus and other 2D items. There’s also a Gamecube Project mod if you want Gamecube textures. To read on how to install mods, head over to the “Fixing the PC version of SADX” section of this blog.
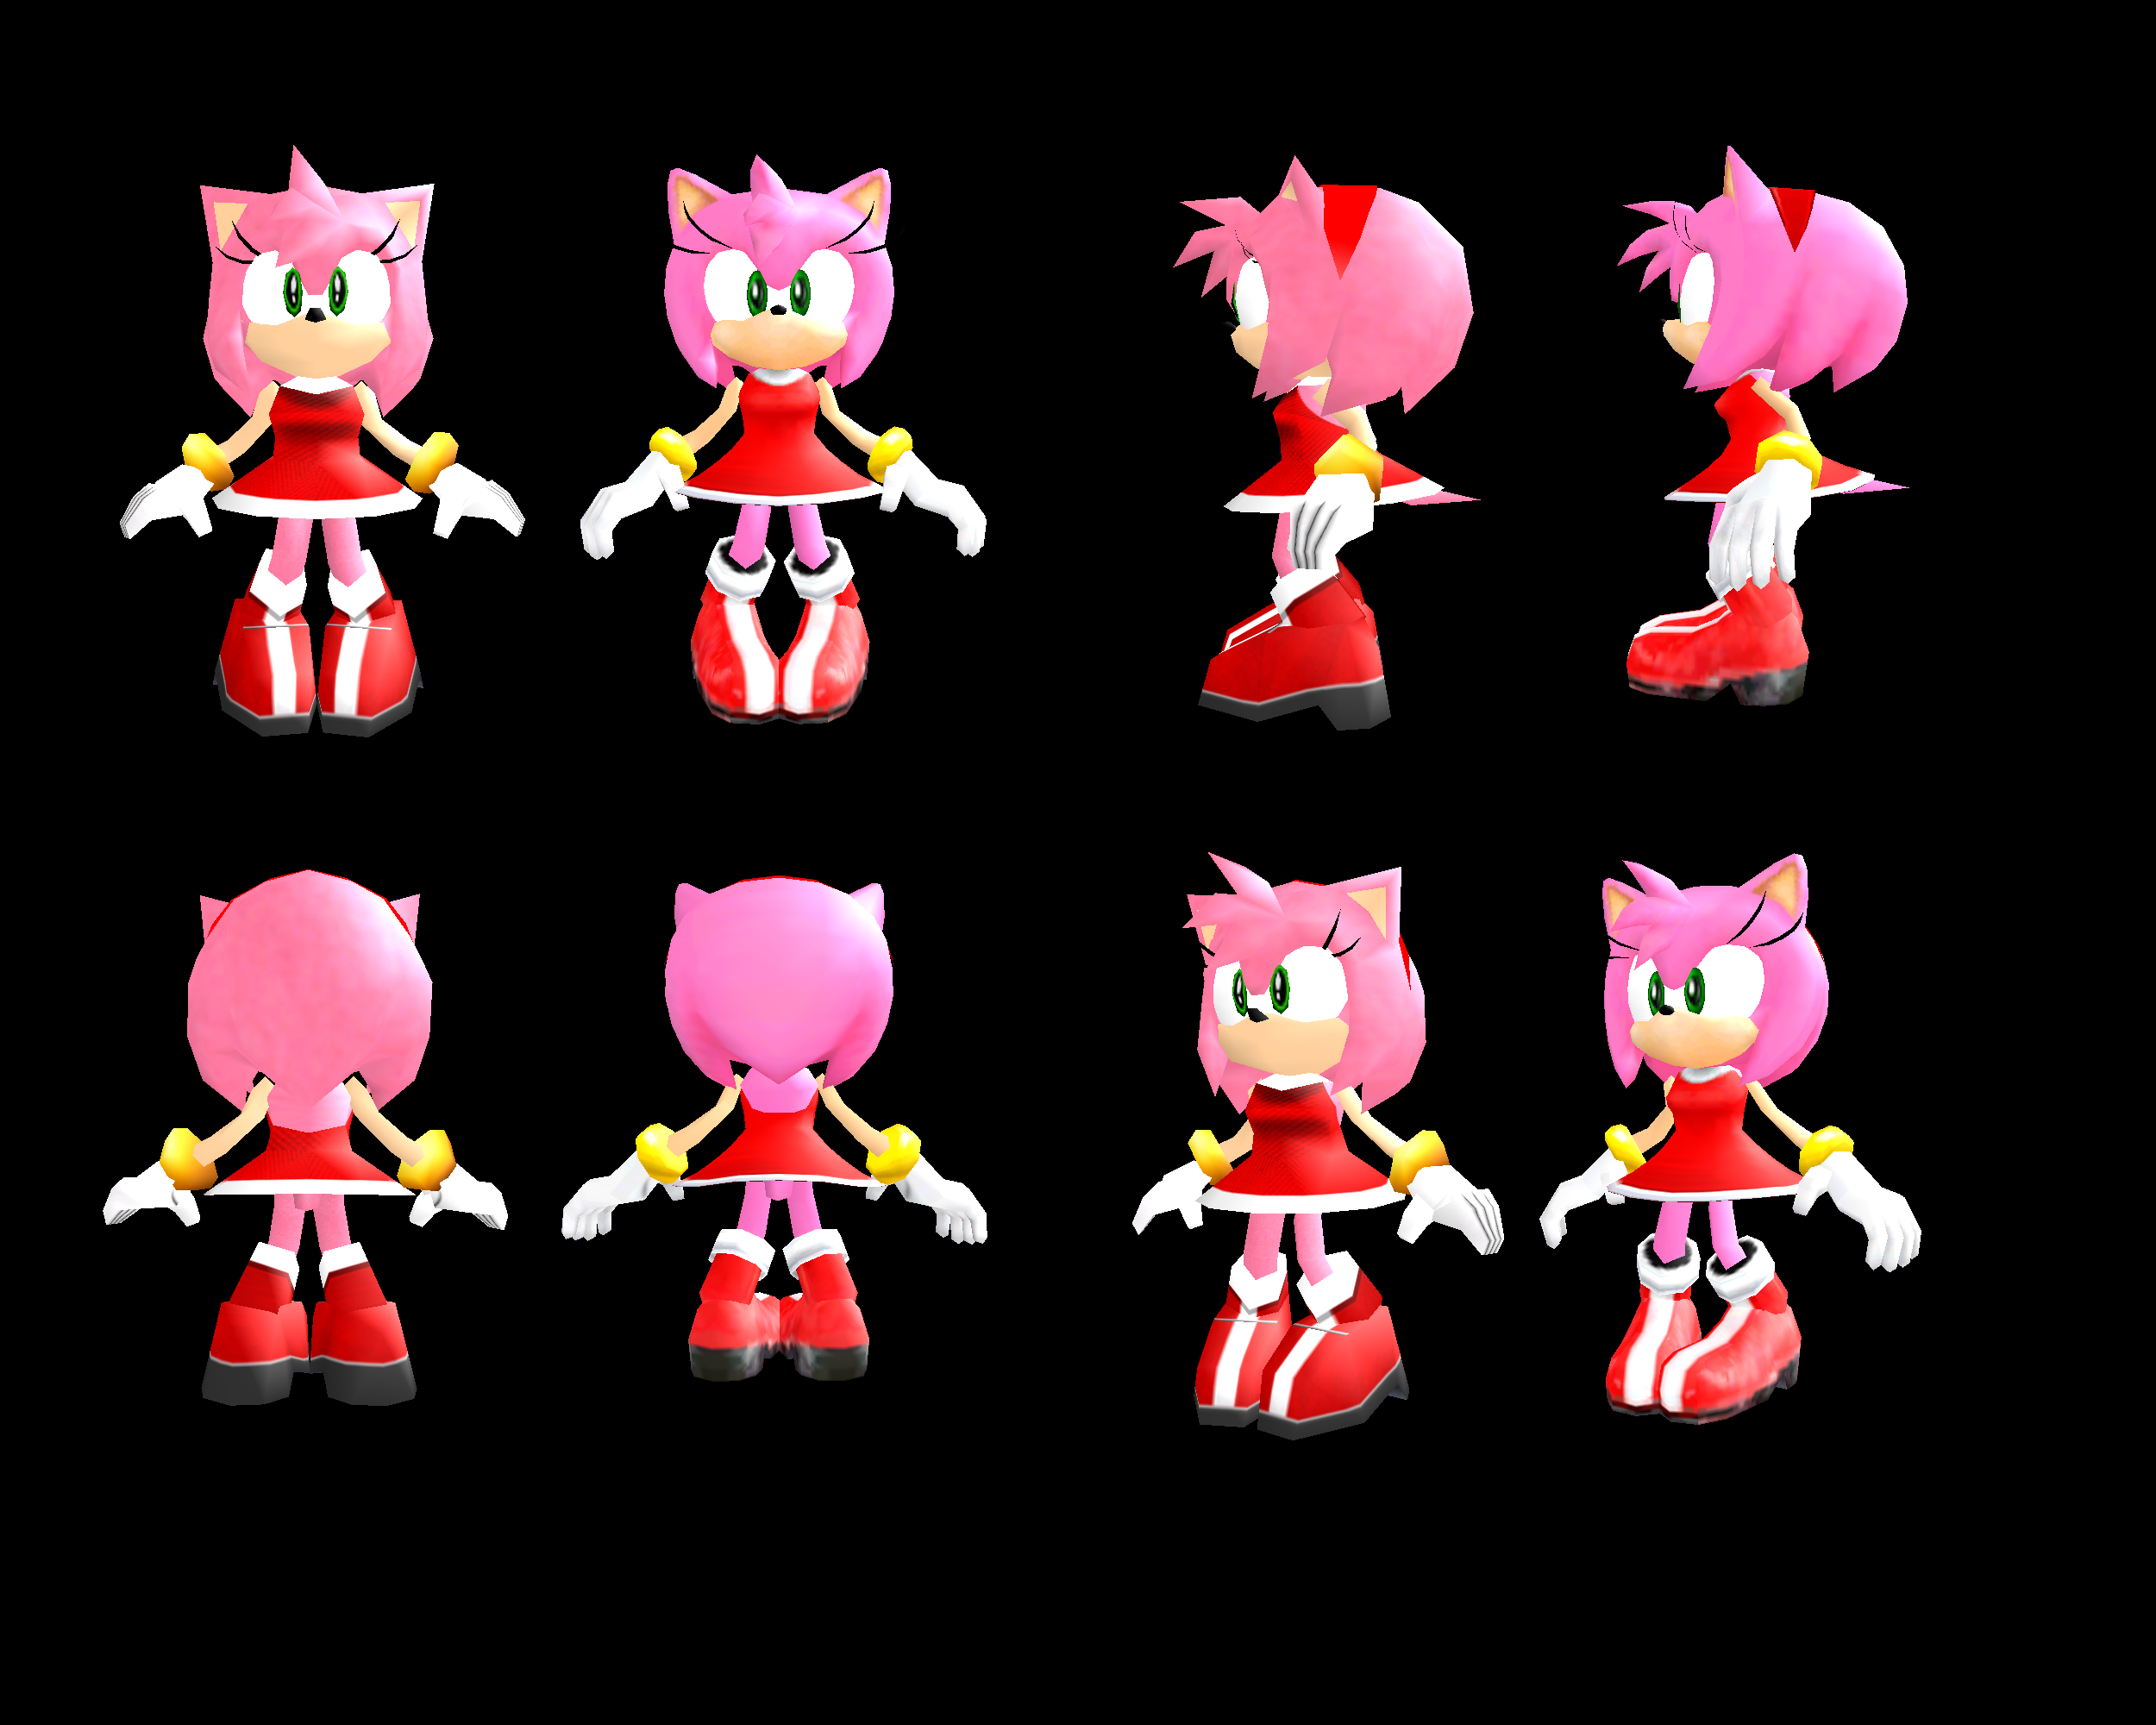
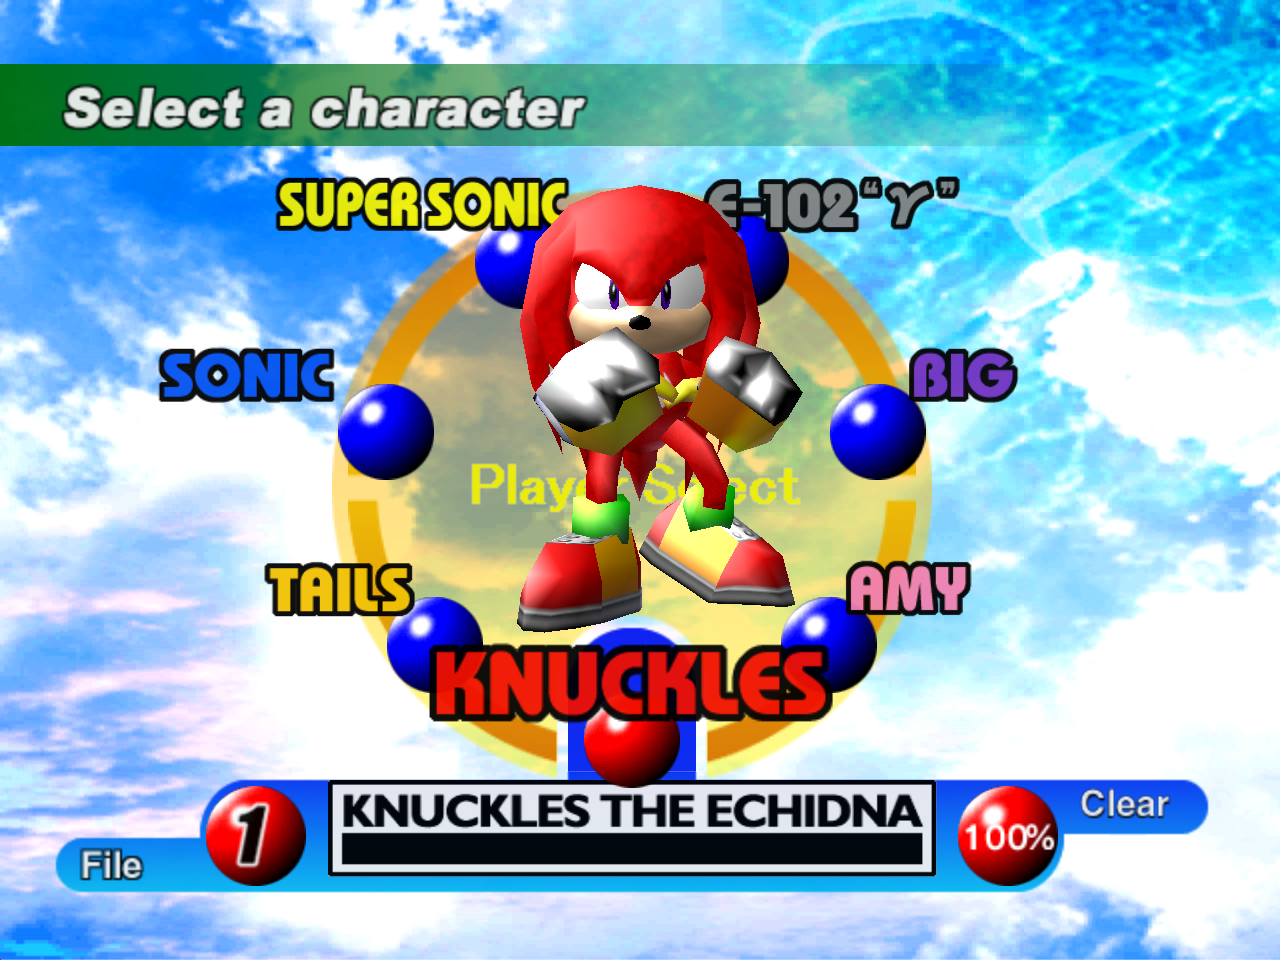
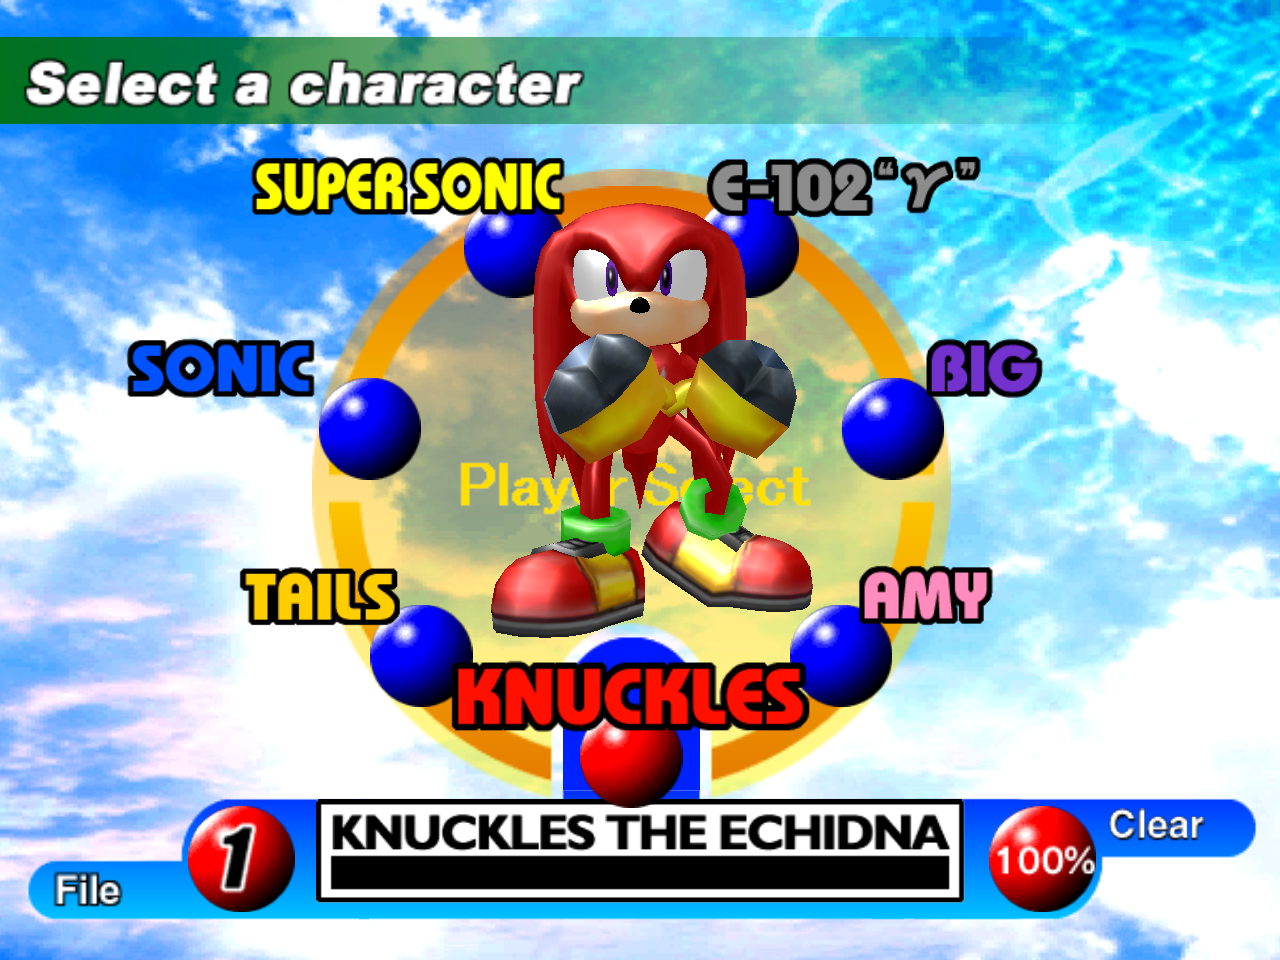
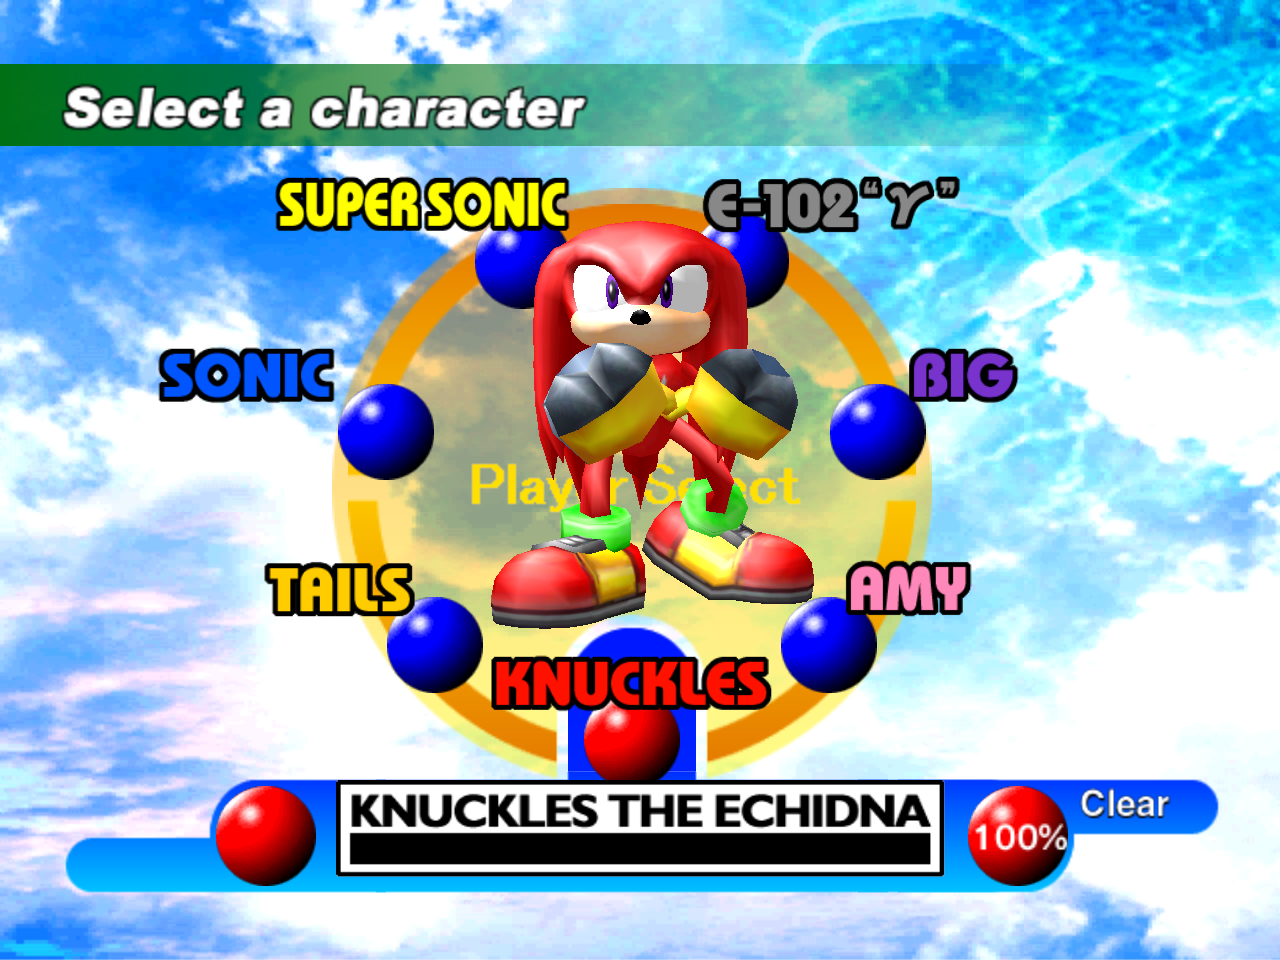
Character model updates are sone of the most noticeable differences in SADX. They’re one of the aspects that can be considered an improvement over the original game as they have more polygons resulting in a more detailed look. It’s particularly noticeable if you look at characters’ hands. Dreamcast character models have “mittens” like many other games had at the time, while SADX models feature hands with clearly separate fingers.
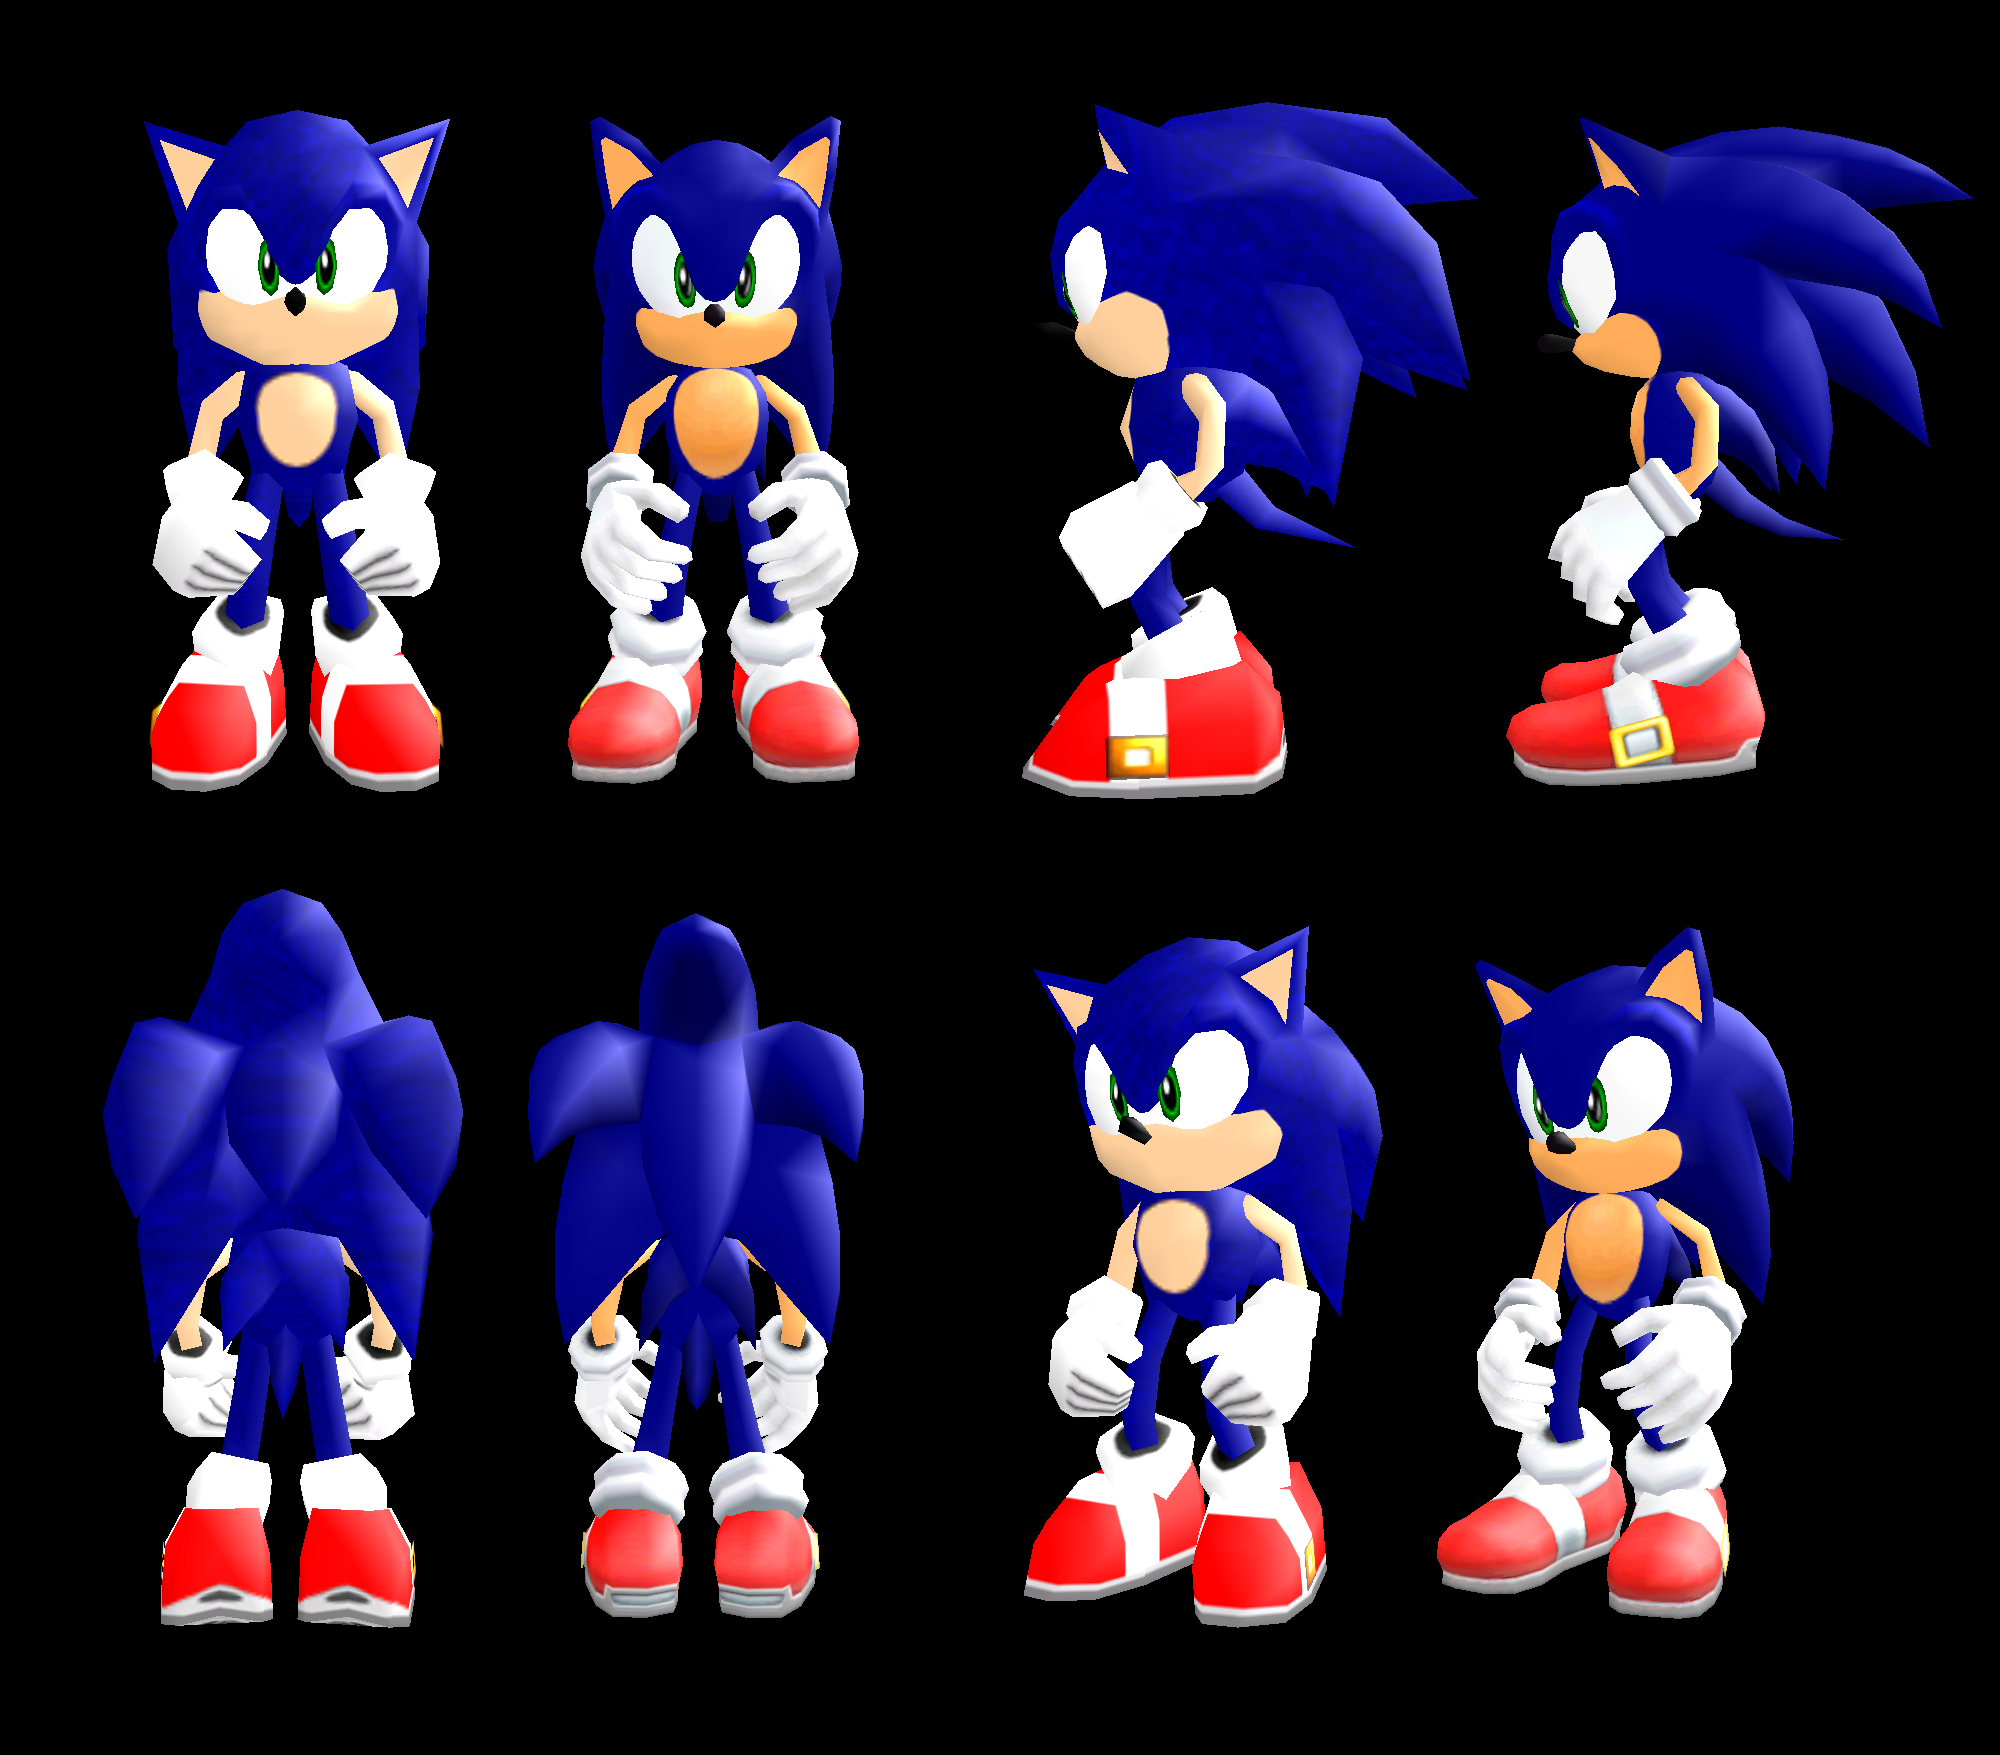
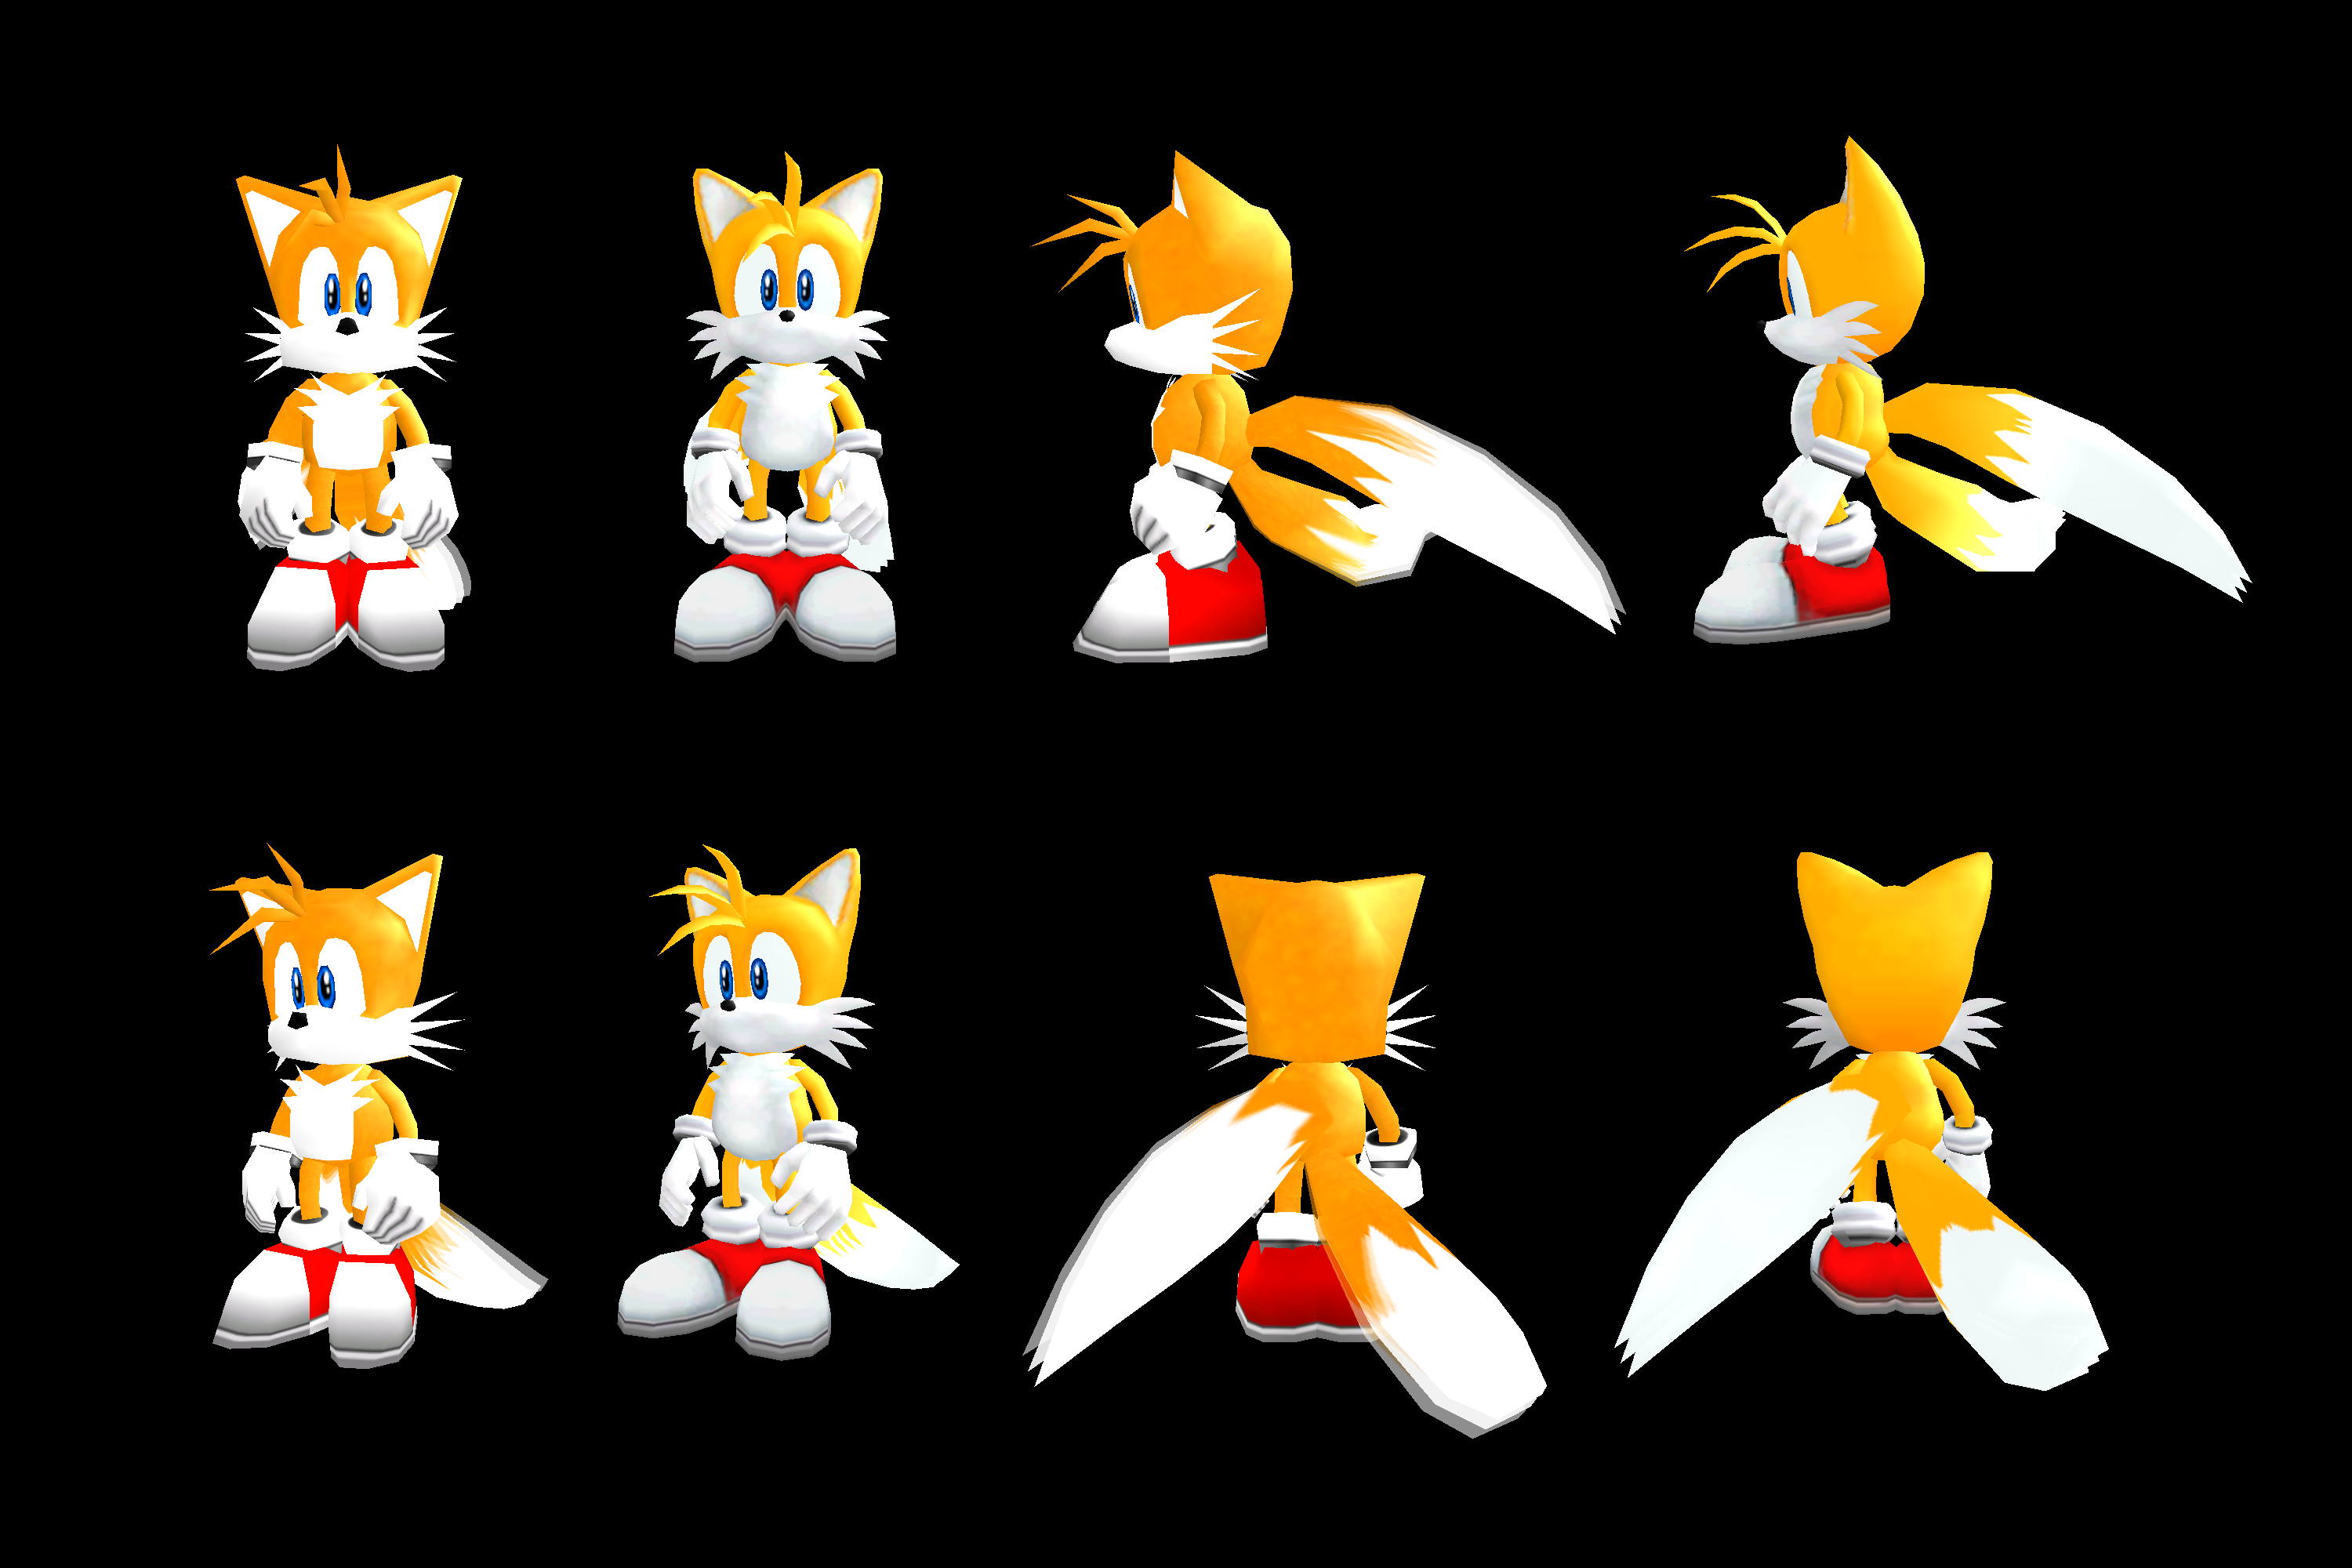
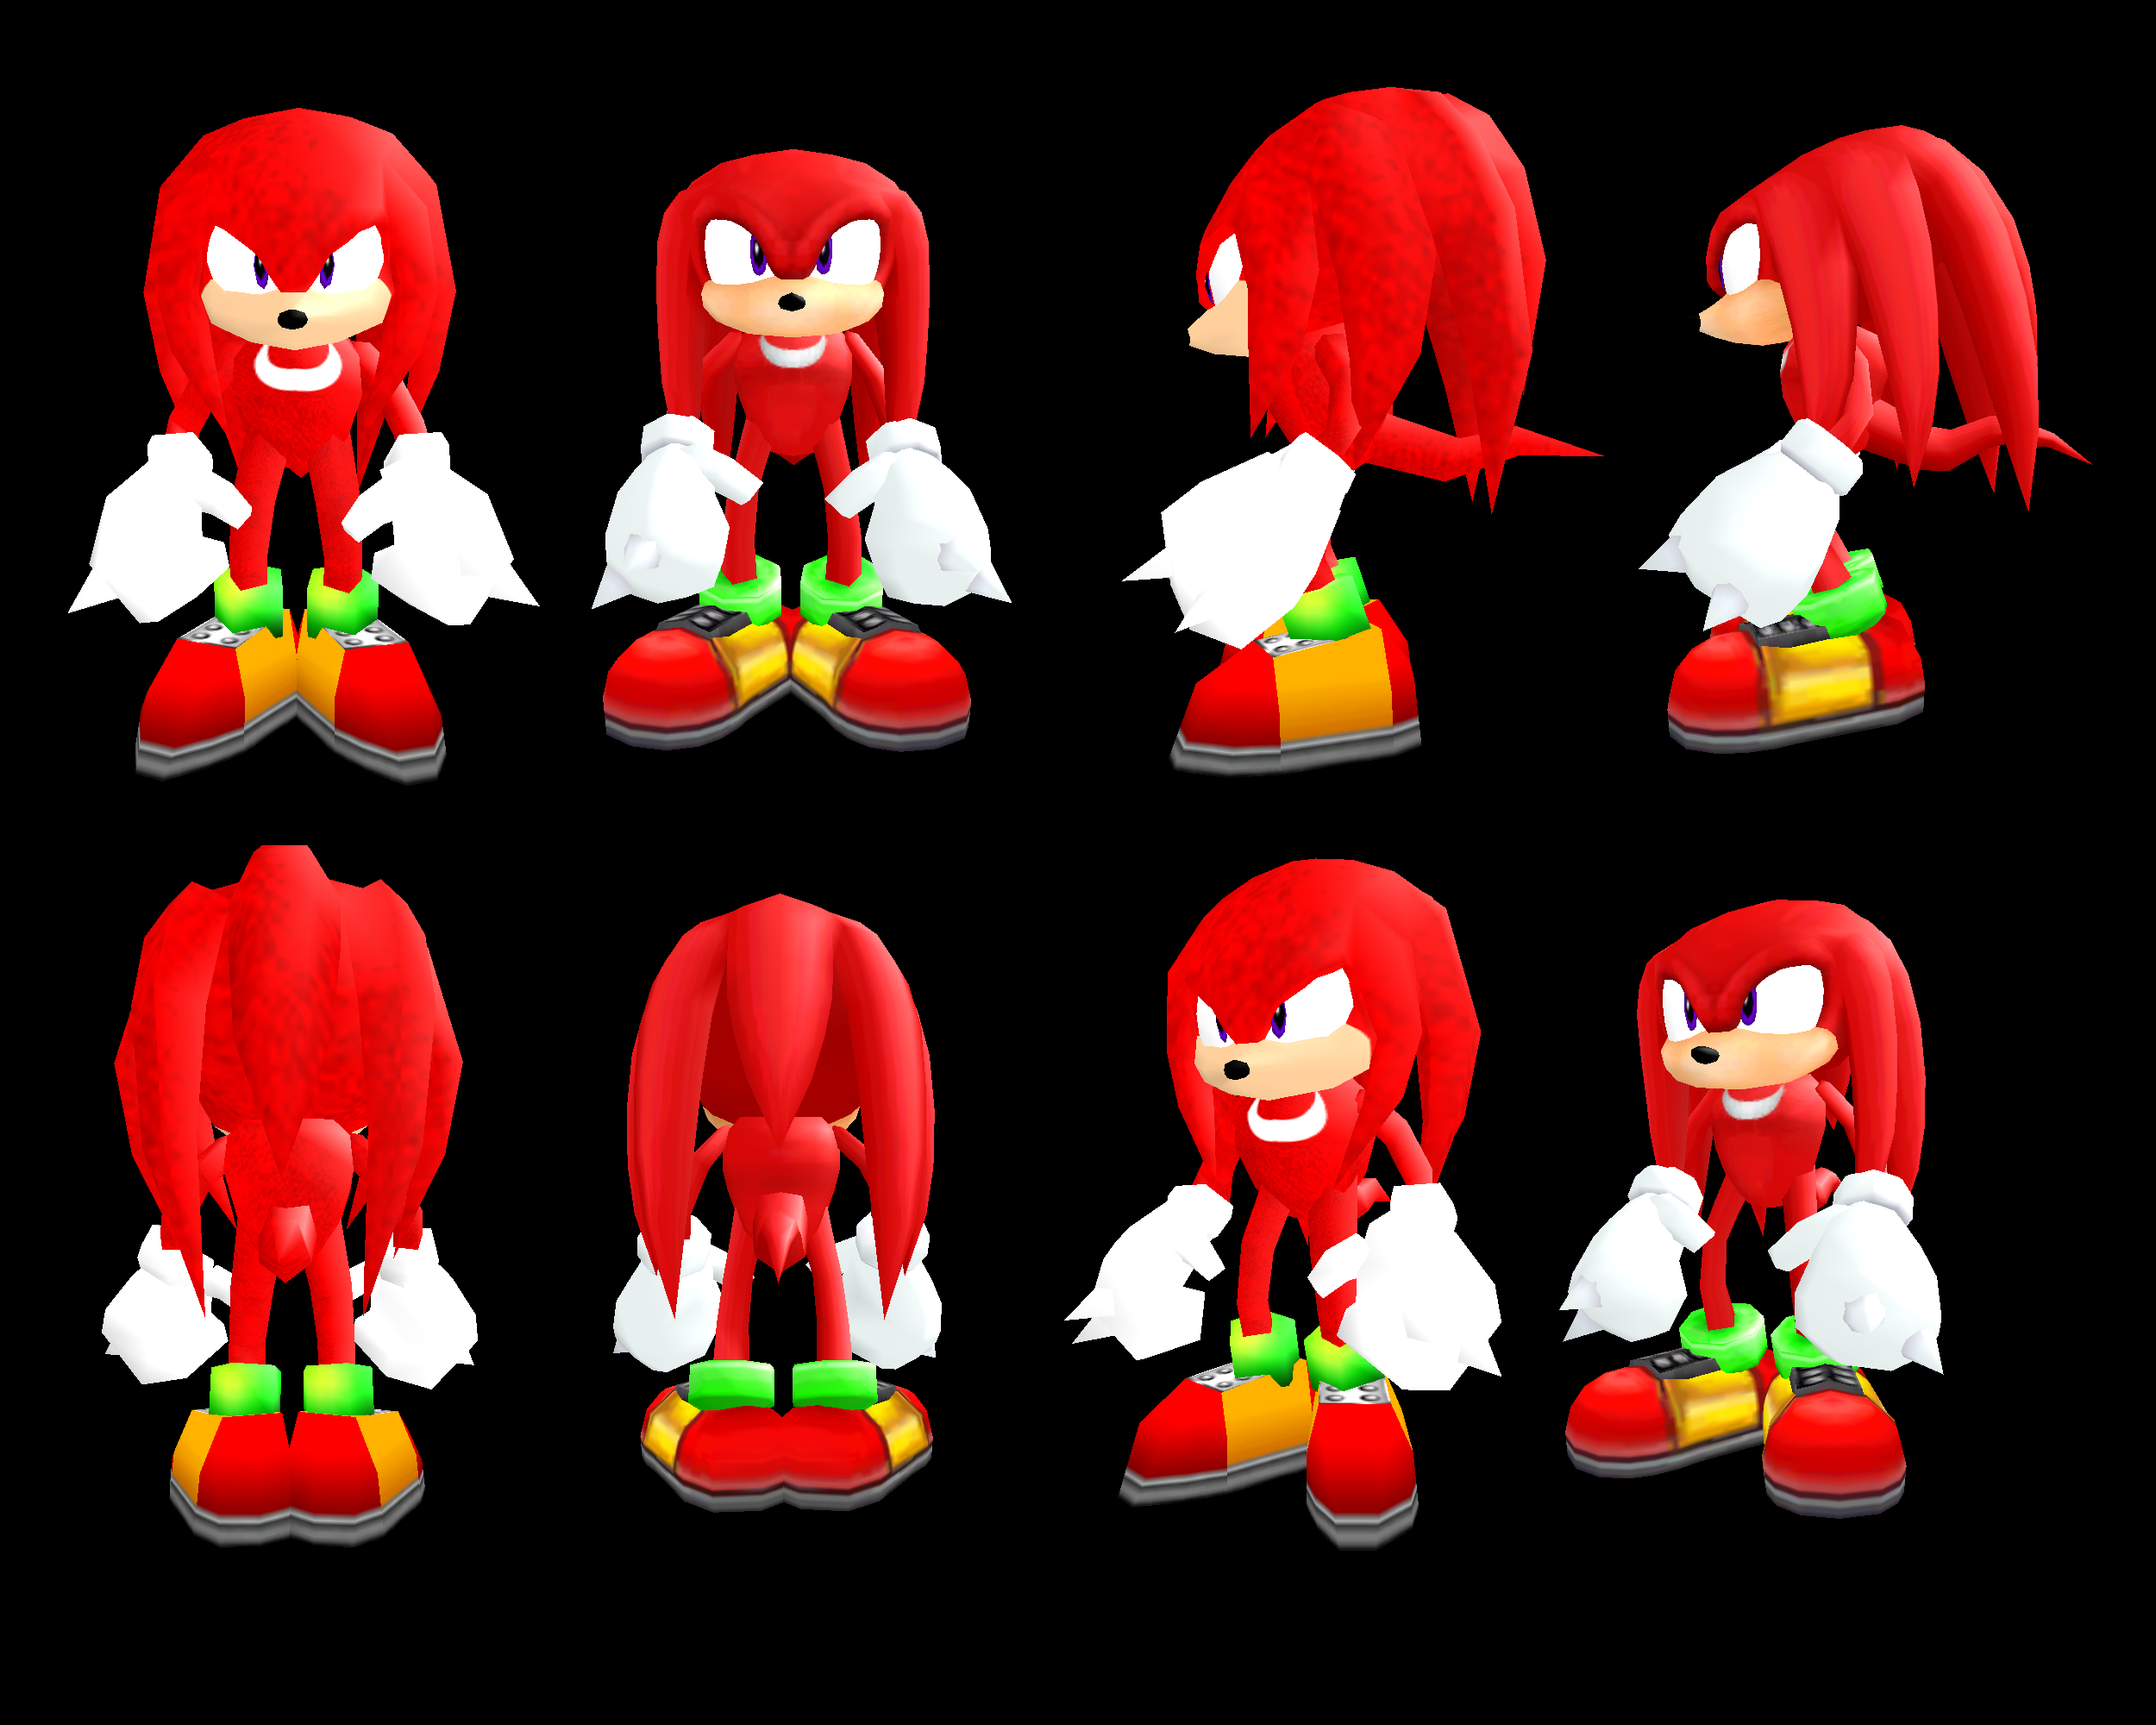
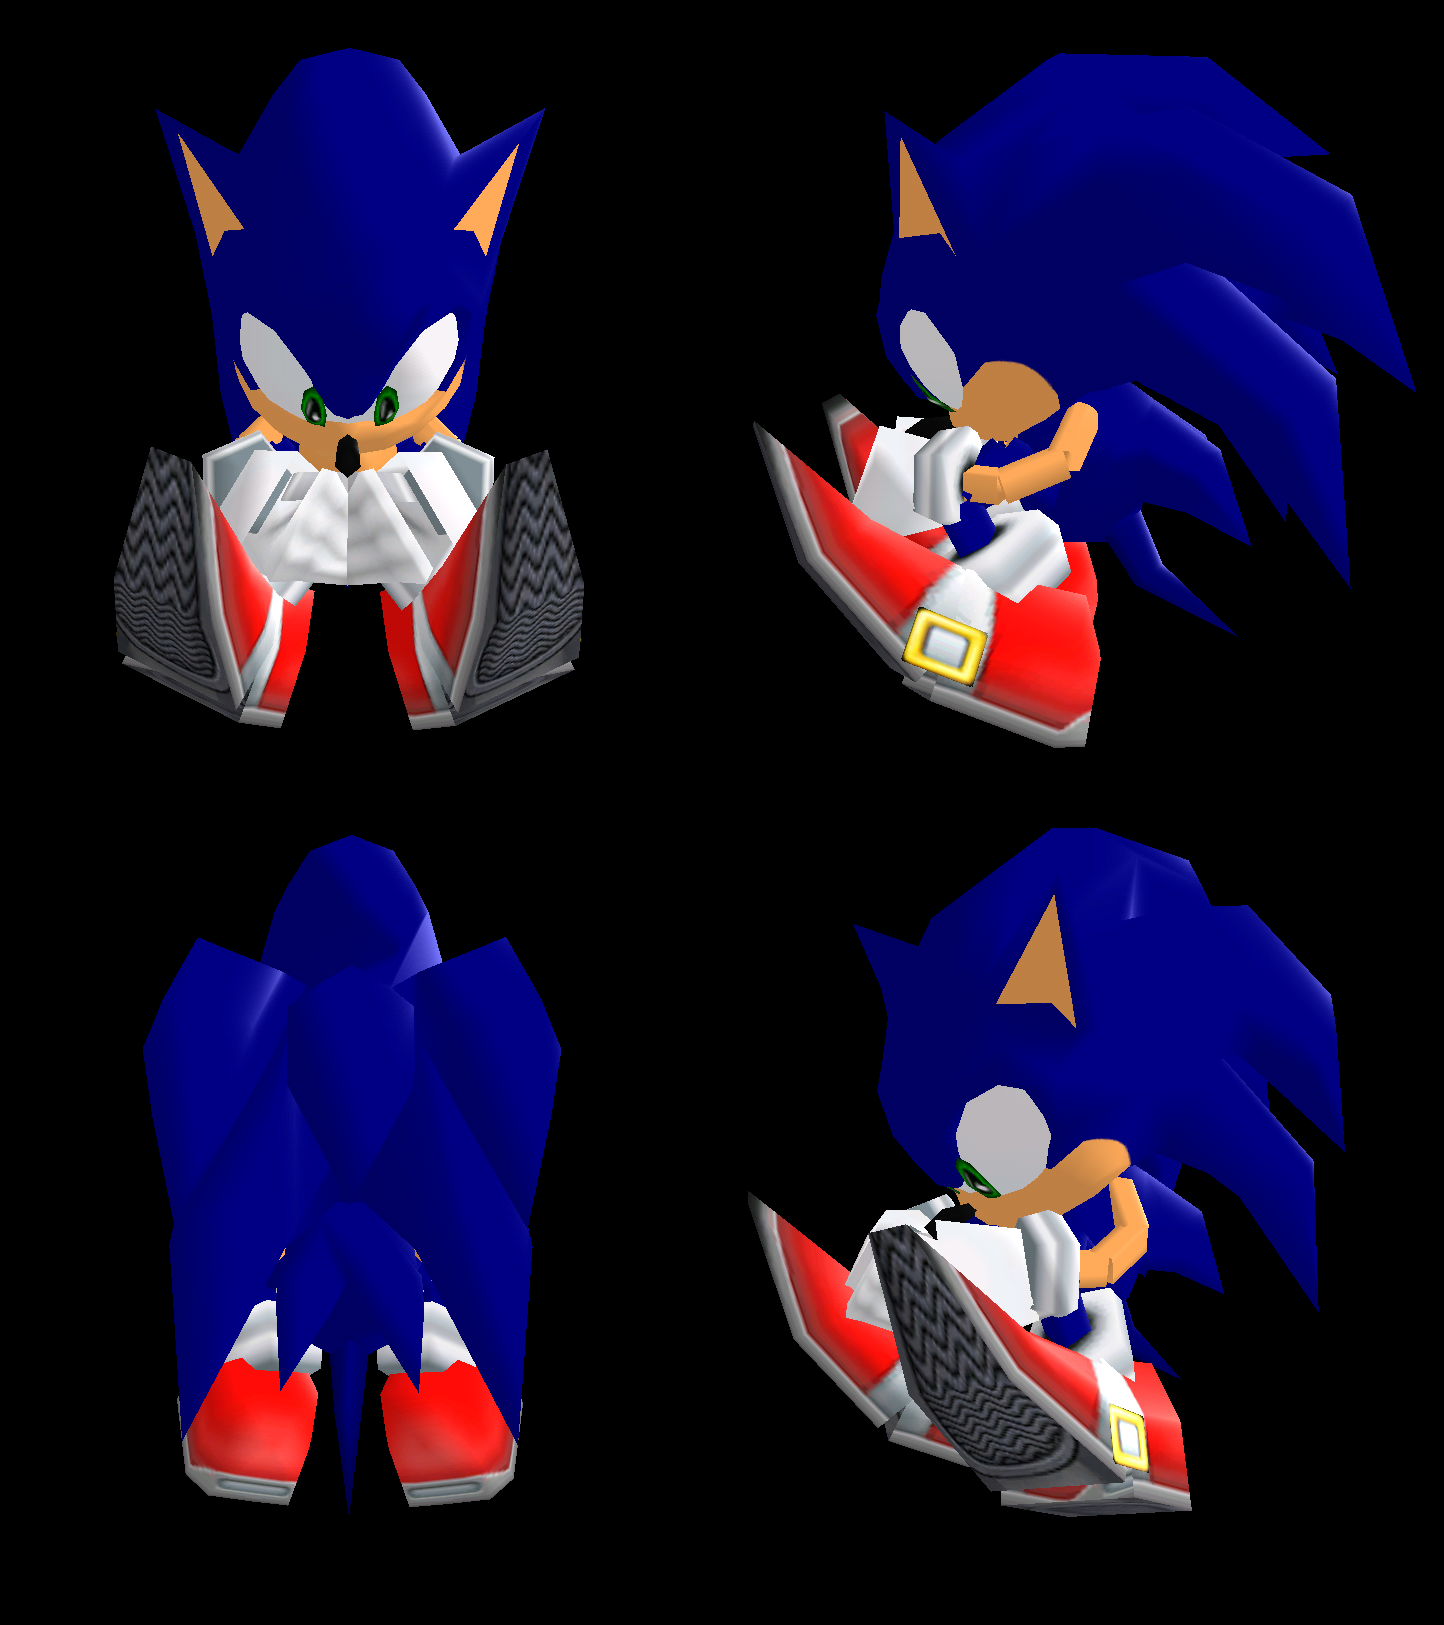
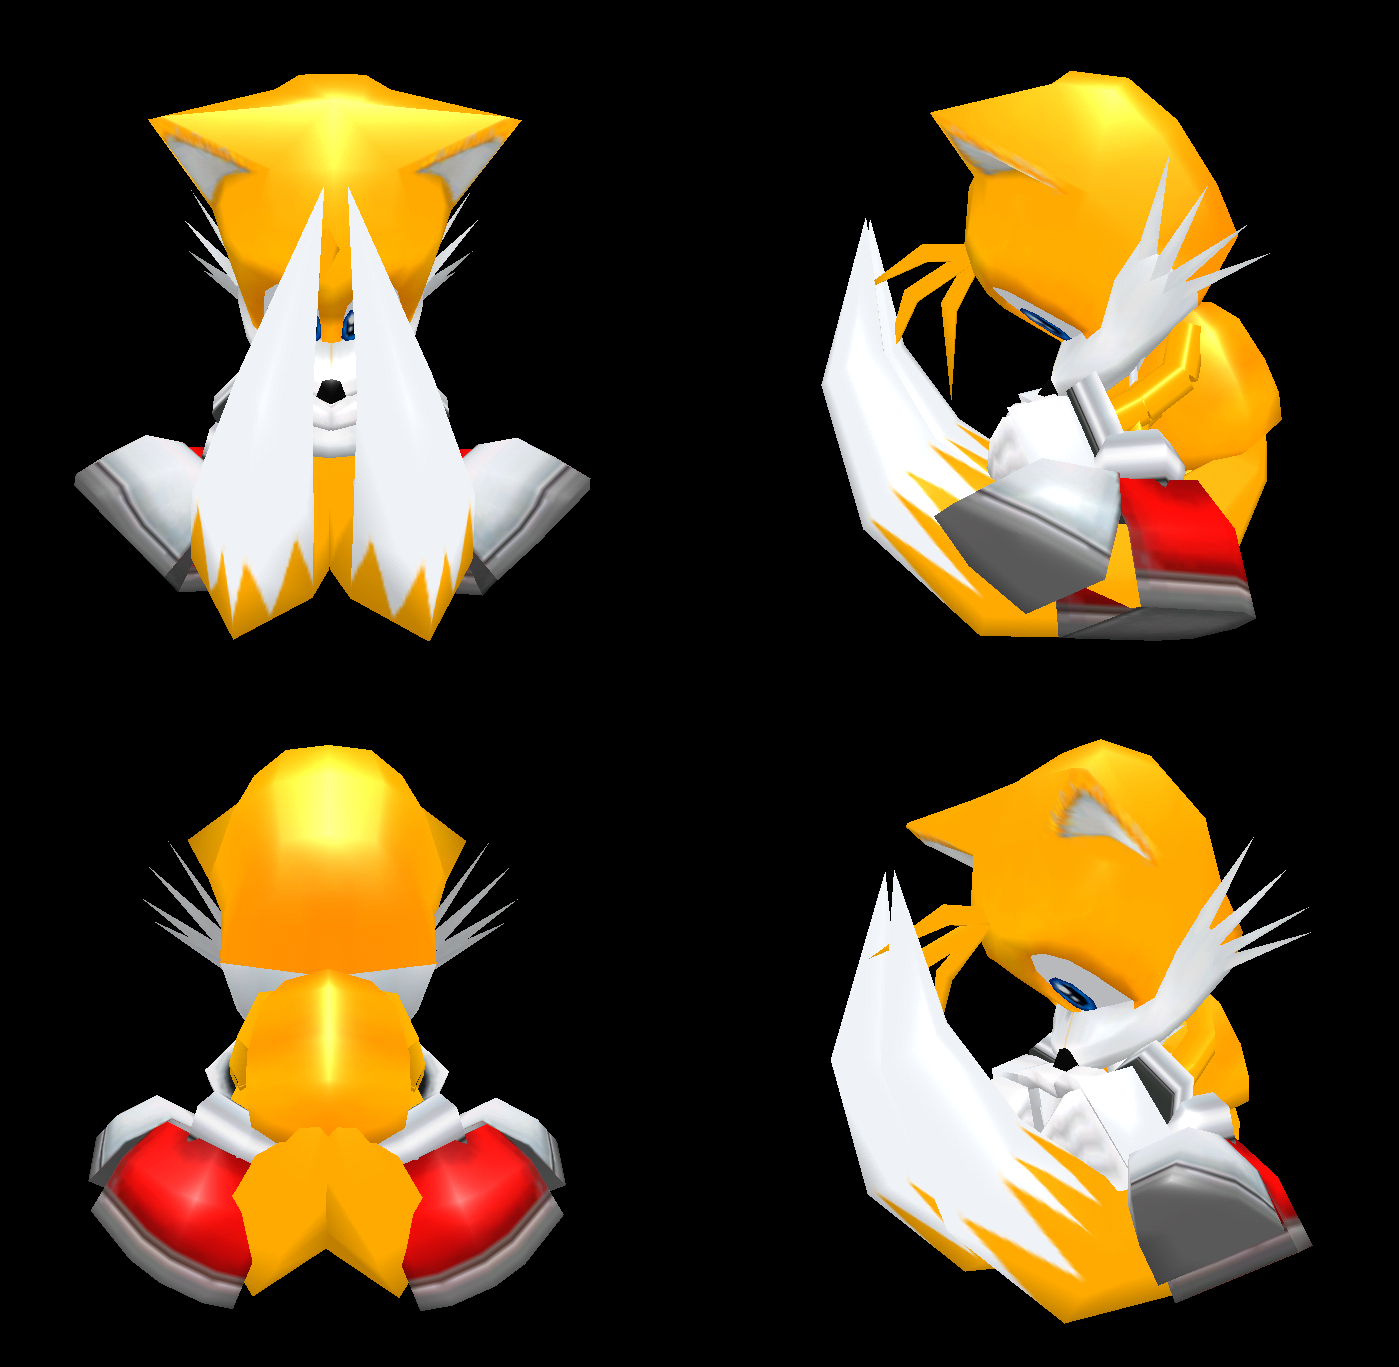
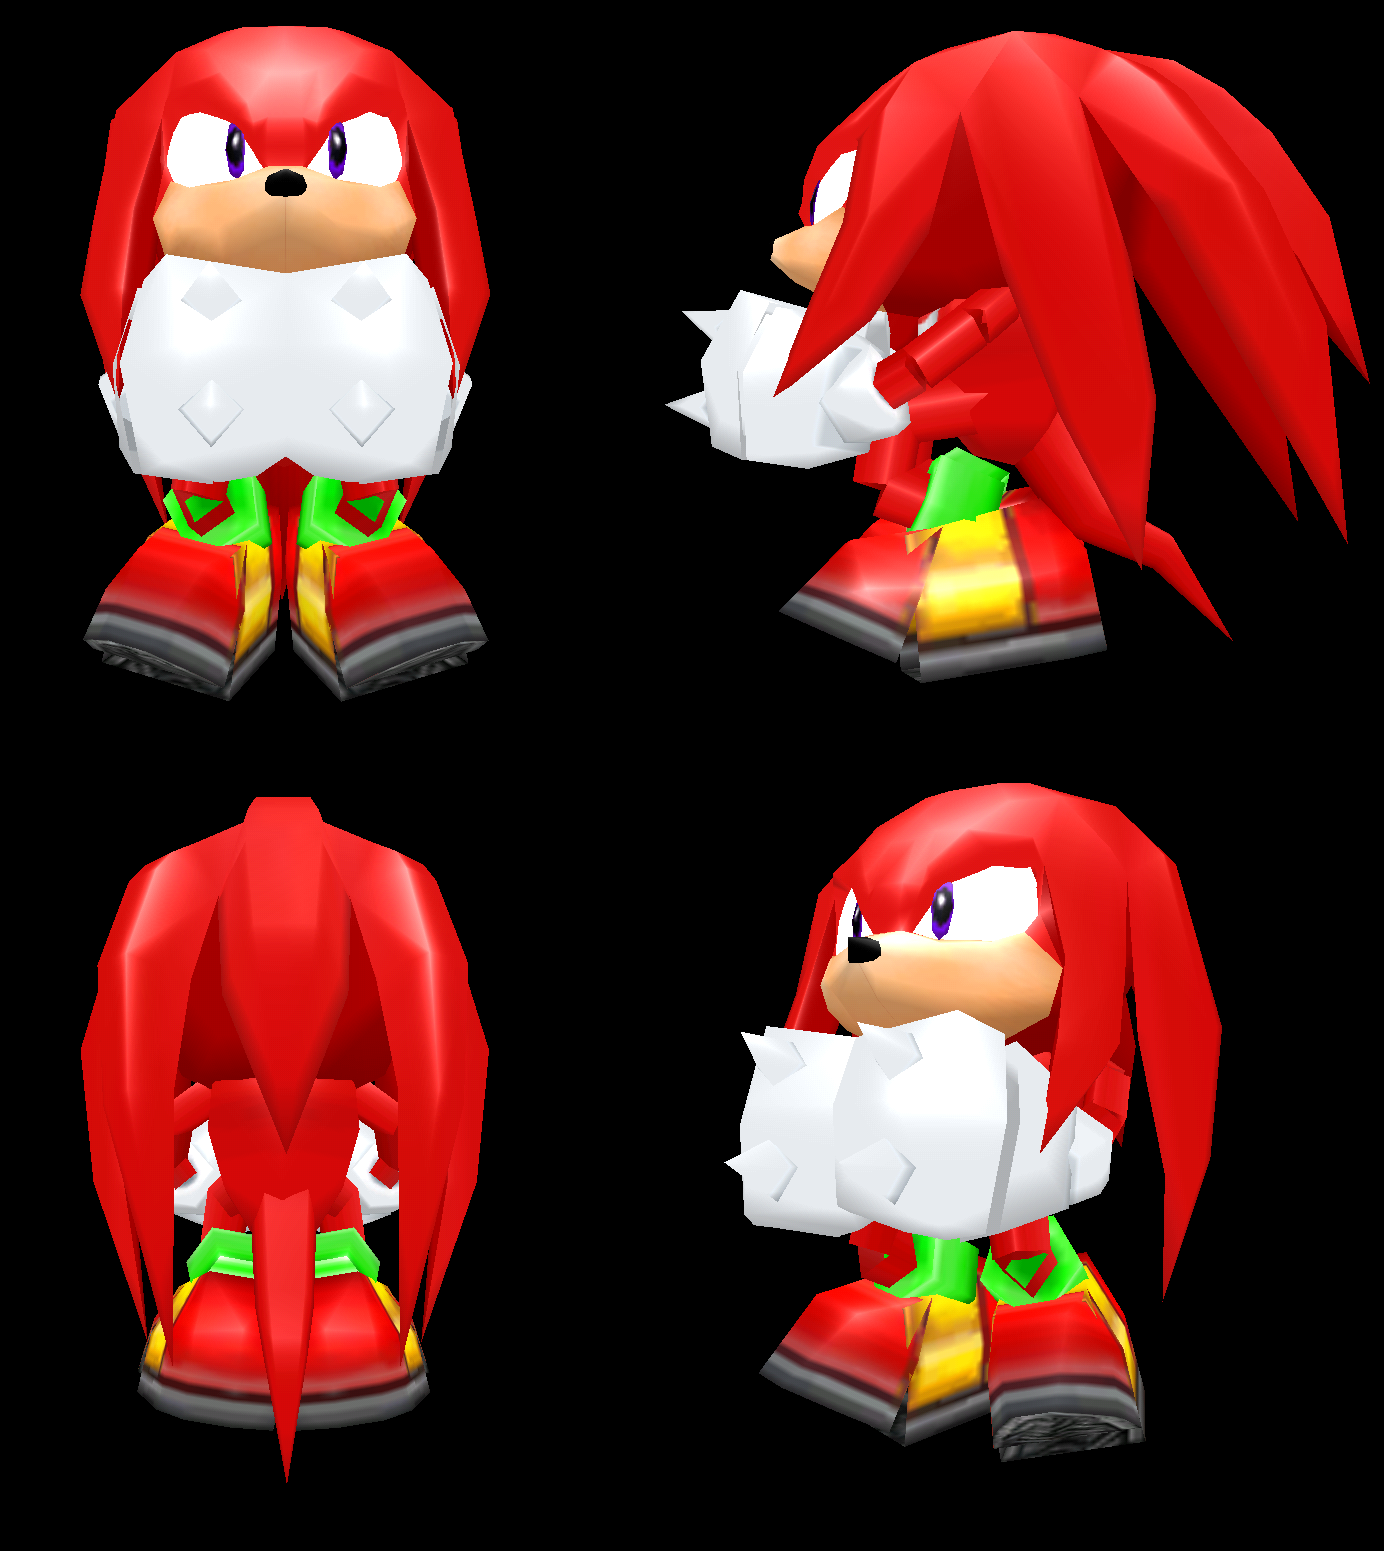
From a purely technical standpoint there’s no argument about it: more polygons = more detail = better. But the SADX models aren’t just improved SA1 models with a better polygon count. They are also different in proportions, they use different textures and are missing several effects from the original. But first, let’s have a look at the following comparison just to see how they differ on a basic level. This comparison was done using Dreamcast and PC versions with several hacks, where we set up a test environment to ensure the models are placed in the exact same spot and have the same lighting:
Sonic
Tails
Knuckles
Amy
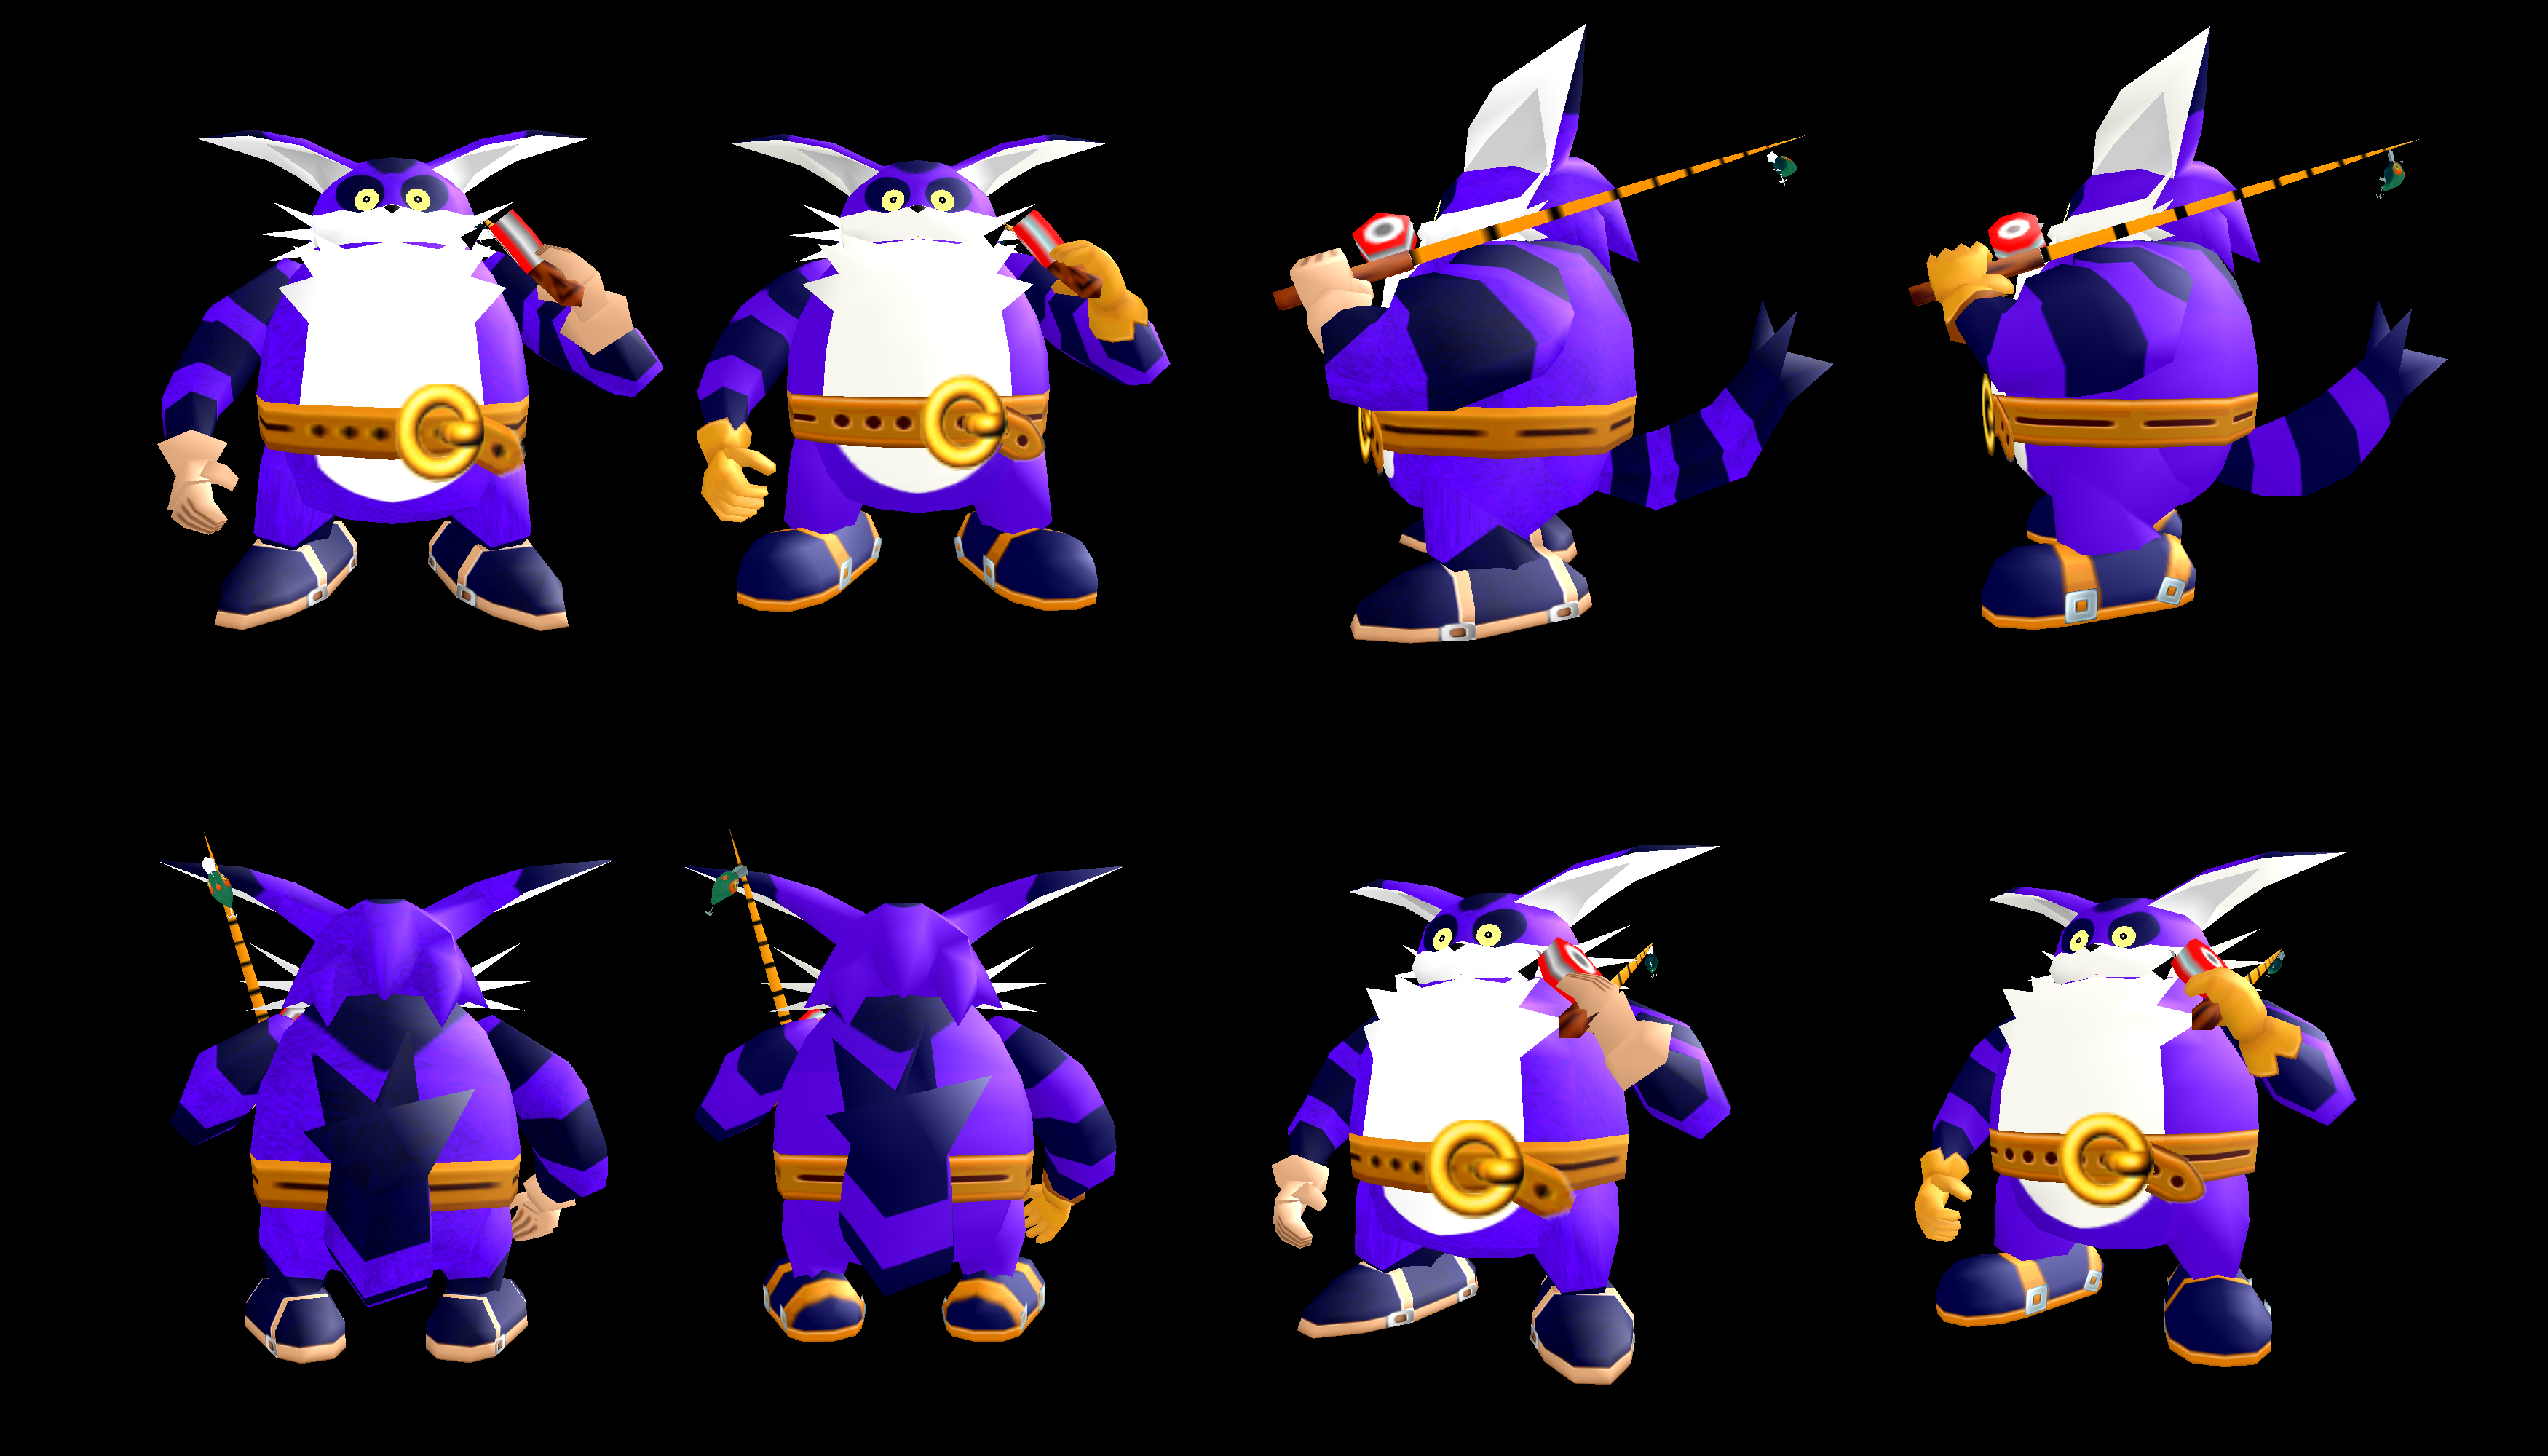
Big
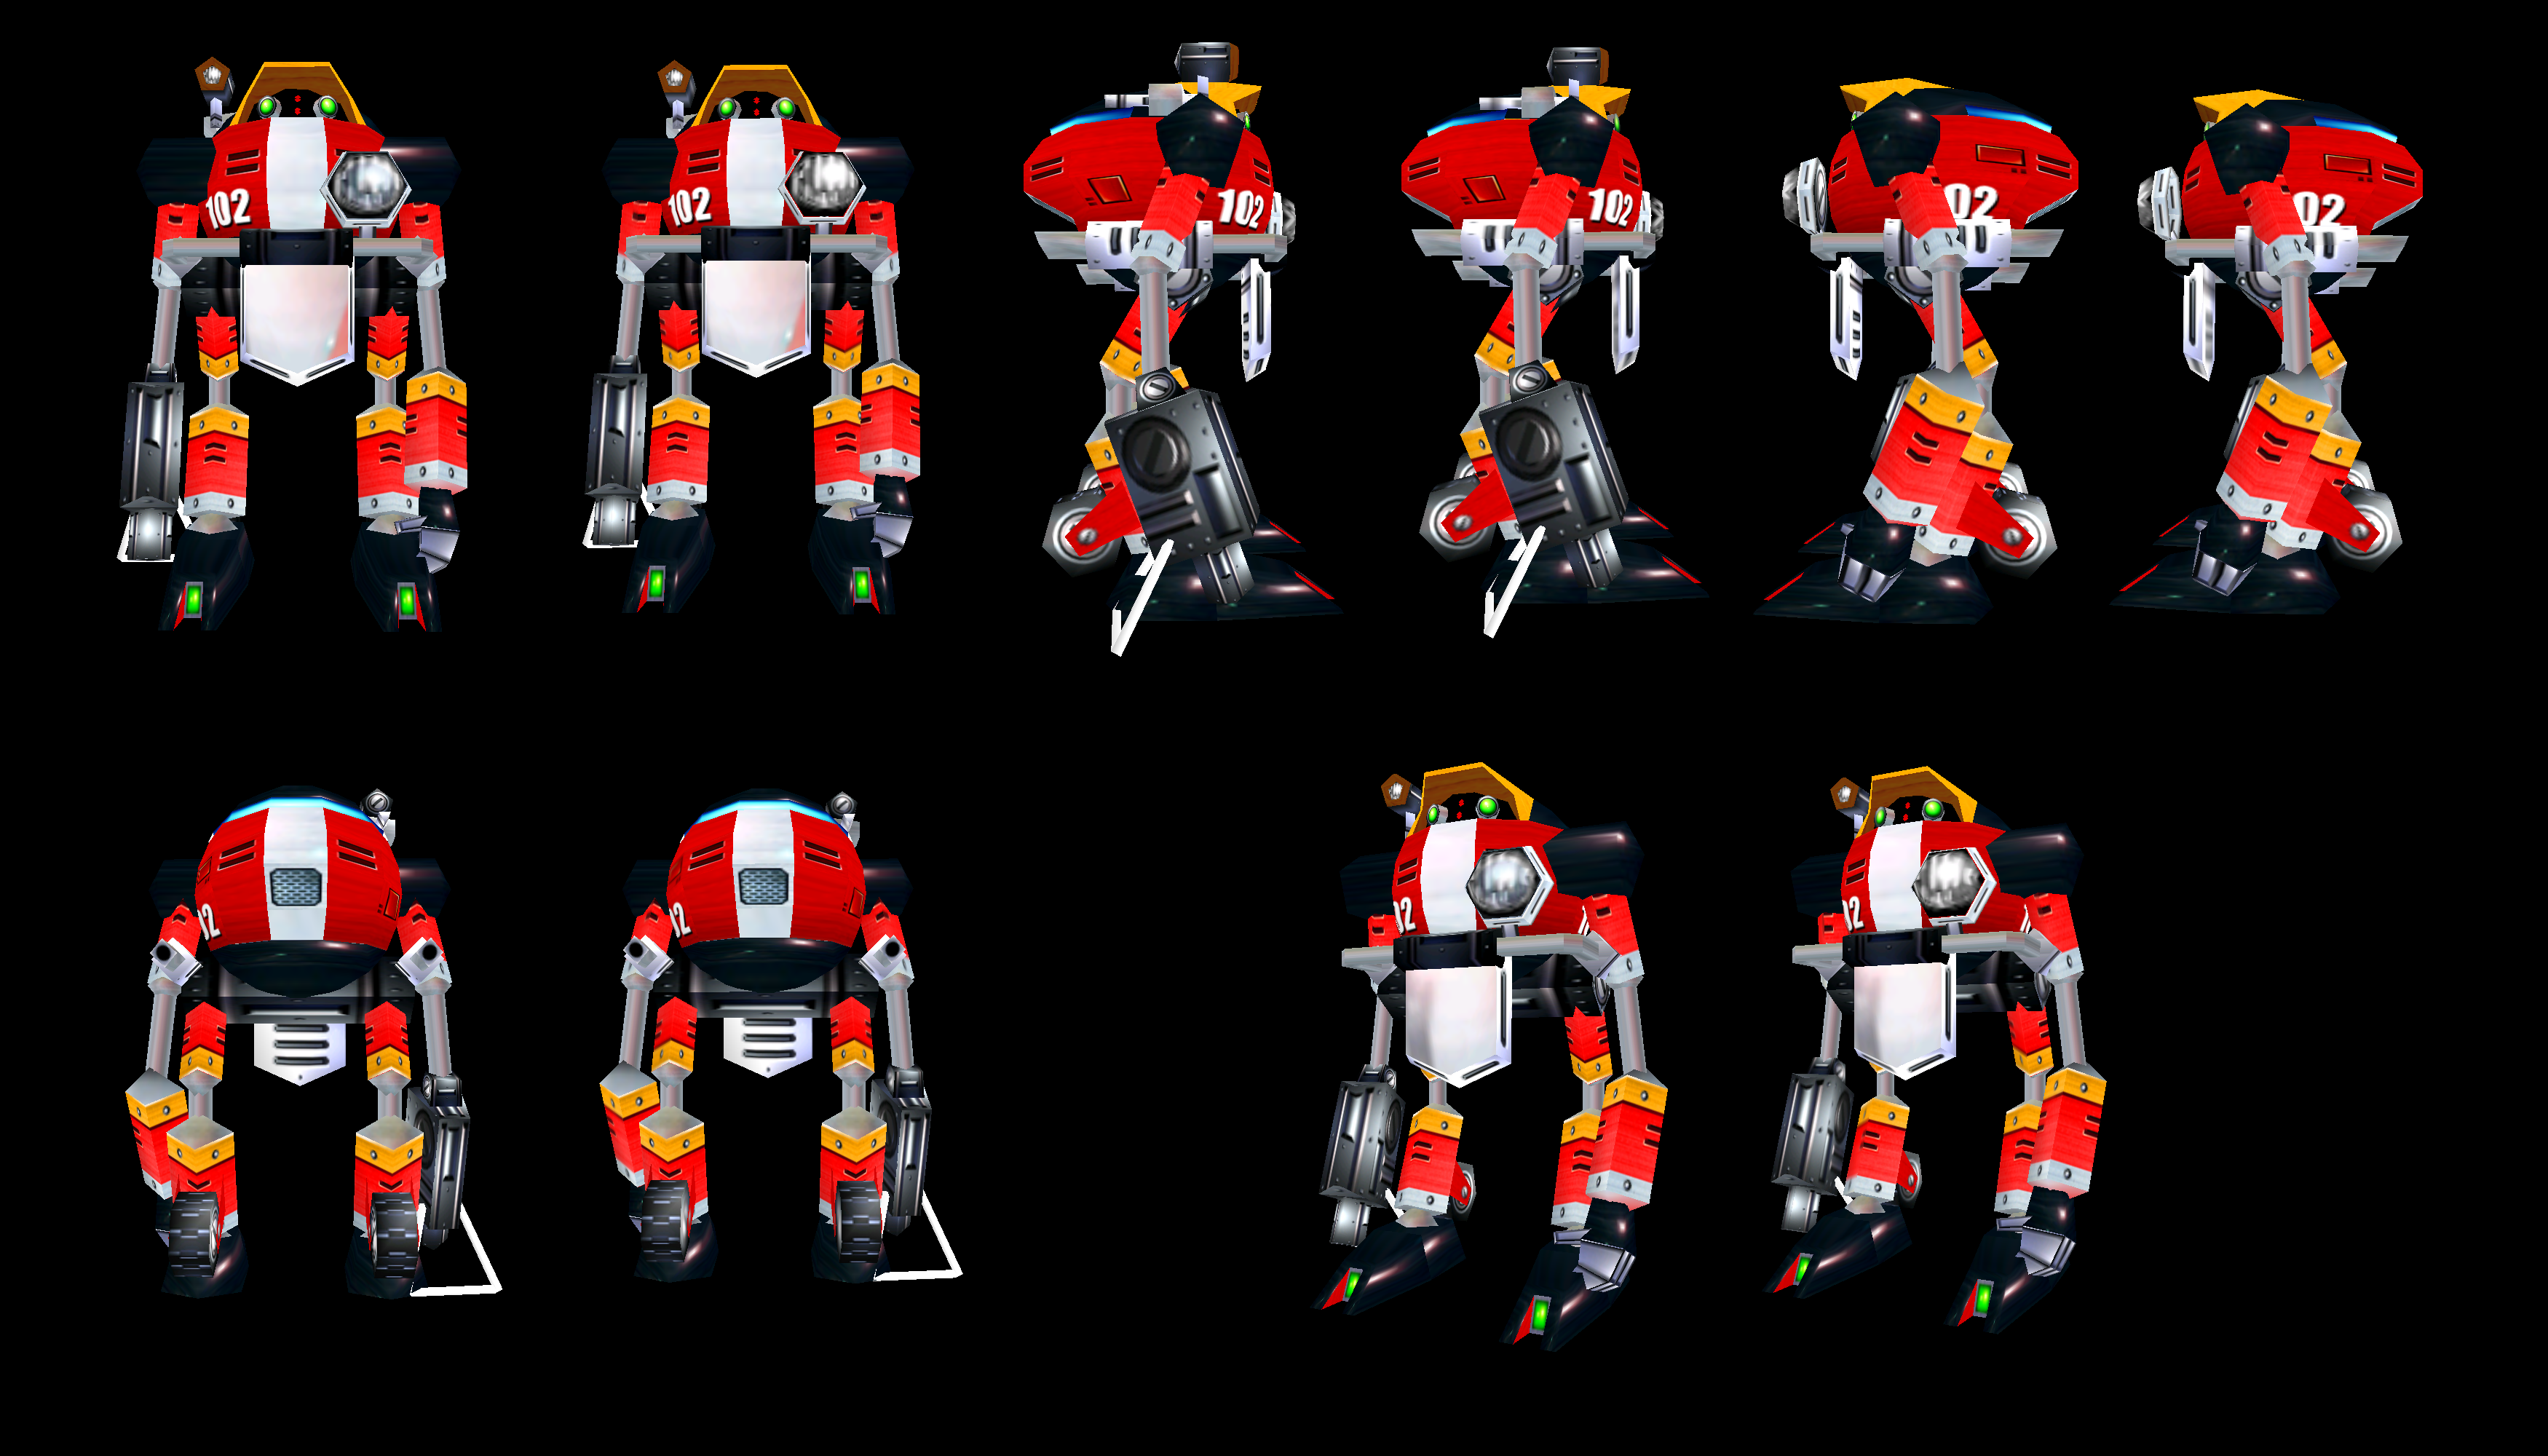
E-102 Gamma
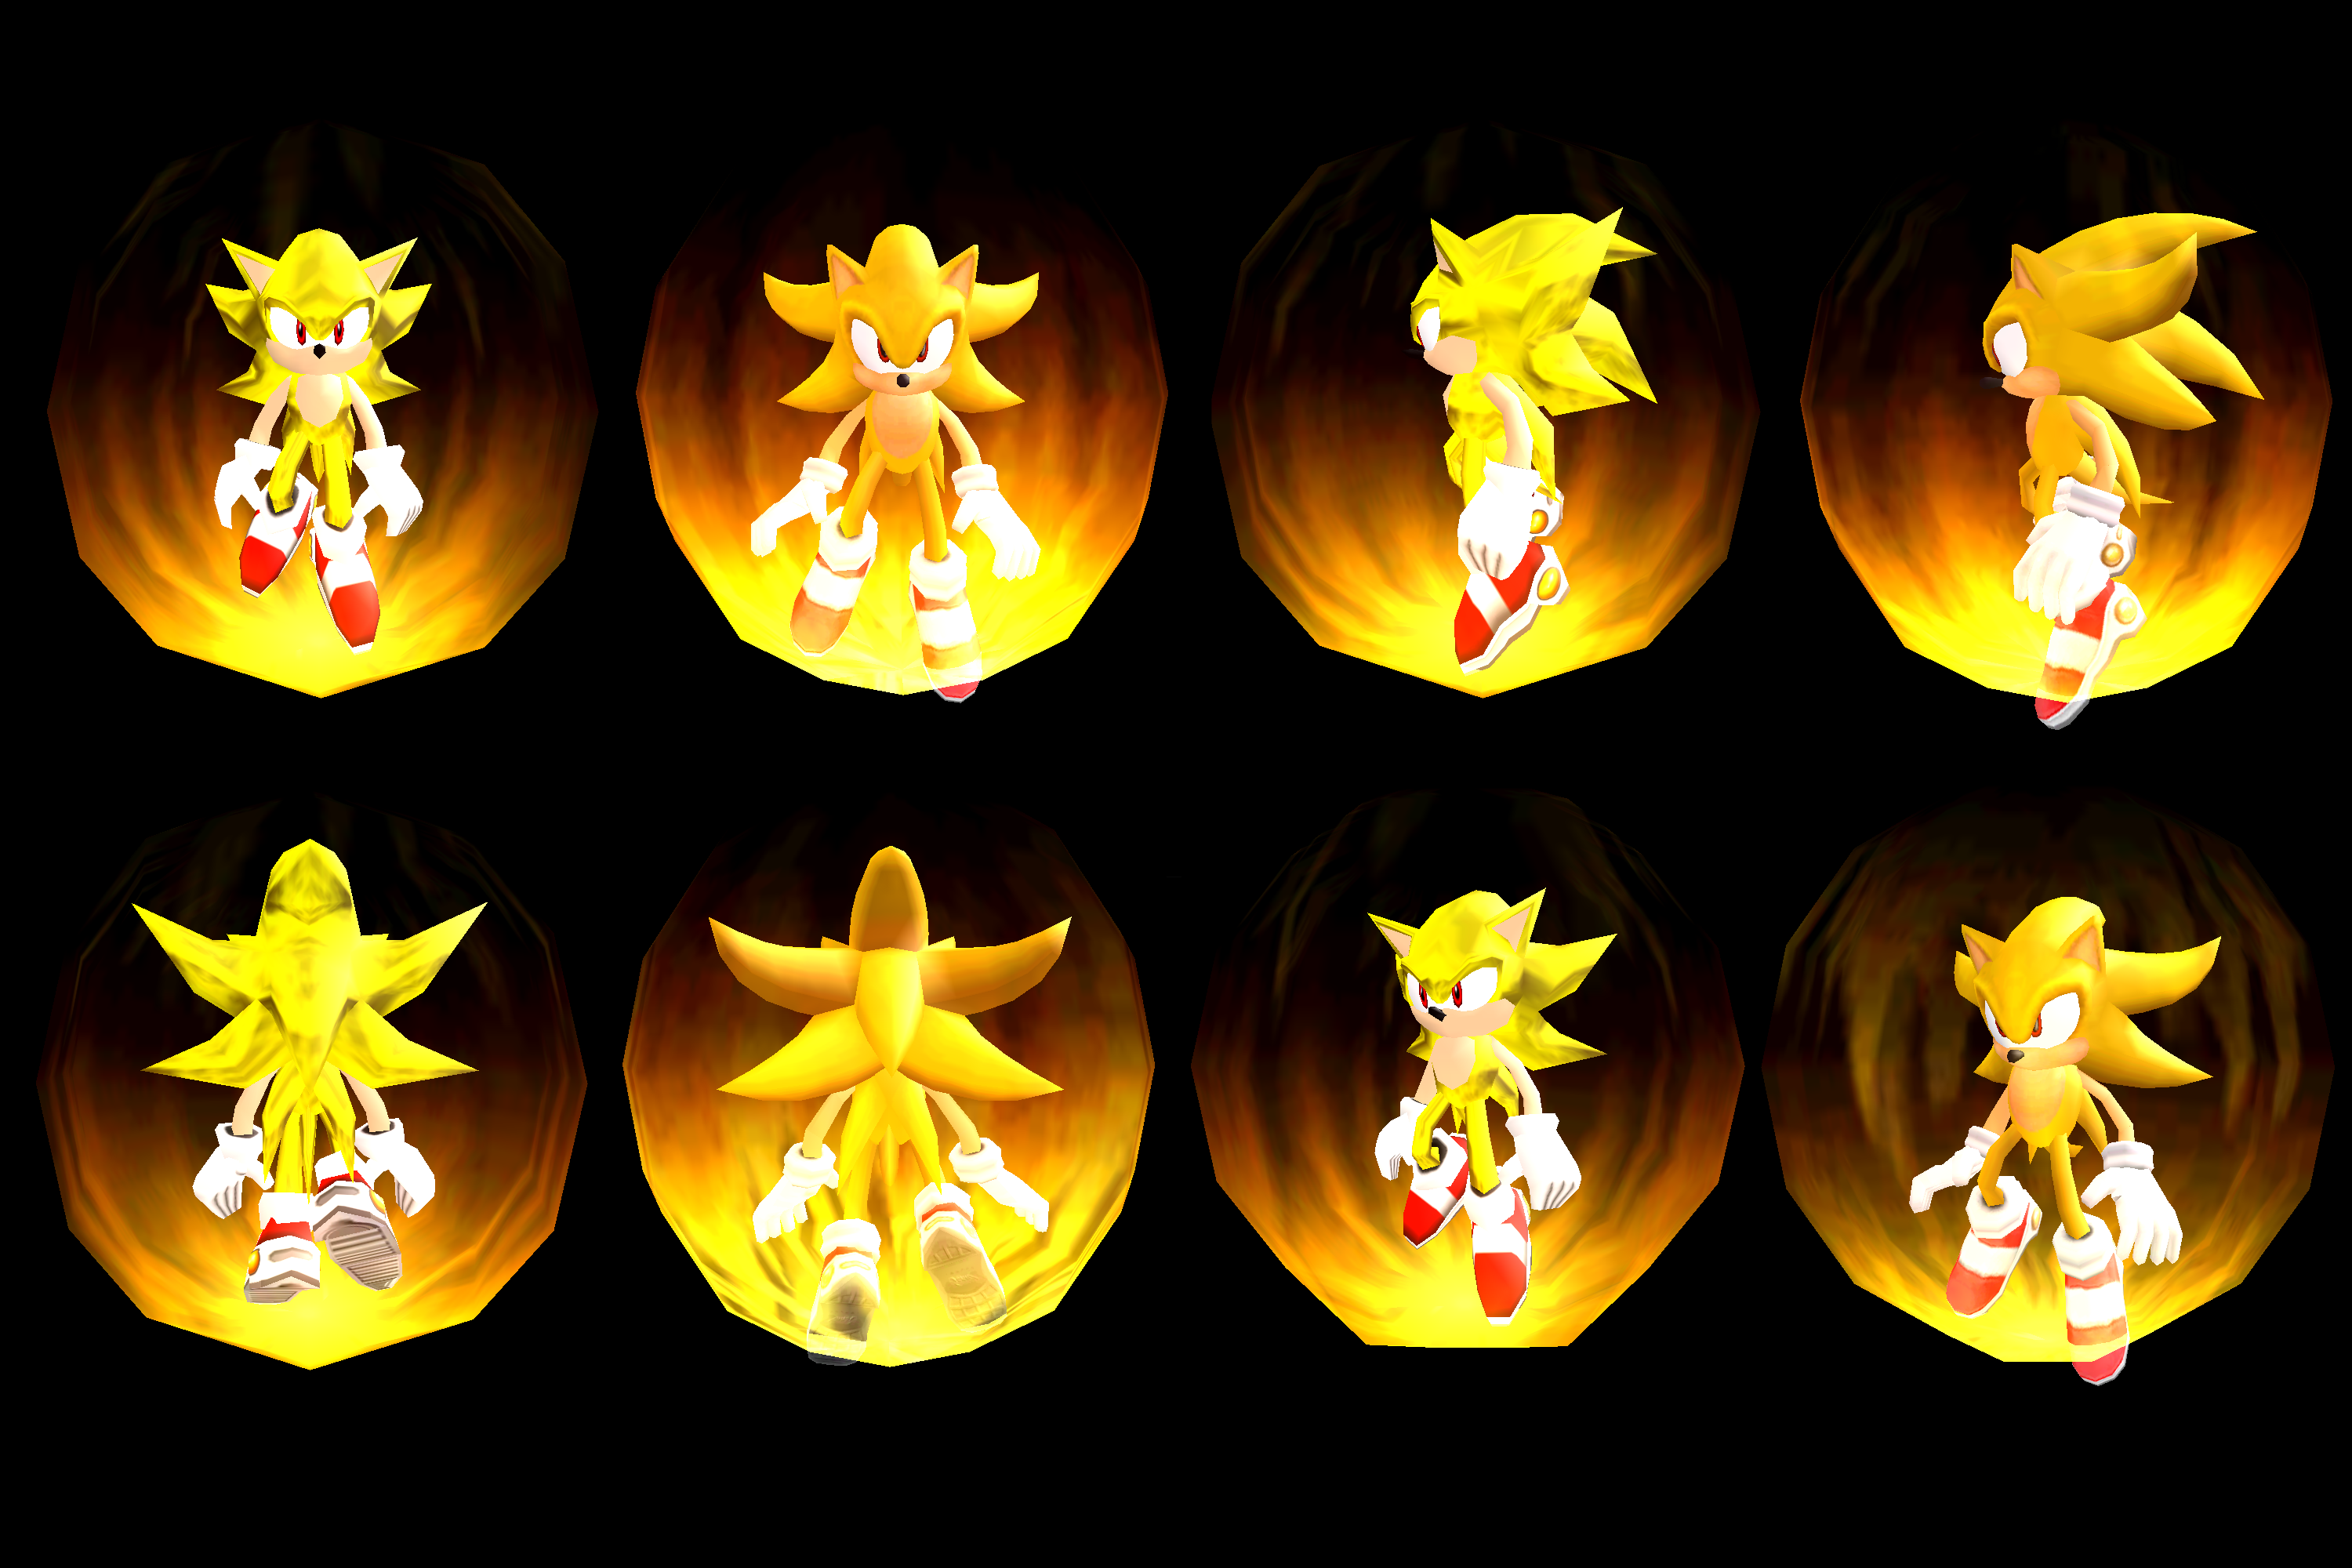
Super Sonic
Apart from some material flags, E-102 Gamma’s model is identical to its Dreamcast counterpart, but there’s a transparency issue with his chest, which will be discussed separately.
Some people prefer the higher poly SADX models, while others say they prefer the original models aesthetically. Some people argue that the SA1 models for Sonic, Tails and Knuckles have proportions resembling those characters in the classic Sonic games, while the SADX models look closer to more recent Sonic games, especially Sonic Adventure 2. This makes sense because SADX came out on the Gamecube after SA2B, and perhaps this prompted the developers to redesign the models so that the newer release wouldn’t look so different from the sequel that came out first on the Gamecube.
Higher polygon counts and separate fingers are objective improvements, and the rest is a matter of personal preference. However, in many aspects the updated character models are poorly implemented in SADX. Here’s a list of problems with the SADX models that didn’t exist or were less noticeable with the Dreamcast models:
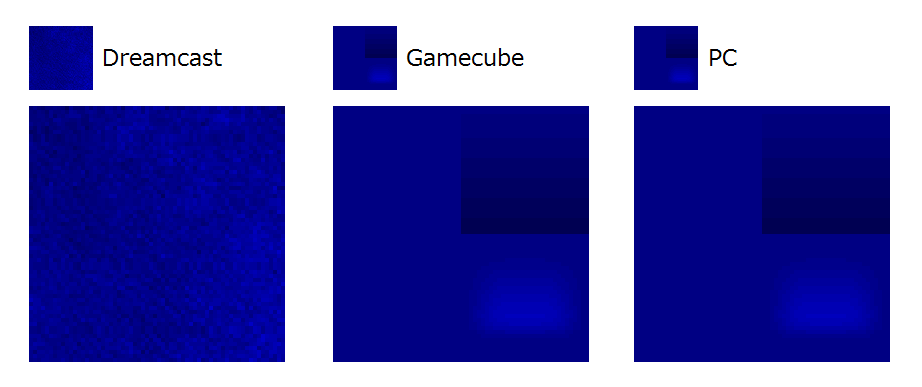
1. The “fur” textures for all characters were replaced with simple colors or gradients. Some people may not like the “grainy” textures on the Dreamcast models, but replacing the “grain” with a solid color seems like loss of detail. It would’ve probably looked better if the original texture was remade in higher resolution. Here’s a comparison of the “grain” texture between versions:
2. The updates are inconsistent as only the main characters were updated.
Tikal and Eggman only received the higher-poly hands, and not all their models were updated – e.g. Eggman’s low-poly models in Egg Hornet and Egg Viper were not updated at all.
The jumping/rolling models for characters were not updated. They use the SA1 hand models with SADX hand textures, which doesn’t look too great together with broken vertex welding and lower quality textures. To be fair, vertex welding is broken on the Dreamcast too, but at least it has the correct textures.
3. The screenshots seen in the endgame credits were updated to feature new models and environments, but character tutorials and final credit screens still feature the old levels and old models with mitten hands.
4. The updated models are inconsistent with other models in the game. The higher-poly models of Sonic and other characters stick out when they are standing next to NPCs because the NPCs use much more basic models. This was already noticeable in the Dreamcast version, but SADX made the contrast even more jarring. The best example of this inconsistency is Knuckles standing next to an NPC in the Echidna City. His original model looks a lot more consistent with the echidnas than his SA2-inspired model used in the ports.
5. The updated models don’t follow the design guidelines from the Sonic Adventure Stylebook. They use wrong shapes and proportions, whereas the original models follow them more faithfully. Considering that SADX is supposed to be a better version of Sonic Adventure, the updated characters don’t represent the original game’s artistic vision.
6. The Dreamcast models had some gloss on them, but the SADX models have much more gloss, which makes them look like plastic. Many people find the excessive gloss unappealing, especially in the PC version, where you can install a NoGloss mod to fix it, or use the Lantern Engine mod to tone it down. The gloss difference is the side effect of the lighting system in SADX. Check out the section on character gloss in the Lighting page to find out more.
7. The new hands are good to have, but Amy has got monster hands with long fingers and it looks a bit freaky.
8. The updated Sonic model has an animation error causing Sonic’s eyes to disappear during his “hanging” animation.
9. The more rounded shoes are good, but the textures used on them were squeezed into one texture, and that texture isn’t very detailed. For example, Amy’s shoes look “dirty” because of the noise that comes from upscaling a low-resolution shoe texture.
10. There is a visible seam between the upper and lower halves of Big’s body in SADX. Big’s model in particular is a great illustration of how a higher poly count improves almost nothing. Did you know that the SADX model has a higher poly count for Big’s body? It’s hard to notice because it looks exactly the same.
11. Super Sonic has lost the reflection effect (environment mapping) on his body and is now using a simple yellow texture.
12. Super Sonic’s foot sticks out of his aura (lol).
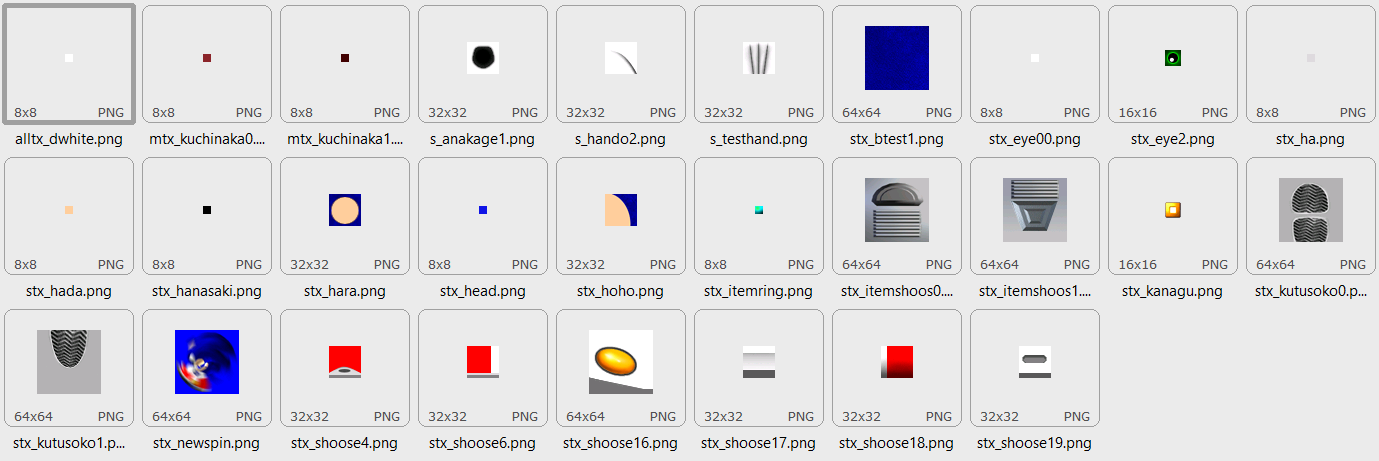
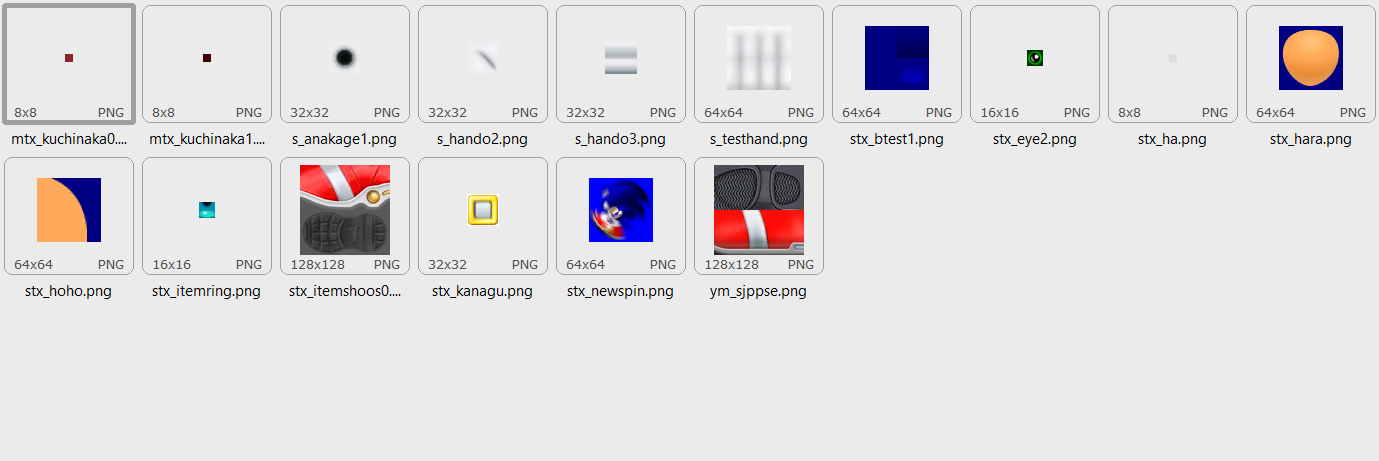
Some people say the SADX models have better textures. Other than the “grain” mentioned in point 1 above (which is still debatable), this isn’t entirely true. Here’s a comparison of SA1 textures with SADX textures for Sonic:
Dreamcast
Gamecube
You can see that the textures used for Sonic’s face and body (stx_hoho and stx_hara), Crystal Ring (stx_itemring) and the shoe buckle (stx_kanagu) are higher resolution in SADX*, but the textures for Sonic’s jump ball, eyes, nose, teeth etc. are the same resolution. You can also notice that the SADX model uses less textures. This is because most of the shoe textures have been squeezed into one. Normally this wouldn’t cause any issues, but in some cases the combined texture in SADX is less detailed than the individual textures used in the Dreamcast version (see the Amy’s shoe example above). *Interestingly the “Autodemo” prototype of the Dreamcast version has higher quality character textures that are mostly on par with SADX resolution wise.
Let’s go back to the “grain” issue again here. The texture in question is stx_btest1, which looks like this:
As you can see, the SADX texture is split into four pieces, which are applied to different parts of Sonic’s body. If we color code the parts, it looks like this. This is obviously an improvement over just one texture in the Dreamcast version, but it also means the resulting texture that gets applied to Sonic’s body is half the resolution of the Dreamcast texture in addition to the loss of “grain” discussed earlier.
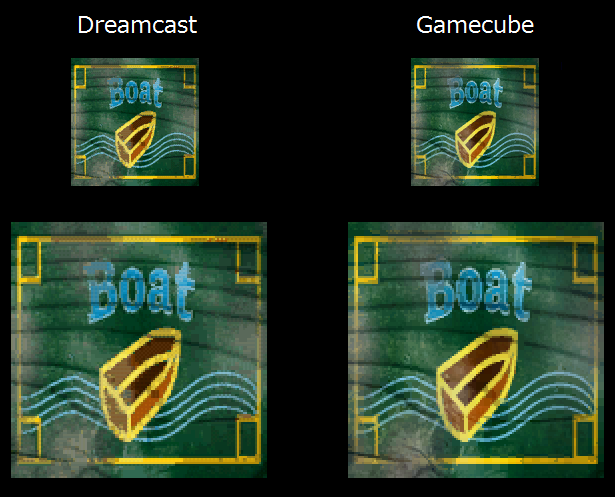
The textures that weren’t redesigned in SADX suffer from quality degradation. A common misconception is that the texture quality downgrade happened only in the PC version, but the Gamecube version’s loss of texture quality is also quite significant. For example, look at what happened to the texture you see on Sonic’s jumpball:
Note that almost all textures in the game have suffered from quality reduction, not just the character textures. More on that in the Textures section.
Even Gamma’s model, which wasn’t redesigned, is suffering from some problems in SADX. There’s a part of his body that looks like this:
This is what it looks like in different versions of the game:
Dreamcast
Gamecube
PC
As you can see, the only version of the game where it renders correctly is the Dreamcast version. The front shield texture is supposed to be semi-transparent so that you can see the light behind it. The texture is still transparent on the Gamecube, but the light part is invisible and you see other parts of Gamma’s body through it. In the PC version the front texture is simply opaque. The same problem affects other robot characters, which also have body parts like that.
Some time ago we found out what was causing this. Gamma’s chest uses a mesh type that is not supported in SADX. However, that mesh is set up exactly the same as another mesh type (trimesh), which is supported in SADX, so making it work would’ve been extremely trivial, and even if they didn’t want to support it they could just change a few bytes in Gamma’s model to make his chest use the trimesh type. In the PC version and later ports transparency for characters is disabled entirely by using a constant material with no transparency on the whole model. This also would’ve been trivial to fix, although it may have been intentional.
Also Gamma’s eyes, parts of his feet and head base are supposed to be lit up at all times. The “ignore lighting” material flags for those body parts were removed in SADX for some reason, so Gamma’s eyes are no longer lit up. Same with Big’s eyes that no longer glow in the dark.
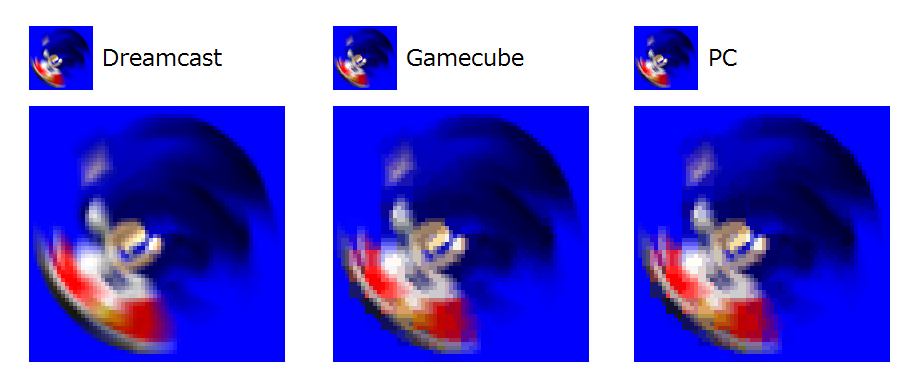
Now let’s talk about missing effects. When Sonic rolls around, the blue trail he leaves behind has an interesting “rainbow” effect in the Dreamcast version. The trail is always purple in SADX, and the “rainbow” effect is missing:
Dreamcast
Gamecube
PC
This happens because SADX never sets the correct texture for the effect. It’s supposed to cycle between the first and second texture in SON_EFF.PVM, but SADX sets one of the textures meant for the longer dash trail, which is always purple.
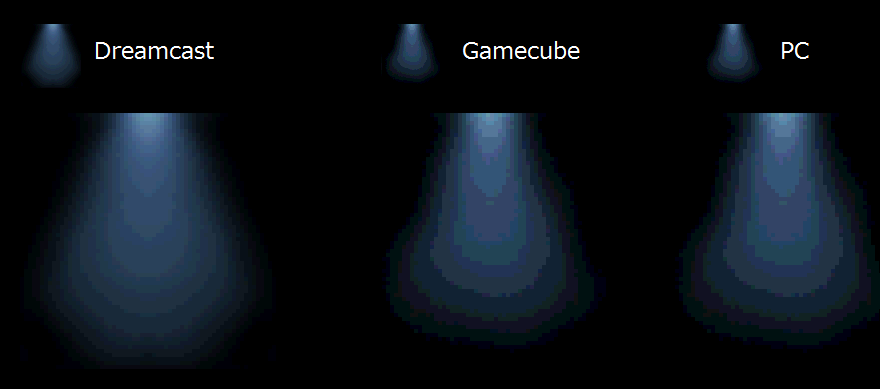
Sonic’s Light Speed Dash aura is also different. It looks more jagged in SADX and its glow is a lot brighter. It’s possible that additive blending didn’t work properly with the glow model (which uses many transparent layers), so transparency was reduced to make the problem less noticeable. However, that resulted in more “jagginess” and a worse look of the aura overall:
Dreamcast
Gamecube
PC
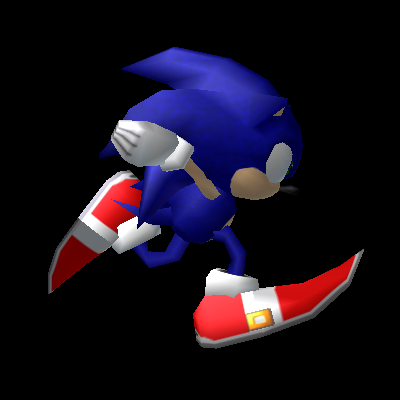
The original Japanese release of Sonic Adventure had an interesting “motion blur” effect when Sonic was running at high speed. It involved real-time replacement of Sonic’s shoes with stretched models to produce an effect akin to what you see in classic Sonic games. In addition to the stretchy feet, the game rendered Sonic’s model multiple times with various levels of transparency to imitate motion blur. In later releases on the Dreamcast the effect was toned down – the transparency was removed, but you could still see the stretchy feet sometimes. In SADX the effect was removed entirely:
Dreamcast JP
Dreamcast US
Gamecube/PC
Sonic’s model looks glitchy in the SADX screenshot – the shoe buckle is missing and the bottom of the shoes use a strange looking yellow texture. Those are the leftovers of the stretchy shoe effect. In SADX, the code for the stretchy shoes is still active, and when Sonic is running fast the shoes switch to an old model that wasn’t updated to use the final SADX textures. This is why the bottom of the shoes is using the buckle texture, and the buckle itself is missing. This bug has always been visible in official promotional materials, such as the Steam page.
A somewhat similar effect was removed on Tails’ tails. If you go back to the model comparisons near the top of this page, you can see that Tails had more than two tails in the Dreamcast version. Those semi-transparent tails showed up when he was running or flying, creating another variation of the “motion blur” effect. He still retains those extra tails in SADX, but the transparency on them is deactivated, which looks a bit strange:
Dreamcast
Gamecube
PC
Knuckles has also had several effect downgrades. The Shovel Claw has lost the environment mapping effect that gave it a shiny metallic surface:
Dreamcast
Gamecube
PC
Knuckles’ Maximum Heat attack aura is also different in SADX. It looks noticeably worse in the PC version, although the Gamecube version also looks somewhat broken:
Dreamcast
Gamecube
PC
Even with all the problems mentioned above, there’s a lot of subjectivity when it comes to saying which models are better. However, in a supposedly enhanced port we shouldn’t have to choose between higher polygon counts for some character models on one side and worse texture quality, removed effects and broken character lighting on the other side. Most of the downgrades discussed here have been fixed in the Dreamcast Conversion mod, which restored or recreated missing character effects. SonicFreak94‘s Lantern Engine mod takes care of level and character lighting, and ItsEasyActually‘s Dreamcast Characters mod is for those who prefer the original Dreamcast models in the PC version. There’s also SoloSlacker‘s DX Characters Refined mod that fixes several problems with updated models mentioned on this page. Learn more about the mods here!